
Data recovery is a complex process, often fraught with challenges. Once data is accidentally deleted or a hard drive fails, it can feel like there's no return. Unfortunately, there's no absolute assurance that files can be recovered, as their state may vary based on several factors, including how the deletion occurred and what actions were taken afterward.
Fortunately, a variety of free tools can enhance your chances of recovering valuable documents, cherished photos, and other irreplaceable files. Whether dealing with a simple accidental deletion or a more significant data loss, the right approach can often help you recover what you've lost.
In this guide, we'll explain how to reclaim deleted files using Windows' built-in recovery tools and free third-party applications. We won't stop there; we'll also delve into methods for recovering deleted files on Linux and macOS, ensuring that no matter what operating system you're using, you'll have a path to restore your accidentally deleted files.
How to recover deleted files using Windows' built-in tools
Accidentally deleting a particularly important file is a frustrating experience that most of us can relate to. It's a sinking feeling when we realize that vital data is suddenly gone. However, deleting a file isn't the only mishap that can occur with documents; it's just as easy to make unintended changes to a file, save those edits, and later regret the alterations we've made. Whether it's an important report, cherished photos, or crucial project details, the loss or alteration of a document can lead to significant stress and complications.
The good news is that the Previous Versions feature in Windows offers an effective safety net against these common issues. By automatically creating snapshots of your files and system at various points in time, this feature allows you to restore individual files to an earlier state if necessary. This means that if you've accidentally deleted a file or saved an unwanted revision, you can quickly and easily recover the version you need without a lengthy recovery process or sophisticated software.
Setting up the Previous Versions feature is surprisingly straightforward. To activate it, simply access the System Properties through your Control Panel, navigate to the System Protection tab, and enable it for your desired drives. This proactive step ensures that your system regularly backs up essential data and gives you peace of mind knowing you're protected against data loss.
You never know when this feature might come in handy, so it's wise to activate it as soon as possible. By doing so, you empower yourself with the ability to easily navigate the accidental missteps we all face in the digital world, preserving your important work and memories with minimal hassle.
1. The Recycling Bin
The Windows Recycle Bin is the first place to check when you accidentally delete a file. When you delete a file, it's usually moved to the Recycle Bin rather than being permanently erased. This feature allows you to recover files easily without the need for specialized recovery software.
To recover a file from the Recycle Bin, follow these steps:
1. Open the Recycle Bin: You can find the Recycle Bin icon on your desktop. Double-click on it to open.
2. Locate the File: Once the Recycle Bin is open, scroll through the list of deleted files or use the search bar at the top right to find the specific file you need to recover.
3. Right-Click on the File: After locating the file, right-click on its icon. This action will bring up a context menu.
4. Select Restore: Click on the “Restore” option in the context menu. The file will then be restored to its original location prior to deletion.
Additionally, if you accidentally emptied the Recycle Bin or if the file was too large to be moved there (files over a certain size limit may bypass the Recycle Bin), you may need to use third-party file recovery software or check for backups if available. It's also a good practice to regularly back up important files to prevent data loss.
2. File history
If you had File History enabled prior to the deletion of your files, you can take advantage of this feature to restore previous versions of files or entire folders. Here’s a step-by-step guide on how to do this:
1. Open Settings: Click on the Start menu (the Windows icon) in the bottom-left corner of your screen, and select **Settings** (the gear icon).
2. Navigate to Backup: In the Settings window, click on Update & Security. Then, from the left-hand menu, select Backup. This will take you to the backup settings where File History is managed.
3. Access More Options: Look for the **More options** link under the "Back up using File History" section. Click on it to expand more backup-related features.
4. Restore Files from Backup: Scroll down until you find the **Restore files from a current backup** option. Click on this to open the File History interface.
5. Browse Your Backups: A window will appear showing your backup history. You can navigate through different backups visually by using the arrows to go back in time. Each backup will show the files and folders that were saved during that specific time.
6. Select and Restore Files: Find the files or folders you wish to recover. Once you locate them, click on the desired files to select them. You should see an option to Restore at the bottom of the window. By clicking this button, the selected files will be restored to their original locations. If you prefer to restore them to a different location, you can hold down the Shift key while clicking the Restore button, allowing you to choose a new destination.
7. Confirmation: After restoring, you may want to confirm that the files are back in your desired location. Check the original folder or the new location where you restored them.
By following these steps, you can successfully recover your deleted files as long as File History was active. Always consider regularly checking and updating your backup settings to ensure your important files are safeguarded.
3. Windows File Recovery
Windows File Recovery is a command-line tool designed for advanced users. It can recover files from various storage devices, including internal drives, external drives, and USB drives.
To use Windows File Recovery, you first need to download it from the Microsoft Store. After installation, open the Command Prompt and type `winfr` to view the available commands and options.
4 Previous version
The Previous Versions feature in Windows is a useful tool that allows users to recover files or folders from earlier points in time, provided that System Restore is enabled on their system. This feature is particularly beneficial in cases where files have been accidentally deleted or modified.
To utilize Previous Versions, follow these steps:
1. Navigate to the Folder: Open File Explorer and locate the folder that originally contained the deleted or modified files.
2. Right-Click: Once you’ve found the folder, right-click on it to open a context menu.
3. Select Restore Previous Versions: From the menu, choose the option labeled "Restore previous versions." This will open a dialog box listing the available previous versions of the folder, along with the dates and times they were saved.
4. Browse Versions: Review the list of previous versions. Each entry may represent a different point in time when the folder was backed up.
5. Choose a Version: Click on a version from the list to highlight it. You can also use the “Open” option to view the contents of that version before restoring, ensuring that it contains the files you need.
6. Restore the Files: After selecting the desired version, click the “Restore” button. This will revert the folder back to that specific point in time, restoring any deleted files and reverting any changes that were made. Alternatively, you can click “Copy” if you want to save the previous version to a different location rather than overwrite the current version.
Using this feature can save a lot of time and hassle when dealing with file recovery, making it an essential aspect of file management in Windows.
The success of file recovery is influenced by several factors, such as how the files were deleted, the amount of time that has passed since their deletion, and whether the storage space has been overwritten with new data.
If you're unable to recover files using the built-in tools, you may need to explore third-party data recovery software, some which are free. Keep in mind that these tools may not always guarantee success and can sometimes be expensive.
While the built-in tools found in Windows can do a good job of helping you recover lost or deleted files, as we mentioned earlier, there are also a range of great third party tools that can go even further in retrieving accidentally deleted files.
One of the best is DMDE – Free Edition. This is a powerful tool that does more than simply recover deleted files – it can also enable you to access hard drives that are still physically working but are no longer visible to Windows.
If DMDE can see the drive, it enables you to copy your files and folders from it, often without losing any data at all. In this tutorial I'll show you how to use the program to access your drive, find lost files and – hopefully – recover working copies of them.
1. Download and extract
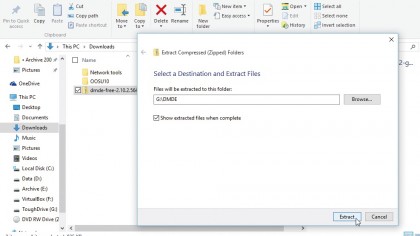
DMDE is a portable tool, which means you can run it from any drive. Open your browser and navigate to the download page and click the 'Download DMDE for Windows' link.
Save the zip file to any drive other than the one you're trying to recover data from. Right-click the downloaded zip file and choose 'Extract All' to extract its contents.
2. Launch DMDE
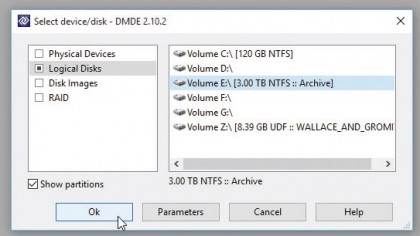
Open the extracted folder and double-click dmde.exe to launch the program, clicking 'Yes' when prompted. Leave 'English' selected and click 'OK'.
Accept the license agreement and you'll be asked to select the drive you wish to recover data from. If the drive is visible in Windows, select 'Logical Disks' followed by the drive letter and click 'OK'.
3. Select physical drive
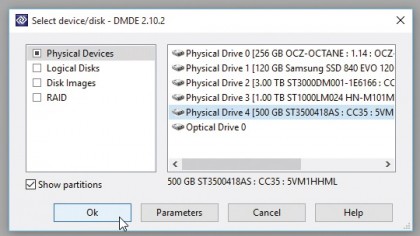
If the drive appears in Device Manager, but doesn't show up in Windows and can't be assigned a drive letter using Disk Management, then leave 'Physical Disks' selected.
Click each Physical Drive entry in turn and DMDE will display information about its type and size, helping you identify the missing drive. Select it and click 'OK'.
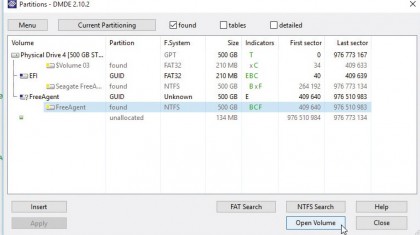
4. Select partition
DMDE will scan the drive for partitions. Don't be surprised if errors appear (click 'OK' to clear them) and then a number of possible matches – some similar or seemingly identical – should appear.
Select the partition you're looking for using the volume name (and drive letter if applicable), partition status, f.system and size to identify it.
5. Construct virtual file system
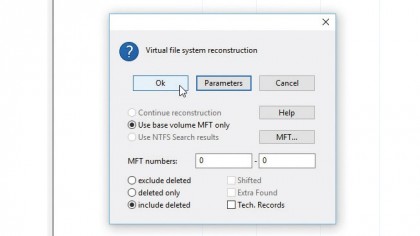
Click 'Open Volume'. After a second scan, a dual-paned window will open. On the left are three entries – to view all recoverable data from the drive (including deleted files), double-click All Found + Reconstruction.
In most cases clicking 'OK' at this point is sufficient, but advanced users can click 'Parameters' to tweak settings if necessary.
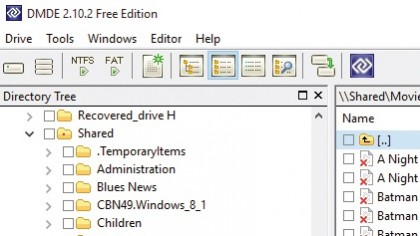
6. Browse for recoverable items
You can now explore your drive's contents via the expanded $Root directory. Click the arrow next to a folder to expand it, or double-click the folder to view its contents (including files) in the right-hand pane.
Look out for folders with red dots – these contain deleted files, so double-click to explore. Deleted files are clearly marked by a red 'x'.
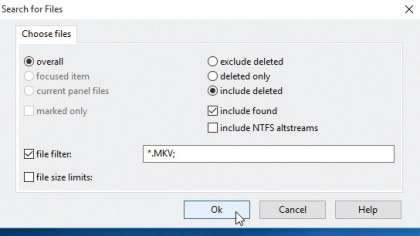
7. Search for specific items
Alternatively, click the 'Search Panel' button (with the magnifying glass) to open a Search window. Use the file filter to define your search – use wildcards if you're not sure about a file's exact name, or to search by file type (such as *.doc).
Use the annotation to help refine your search further, then click 'OK' to let DMDE scan for matches.
8. Select what to recover
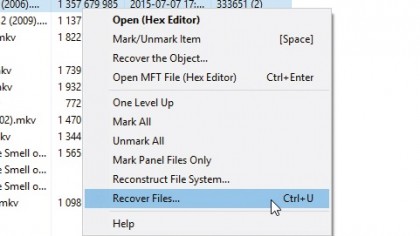
The Free Edition allows you to recover files one of two ways: you can select up to 4,000 files from a single folder by opening it in the right-hand pane, selecting the files you want to recover and choosing 'Tools > Recover'.
If recovering files from a search, you must recover each file individually by right-clicking it and choosing 'Recover the Object…'
9. Recover your data
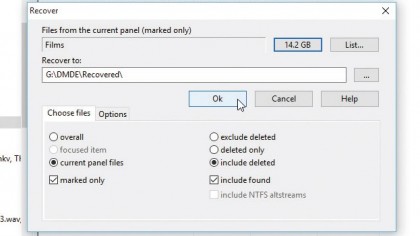
Click the 'Size' button to get an estimate of how much space your recovered items will require, then click '…' to select a different drive with enough space to recover them to (never recover files to the same drive).
Make sure 'include deleted' is selected if applicable and finally click 'OK' to attempt file recovery. Wait while the files are copied.
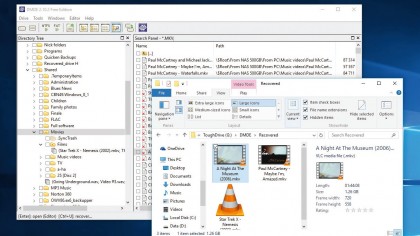
10. Your data, restored
Once complete, a dialogue box will display the results of your recovery. Browse to the folder where your recovered files are and see if you can open them – not all files can be recovered sadly, but if the file was only recently deleted then your chances of success are greater.
Return to DMDE to continue recovering other files and hopefully save the day!
DMDE isn't the only great app for helping you recover lost or deleted files. We've listed some of the best data recovery tools that you can use if you need to recover a deleted file.
All of these data recovery tools are feature-packed, will reliably recover your deleted files, and best of all, are completely free.
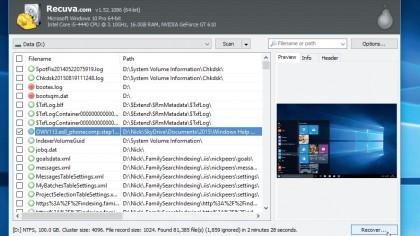
Recuva Free
Recuva Free is easy to use, and a wizard asks what type of files you're looking to recover and where to search, then scans your system at speed (FAT, exFAT and NTFS file systems are supported).
Any files found are listed (with previews for images), and you can restore anything you need in a couple of clicks. Advanced Mode provides more options, including a deep scan (which is slower, but recovers more files), the ability to locate files containing particular text, and an option to securely wipe files containing sensitive information so no one else can undelete them.
Recuva is an excellent recovery tool – effective and simple to use.

MiniTool Power Data Recovery
Standard undelete programs are perfect for recovering a few deleted files, but if you've lost an entire partition, try Power Data Recovery Free Edition.
The program includes fully functional free partition recovery tools, accessed via a wizard-based interface. Point it at the problem drive, specify the area to be searched, and it scans for the missing partition. A report tells you what it's found, and you can recover the partition in seconds. A bootable version for recovering system partitions costs $69.
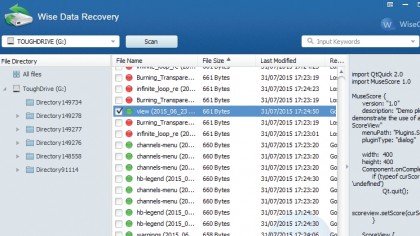
Wise Data Recovery
It's hard to imagine how any tool to recover deleted files could be simpler than Wise Data Recovery (download the portable version to run from a USB disk). There are no menus, complicated options or dialog boxes. All you do is choose a drive, click 'Scan' and wait while the program locates any deleted files.
Select what you need, click 'Recover' and that's just about it. It doesn't seem to work with FAT-based drives, though. It's also only free for personal use – but if you just need something quick and easy that will recover files from NTFS drives, it should be on your shortlist.
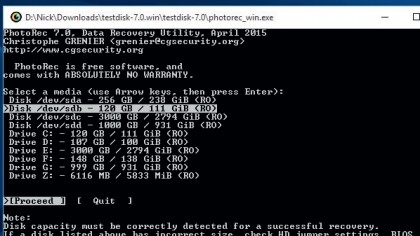
PhotoRec
PhotoRec is a very powerful data recovery tool with very few restrictions, and despite its name, it isn't limited to recovering deleted image files. It's free, runs almost everywhere (DOS, Windows, Linux, OS X and more), and works with most file systems and device types.
It uses in-depth knowledge of more than 200 file formats to help recover data, and TestDisk, bundled, can even recover deleted partitions. There is a complication, though: PhotoRec has a very basic DOS-like interface, which can be off-putting. It doesn't make it complicated, however, as it walks you through every step.
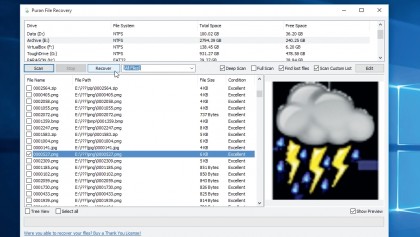
Puran File Recovery
This free data recovery tool has been heralded for finding and recovering deleted files missed by other programs, so it's well worth adding to your recovery toolkit. It supports both FAT and NTFS drives, boasts a user-friendly interface and offers three different scan levels, from a quick search to full-on surface-level scan.
Identifying files is helped by the listing of recovered file paths and you can preview files before attempting to recover them. A search box also helps you filter through the list of results too. Portable versions are available, allowing you to run the program directly from a USB flash drive.
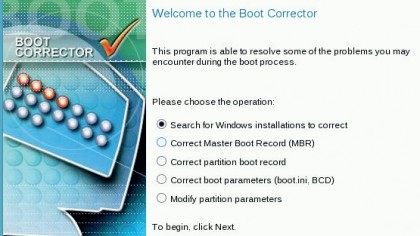
Paragon Rescue Kit
If your PC has been trashed so badly that it won't boot at all, any undelete tools you've installed will be useless. Paragon Rescue Kit Free is different. It comes on an image that you burn to CD, and if disaster strikes, you just boot from the disc and get to work.
For instance, the program can recover a lost or deleted partition. The Boot Corrector can fix common boot problems and may be able to get your PC working, but if not, Paragon's File Transfer Wizard helps transfer key files to another local drive, or burn them to disc.
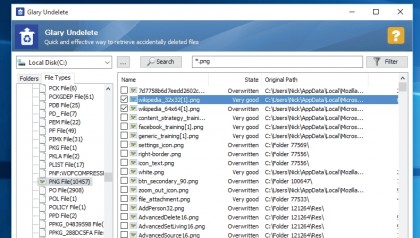
Glary Undelete
Another no-frills package, Glary Undelete takes a fairly basic approach to data recovery. There's nothing to do beyond choosing a drive to scan, clicking 'Search', and waiting for the program to finish (though that might take a while, as it's slower than most).
The program does do a good job of recovering data from both FAT and NTFS drives, and any files it finds are presented in both a single list and by folders. You can also filter them by file type or name, which makes it easy to find the ones you're looking for. There's not much in the way of extra features here, but Glary Undelete scores well on the fundamentals.
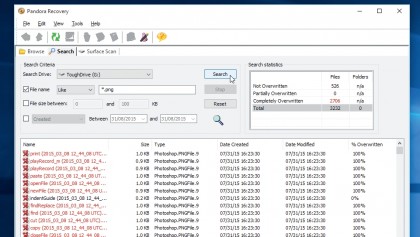
Pandora Recovery
Unlike some tools, Pandora Recovery doesn't just present the files it finds in a single list – you can also browse them in a Windows Explorer-like folder view, or use an excellent search tool to filter them by file name, size, date created or date modified.
Sadly, the software's file detection isn't always reliable, particularly on FAT drives, and the Quick Scan didn't recover anything for us. The more thorough Surface Scan mode retrieved everything, though, so on balance we'd say Pandora Recovery is still well worth a try.
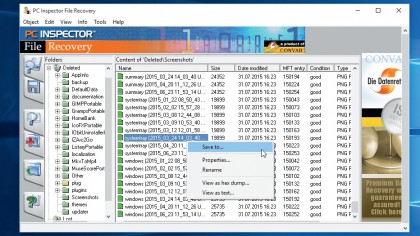
PC Inspector File Recovery
PC Inspector File Recovery did well in our tests, correctly locating the full set of missing files on FAT and NTFS drives. The files are clearly presented in a simple folder view, and there's a simple search dialog to help you locate files by name.
The program can then restore them to local or network drives. Getting to this point may take a while, though, because the interface is a confusing mass of tabs. We recommend you experiment on a USB key or other spare drive until you've figured out how to use it.
Have you lost an important document? Did your Mac crash while you have a document open? Don't worry: most software tools are able to recover documents automatically if this occurs.
If you've trashed a file and then realised you need it, you can recover it if you haven't emptied the Trash since you dragged the file there; just click the Trash icon in the Dock, and drag the file from the Trash folder to the Desktop.
If you've emptied the trash and are using Time Machine to make regular backups, open Time Machine, use the arrows at the bottom-right of the screen to 'go back' to a point when you know you had the file. Click on the file and hit Restore.
For other back-up software, refer to that app's manual to find out how to recover a file. Not running regular back-ups? Set up a regular schedule now. At least two: both on and off-site.
It's not time to panic yet. Trashed files aren't deleted from your disk, but their entry in the directory is removed and the space made available to be over-written. So as soon as you realise you need the trashed file, stop using your Mac for anything that's not necessary to recover the file.
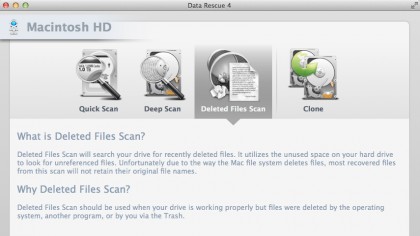
There are a number of software tools that can help recover deleted files on your Mac. ProSoft's Data Rescue is one; Clever Files' Disk Drill another. Both apps have free demo versions that allow you to scan a drive for deleted files. Start a scan; if it 'finds' your trashed file, you might be in luck. Depending on the size of the file and the tool you use, you might be able to use the demo version to recover the deleted file.
If not, you'll have to pay for the full version. If neither tool can find your file, the next step is to take your Mac to a specialist data recovery firm. (This is expensive.) If the document hasn't been trashed but has been changed and you need an earlier version, OS X's versioning may be able to help.
The app you use to work on the document must support it, though. With the current version open, click on the File menu, then go to 'Revert to' and select 'Browse all versions'. Use the checkmarks on the right to navigate to the version you want, and click Restore. Or, hold down Option and hit 'Restore a Copy' to open the old version in a new document.
If you use Linux and you need to recover a deleted file, then your best bet is with a Linux live CD, such as Rescatux.
Linux live CDs are a wonderful invention, they let you try new distros, show Linux off to your unenlightened friends, and fix broken systems. There are live distros aimed specifically at repairing damaged systems, but they have a common drawback. They all require a certain amount of expertise and most of us don't break our systems often enough to gain that sort of experience.
You accidently delete an important file your main priority is fixing it as quickly as possible, not spending time using a search engine from a live CD to try and find the correct solution to your problem.
Rescatux boots like a typical live CD to a lightweight LXDE desktop, but the window that opens on startup is the key difference. Called Rescapp, this is a one-stop centre for fixing various problems. Rather Many system recovery operations require you to be booted from a live CD, either because normal booting is broken or because you need your root filesystem to be unmounted.

You normally also need to use command line tools, and Rescatux provides all of this, but the Rescapp makes life much easier for many tasks.
When you press any of the operation buttons in Rescapp, it does not directly perform the operation. It displays a documentation page explaining how to use the option and, considering the low-level aspect of many of the operations, it's a good idea to read this. Then press the Run! button at the top right to perform the operation.
Recovering deleted files in Linux
It is both amazing and terrifying how a simple typing mistake can cause so much damage. There is the odd filesystem-specific tool for recovering deleted files, such as extundelete – but a really determined typo can easily beat that, and it can't help if your partitions are gone.
The first thing to do in such a situation is to stop writing to the disk – if the damage is on the partition containing your root filesystem you should shut down the computer with
sudo shutdown -n
This kills processes without using the usual init system, which reduces the number of disk writes. Now you can boot Rescatux. If you partitioned a drive, you can use testdisk to search for the old partition boundaries and restore them.
Repartitioning a drive only writes to the partition table, the actual data on the rest of the disk isn't touched until you format the new partitions. So if you can find the old partition boundaries and write them back into the partition table, everything should be back as it was.
This is what testdisk does. After accepting the option to create a log file, that may be useful later, pick the disk to scan. The partition type should be Intel for the old-style MBR partition tables or EFI GPT for the newer GPT variant, the other choices are rather specialist.
Removable drives occasionally use the None option, but usually have a single partition with an MBR partition table. Select Analyse to scan the disk's partition table and then Deeper Scan to search for lost partitions. If you find what you are looking for, Write will hopefully restore your lost settings.
Although it is not mentioned in all the menus, pressing Q usually takes you back to the previous menu. Testdisk is a very low-level tool, and its effects may not be reversible, where possible use dd to make a backup of your disk before proceeding.
If you deleted files rather than partitions, the tool you want is PhotoRec. PhotoRec scans the disk for evidence of files and then attempts to reconstruct them – you will need another disk attached for saving these files to. PhotoRec can only find the contents of files, metadata such as ownerships, permissions and even the file name is not available to it.
So you end up with a lot of files with numeric names, although PhotoRec does give them a suitable extension based on the contents of the file. If the files are digital camera photos (PhotoRec was originally written to recover files from an erased memory card) or music files, you should find that any EXIF or ID3 tagging is preserved, making identification of the files relatively simple.
Otherwise, you may have to spend some time trawling through the files to identify them, but that is better than losing your data altogether.