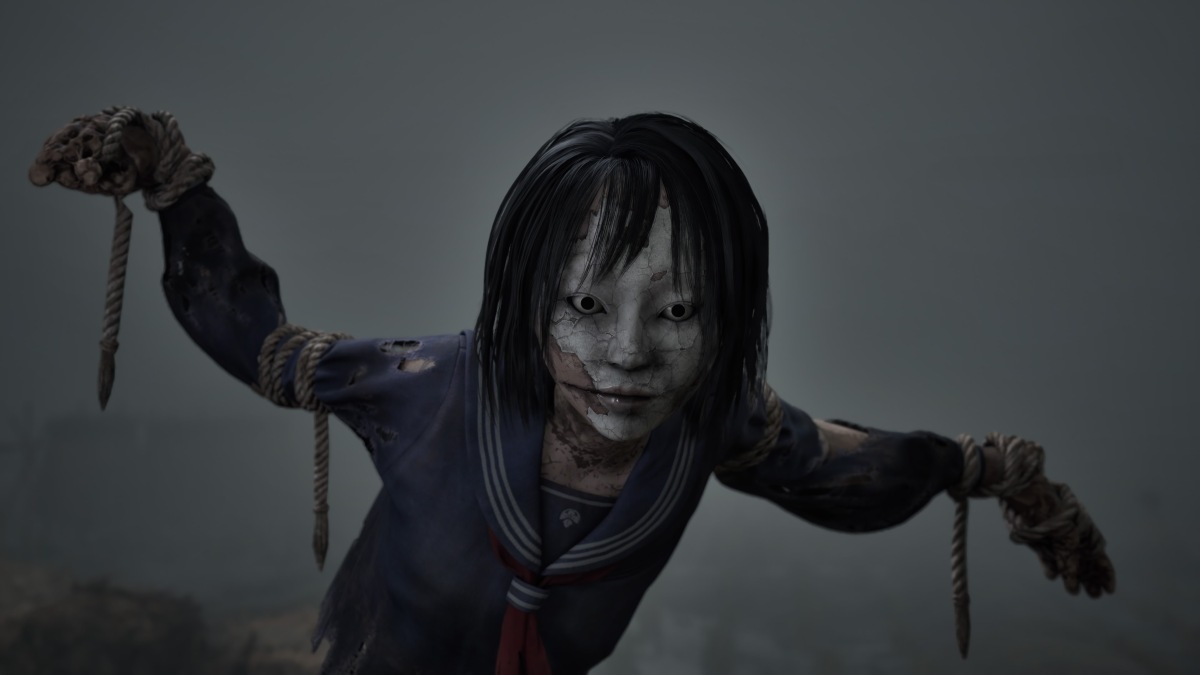
The appropriately named puzzle difficulties in Silent Hill f could leave you roaming aimlessly in the dense fog for good. Some puzzles may make you sigh, cry, and want to die, but solving them never felt so good.
Here are all story puzzle solutions for Hard and Lost in the Fog difficulties to help you reach Silent Hill f's conclusion. This guide doesn't include any ending criteria puzzles (Crimson Water and Sacred Sword).
WARNING: The late-game puzzles change depending on which ending route you're on. For example, you will see a different Scale, My Room, and Mural puzzle if you reload a manual save after beating the game with the unpurified Sacred Sword to then purify it with Agura no Hotei-sama. We are actively working on getting those ending puzzles up for you as fast as possible.
Table of contents
All Silent Hill f Hard puzzles
Altar
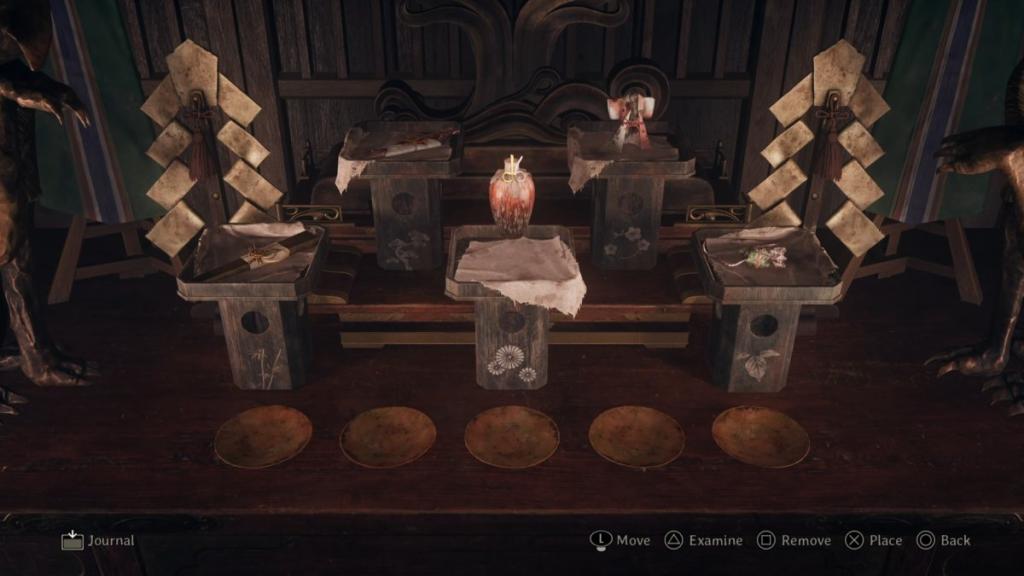
Place the following items in this order:
- Bamboo fan on low left.
- Bloody jar on the middle podium.
- Rat on the lower right.
- Fish on top left.
- Bird wearing kimono on top right.
Shrine Vault
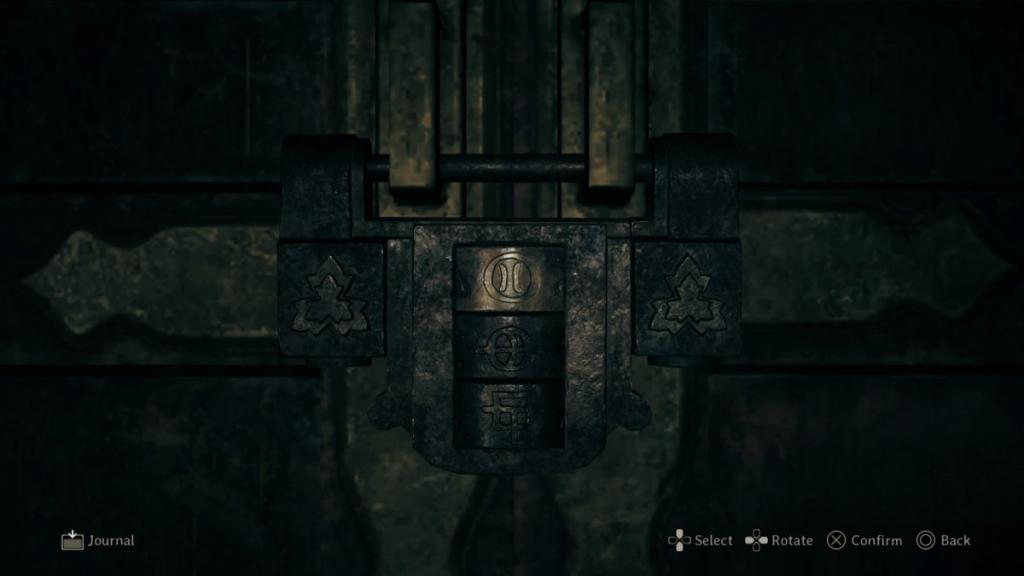
Surrounding the Shrine Vault door are three areas that the four-legged creature slowly patrols. This monster's blind, so make as little noise as possible if you want to avoid fighting him. You need to find the three ema displaying these images: purple flowers with green leaves, lightning striking, and a dead tree with the moon centered behind it (you also get the combination lock dial here). Each ema correlating to the puzzle will only show up once, whereas all other ema repeat, meaning you're on the lookout for three unique ema.
The combination from top to bottom is: circle with two lines inside, circle with curved cross inside, and square with an overlapped backwards J.
Field
Referring to the message sprawled across the scarecrow's face covering, locate and pull the Flash Card embedded in one of the schoolgirl scarecrows on the field. The scarecrow springs to life and attacks if you guess wrong. Here's which scarecrow you should choose per riddle:
Polite smile
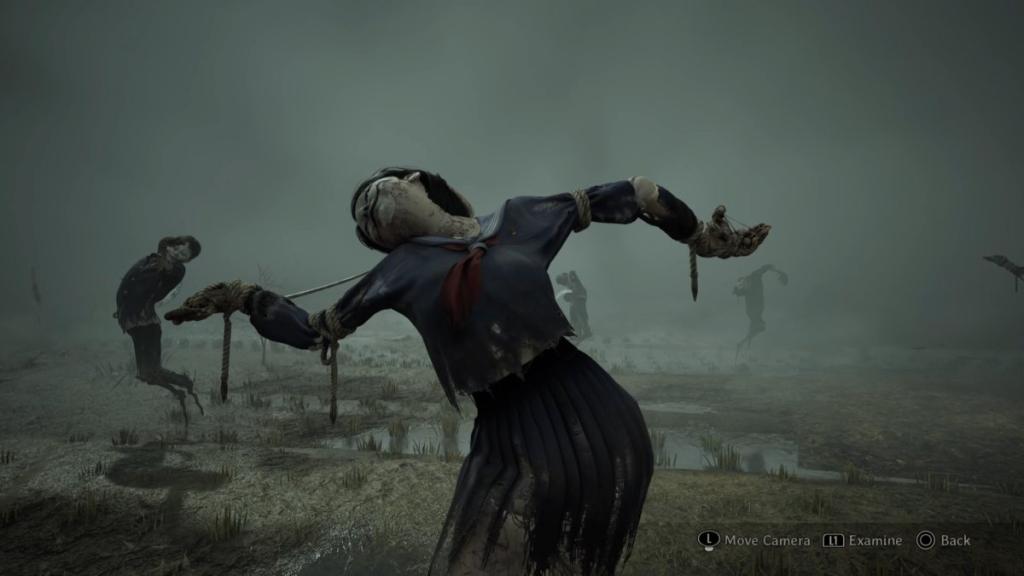
- Scarecrow with two faces, the front smiling menacingly and the back looking deadpan. Arms open, back slightly bent, and head tilted, brandishing a sickle.
Deceived by you
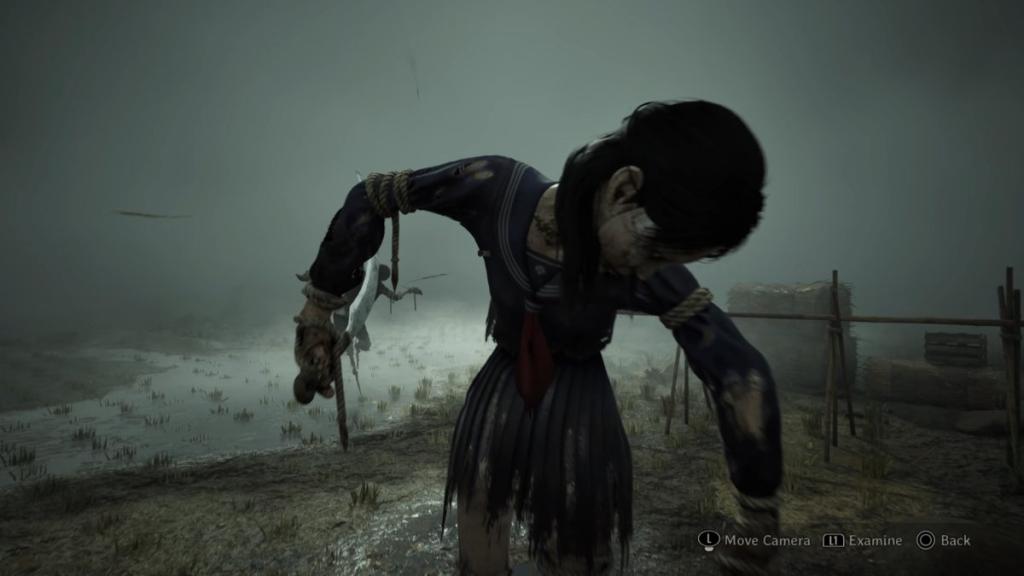
- Back-stabbed scarecrow.
The way he looked at you
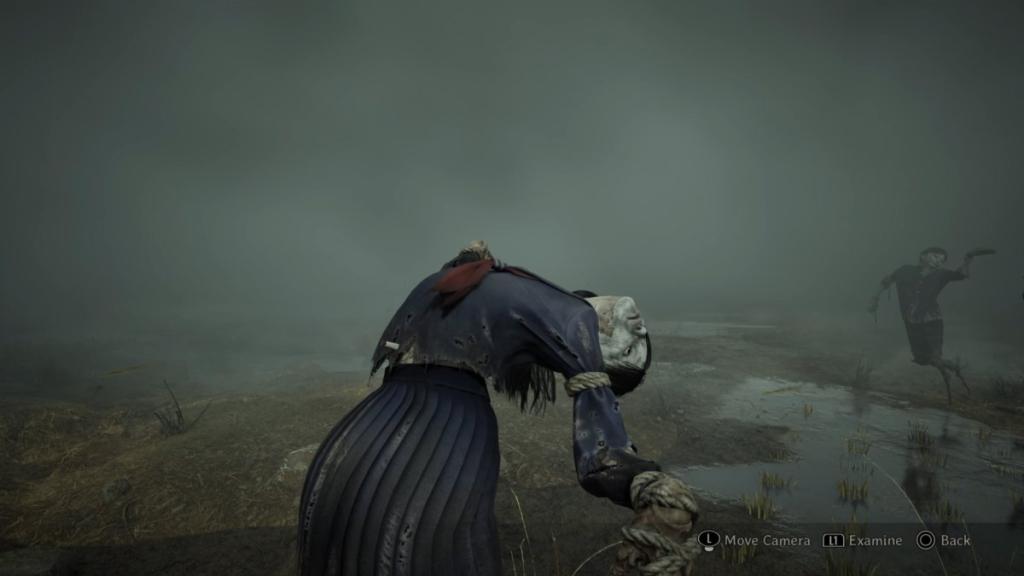
- Unarmed scarecrow with a curved back, pretty much standing by herself.
An eyesore
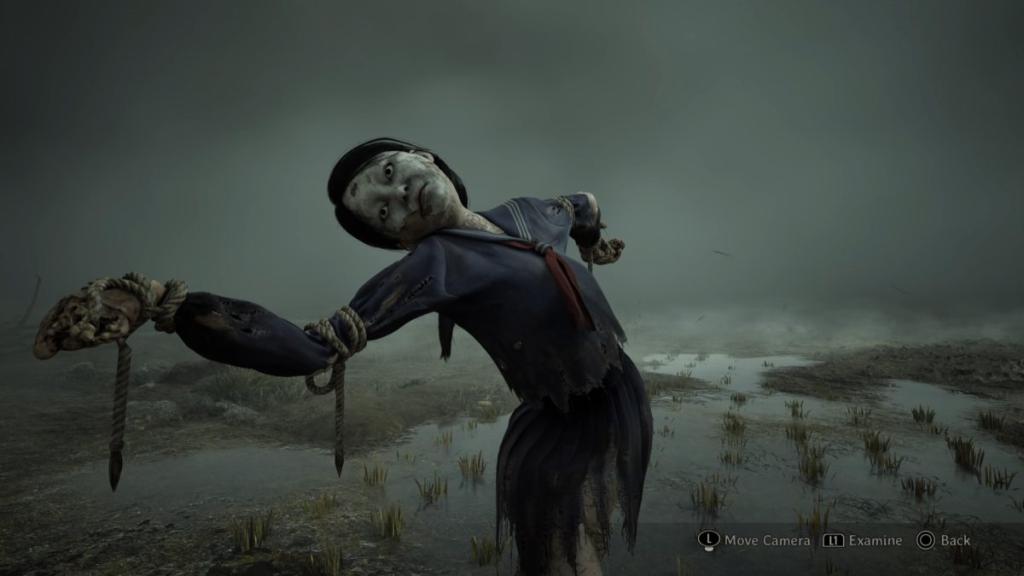
- Find the scarecrow with her head down, her hair covering her face, and pull the Flash Card out of the scarecrow, looking right at her with a serious look on her face.
Force a smile
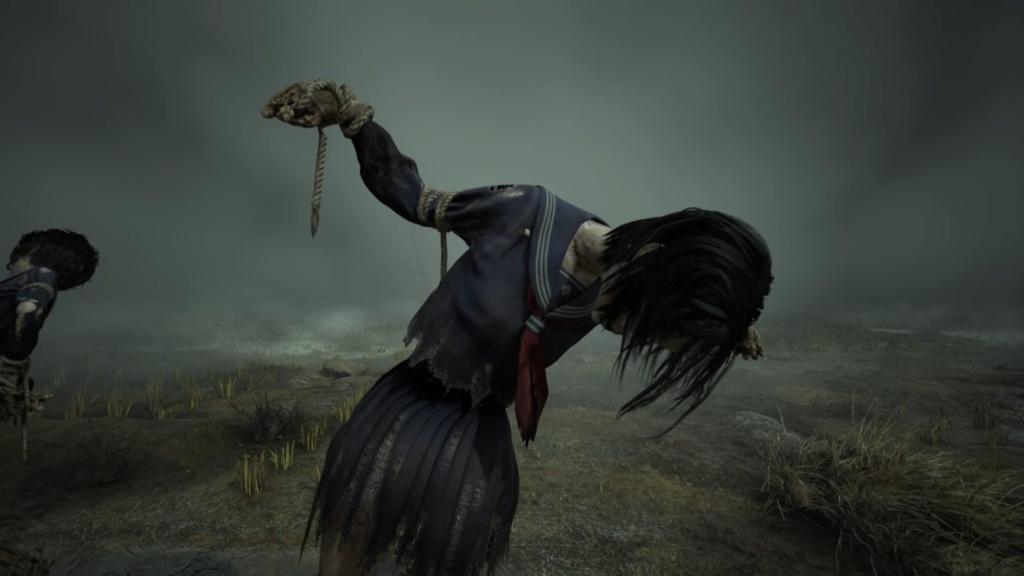
- Scarecrow with her head down and a sickle buried in her back.
Stairwell
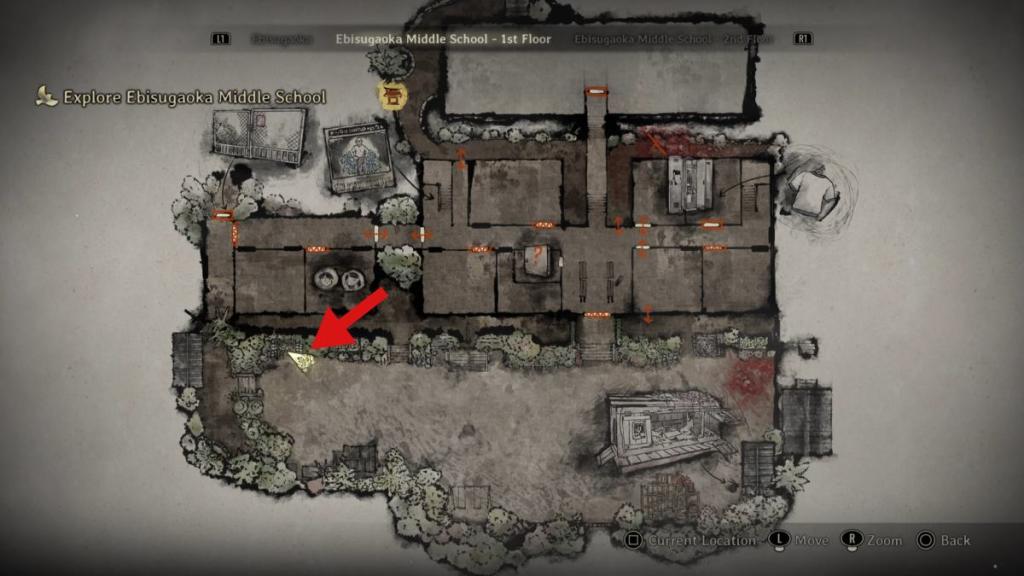
Go to the stairwell nearest the room with Shu and Rinko inside. Check the photo on the stairwell wall for information on the principle. Go to the schoolyard out front via a window in the classroom opposite the locker room. Avoid the enemies in this area and pick up the Main Building 2F Stair Key from the flowerbed at the far-right corner, between two flights of stairs.
Secret Box
Here we'll show you which items need to be on display on the Secret Box to get Rinko's letters to Shu and the Second Floor Classroom Generic Key.
First box
- Apple, cherry, grapefruit.
- Grape, strawberry, pineapple.
Second box
- Closed notebook, upright notebook, opened book faced down.
- Opened book to the middle.
Third box
- Tree with leaves falling off.
- Two flowers, flowers on a single branch.
Locker
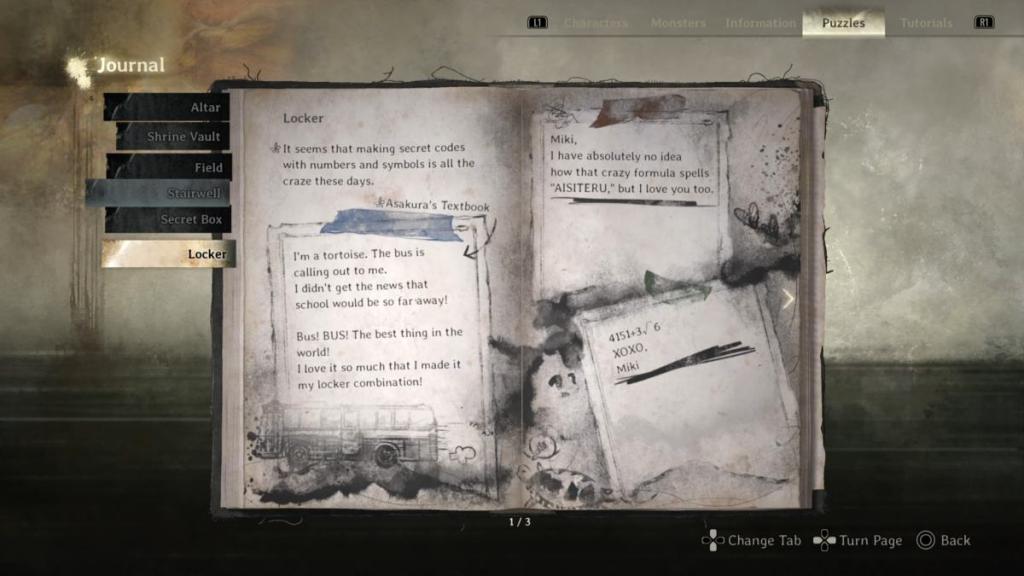
I was on this puzzle for an embarrassingly long time because I hadn't found everything I needed to solve it. The main component to solve the locker combinations is the formula: "AISITERU" equals 4151+3√6. Here's the solution:
Asakura (to get Key Cabinet Key)
- BUS - 865
Aoi (to get Suga's code)
- A01 - 401
Suga (to get School Bag)
- SOS - 505
Tsuchiya
- 377
Light
Have the fox and the rabbit statue on both tables face away from each other, levelling out the crates for you to pick up the Restraint and Talon Lampshades.
Memories
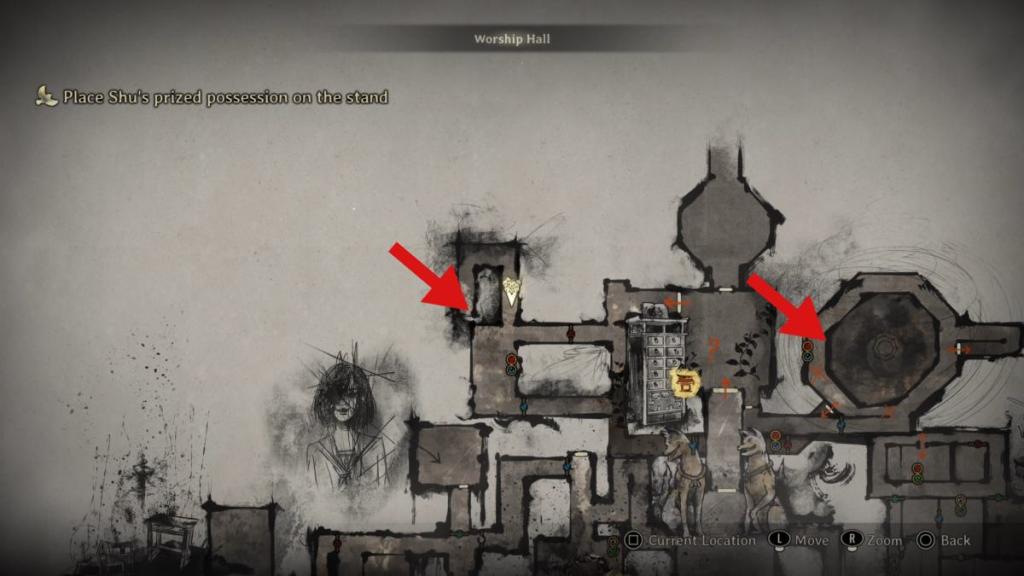
Find Drawing of Hinako in the uppermost left corner (dead end) of the area you need to search for Shu's prized possessions. Then find the Brainiac Hero Comic on the second floor of the far-east arena area, past the two levers you need to pull to enter this mini-boss fight.
Ominous Photo
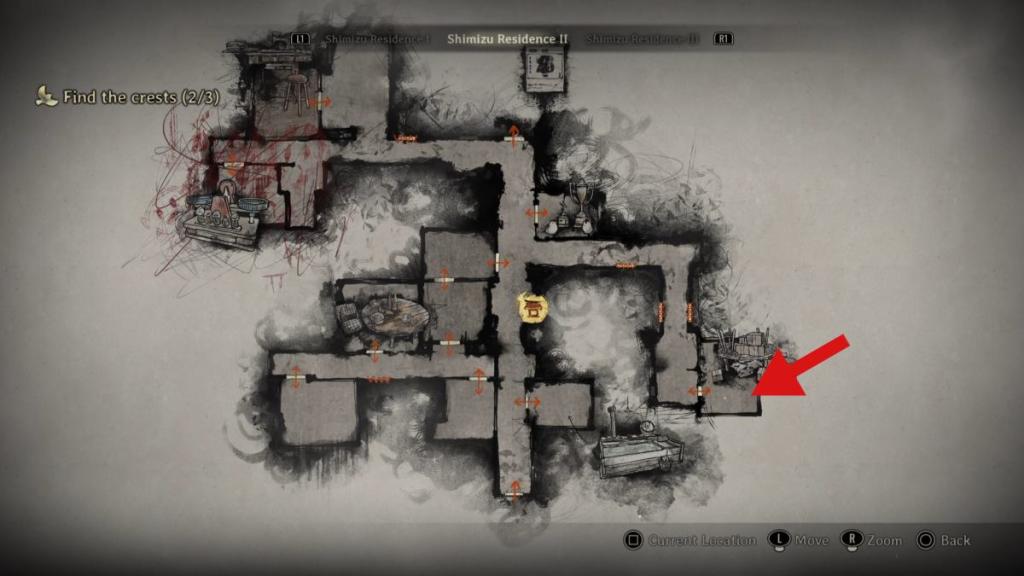
First, find the Oct. 6 Calendar Page near the main door you're supposed to open (where you hear Shu's voice behind it). Then use the Calendar on the blank wall next to the door at the end of the corridor with the shrine in the middle of said corridor. Go to the right-hand side corridor in the Shimizu Residence II, where a four-legged monster spawns, to find Hinako's Photo in the room at the end of this area.
Return to the first Shimizu Residence and go to the photo room, placing Hinako's Photo on the empty wall. Keep every photo aside from Hinako's upright, turning her image upside down to get the White Bird and Fox Plate.
All Silent Hill f Lost in the Fog puzzles
Altar

Place the following items in this order:
- Bamboo fan on low left.
- Bird wearing kimono on middle podium.
- Bloody jar on low right.
- Fish on top left.
- Rat on top right.
Shrine Vault
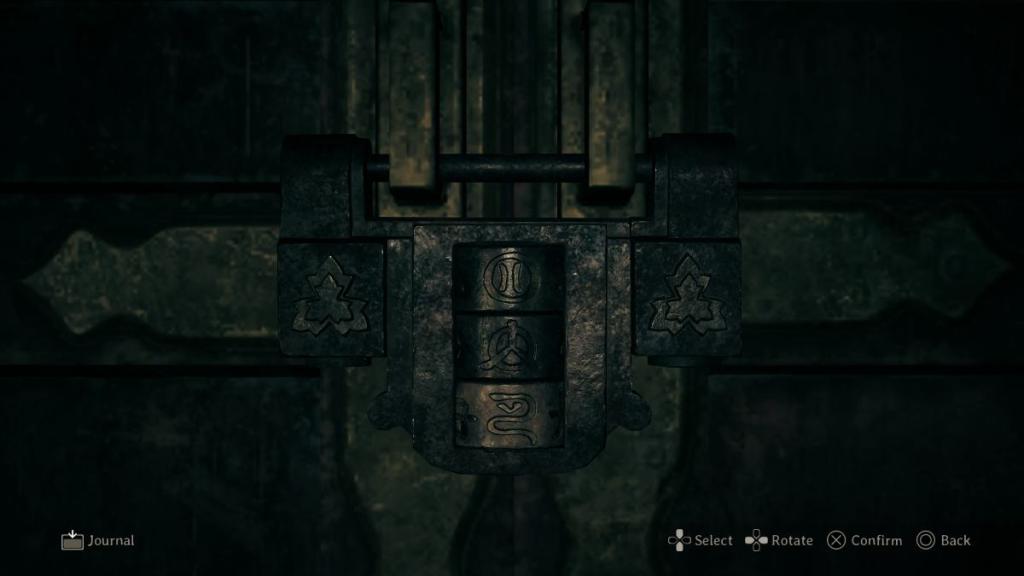
Locate the three yokai in the ema display areas surrounding the Shrine Vault. This was, without a doubt, the hardest puzzle to figure out, and I still don't understand the answer. The combination from top to bottom reads: circle with two vertical lines inside, peace sign, and snake-looking symbol with a line underneath the head.
Field
Standing ovation
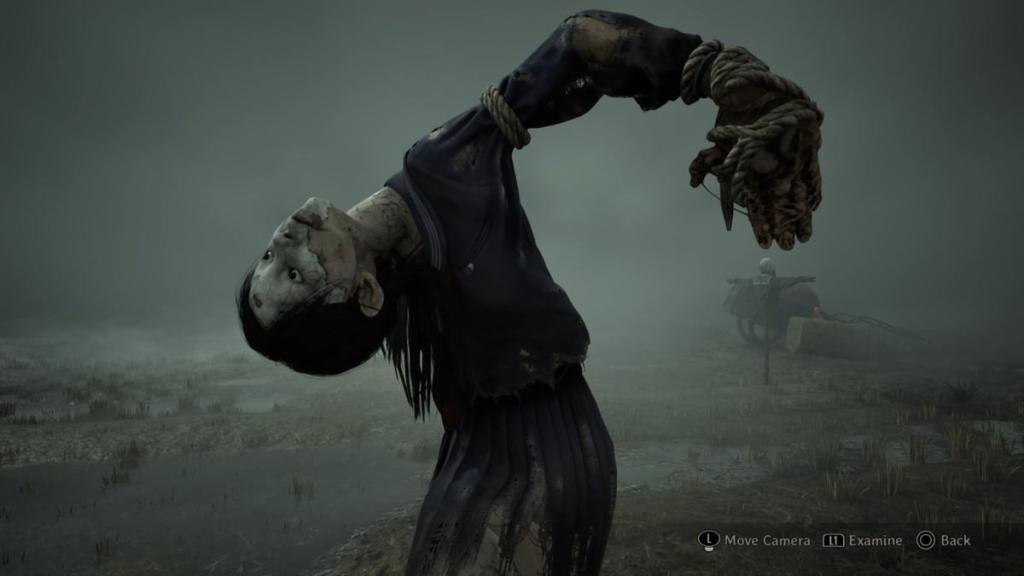
- Scarecrow with cracked porcelain mask, body contorting into a bow, with head pointing towards the sky.
Painful burden off my chest

- Scarecrow bowing, with a sickle on the floor in front of her.
You hurt him
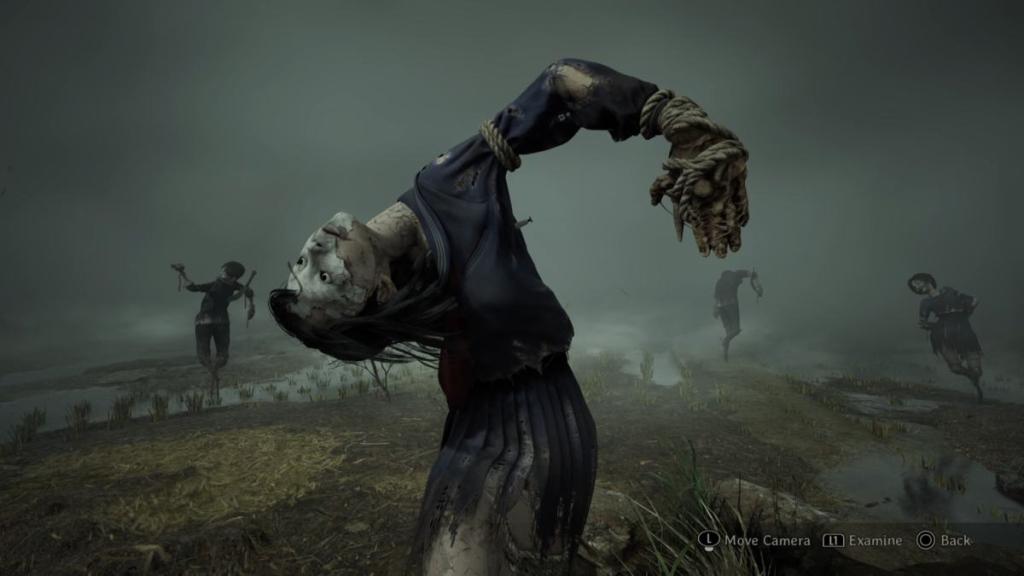
- Scarecrow with cracked mask and head pointed upwards, body turned away from the schoolboy scarecrow lying on the floor with a sickle in his back.
Thorn in my side
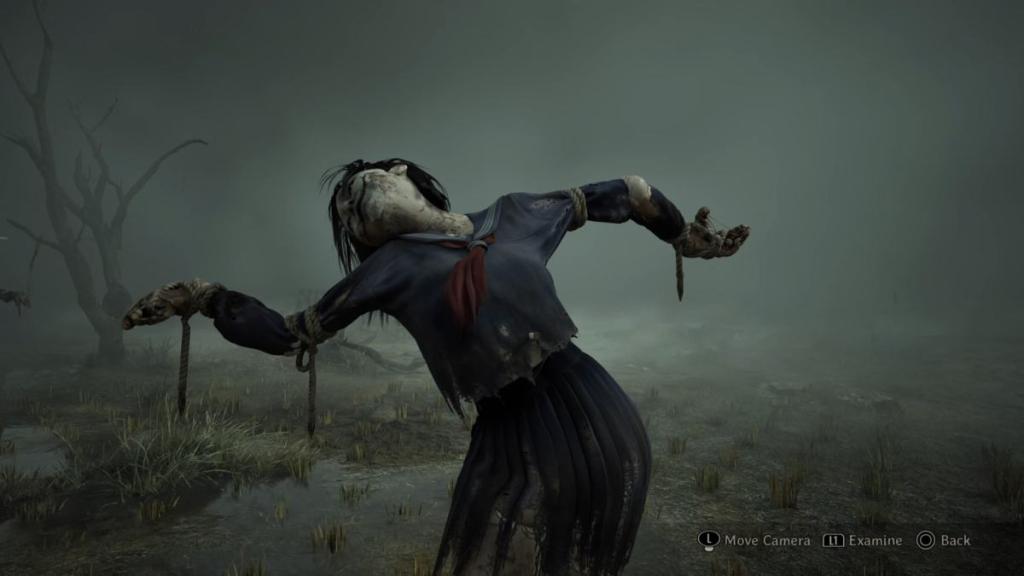
- Smiling scarecrow standing on one leg, arms spread out and head turned to the side.
Go do your own thing
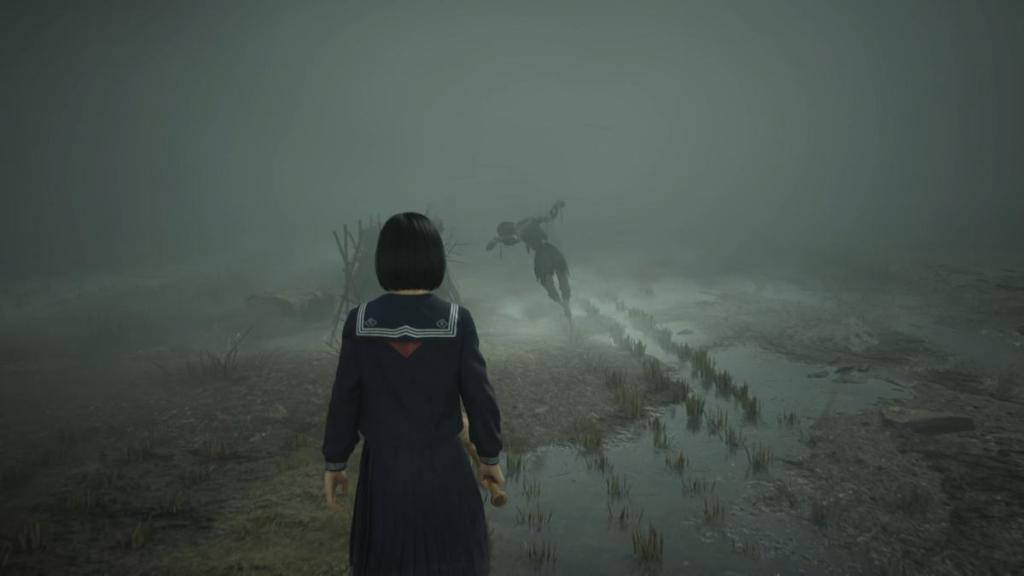
- You won't find the scarecrow you need from this group. Instead, follow the trail of bodies leading to a scarecrow leaving the scene, as this is the one you need.
Stairwell
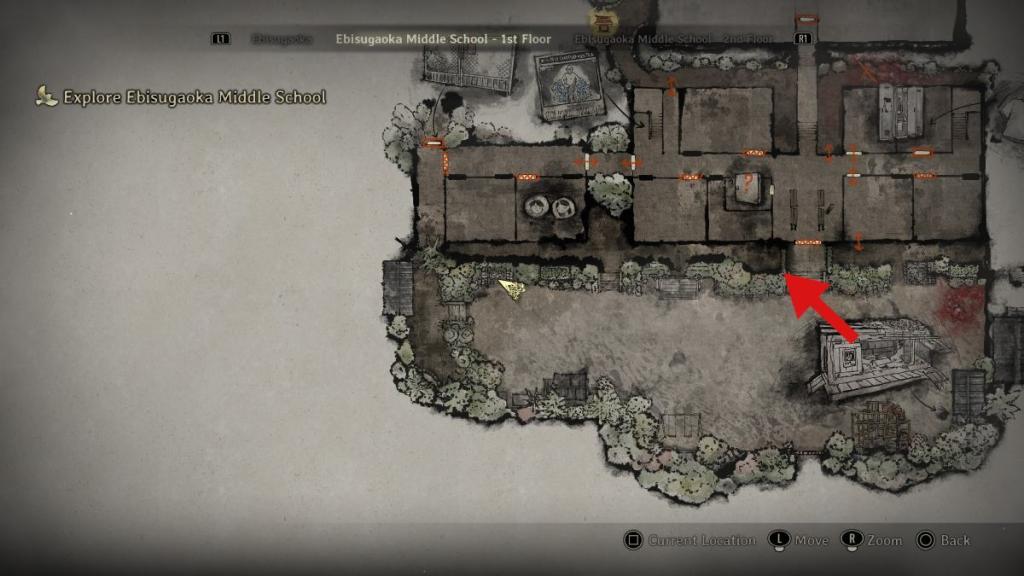
The 2F Stair Key has been moved to the flower pots directly to the right of the school front door (behind the red postal box).
Secret Box
There are more objects to look through for this Secret Box puzzle, including new sliding components.
First box
- Grapefruit, apple.
- Cherry, strawberry, grapes, pineapple.
Second box
- Opened book faced down, upright notebook, closed notebook laid flat, opened book to the middle.
- Opened book to the middle.
Third box
- Flowers on a single branch, two Sakura flowers, leaves falling off a tree.
- Two Sakura flowers.
Locker
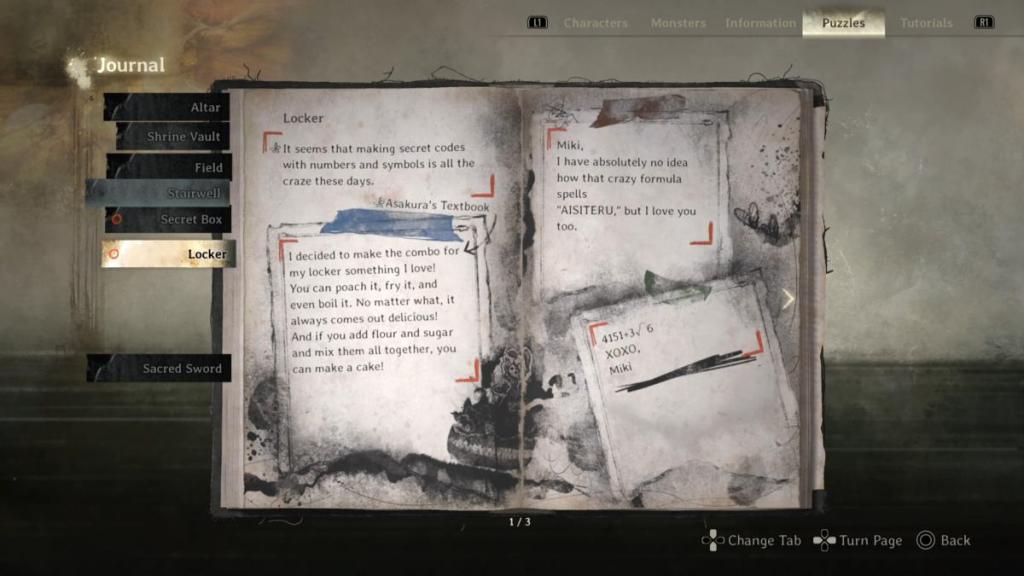
The only thing that's changed here is Asakura's code; all other solutions are the same as seen in the Hard version.
Asakura (to get Key Cabinet Key)
- Egg - 399
Light
Turn the fox and rabbit away from each other on the left. Then turn both the fox and the rabbit to face the far left to pick up the two Lampshades.
Memories
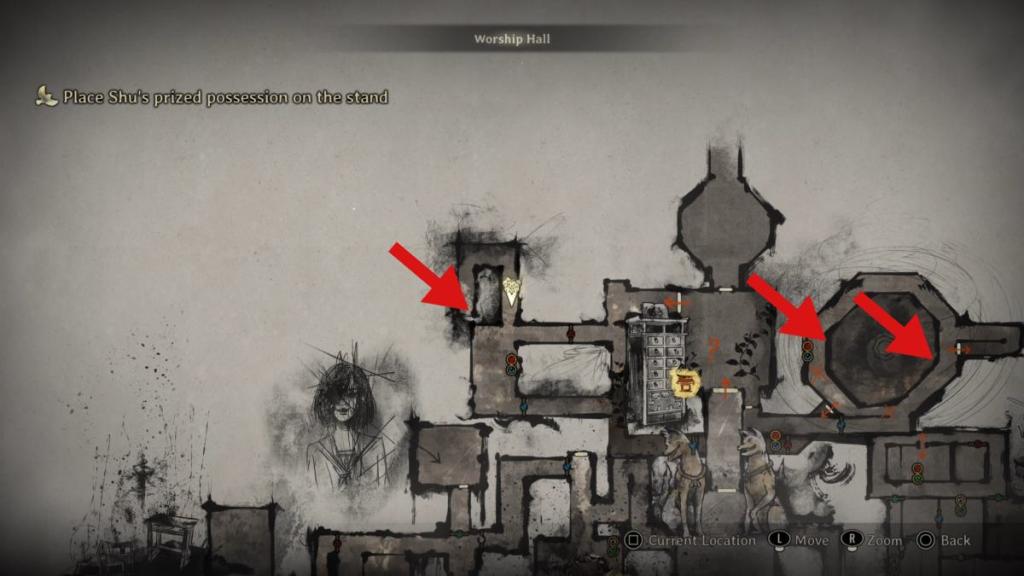
Find the Drawing of Hinako and Heroic Comic in the same locations as found in the Hard version. The Ray Gun is inside the arena where the birthing monster resides; on the ground floor, near the stairwell to reach the Comic and lever to return Shu's prized possessions.
Ominous Photo
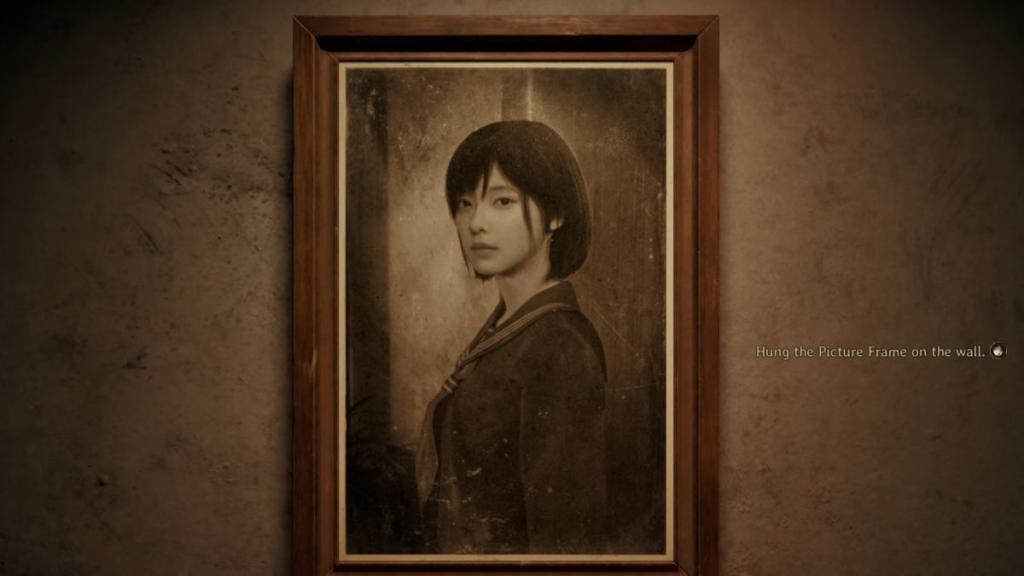
The only difference with this puzzle compared to the Hard version is that Hinako's parents and Rinko are crossed out. This means their pictures need to be rotated upside down, while Hinako's photo (which you can find in the usual spot), and Sasuko and Shu's picture stay upright.
You need the Calendar Pages to reach the other two versions of Shimuzu Residence.
All ending puzzles
This part of the guide is currently a work in progress and will be updated soon with all ending puzzle solutions.
Coming Home to Roost
My Room
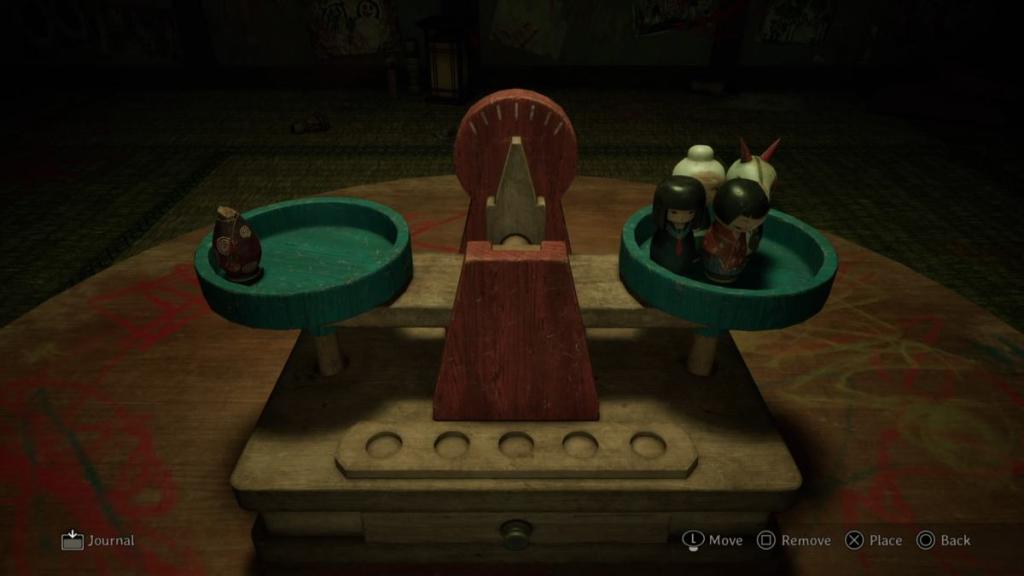
Here's the order we used to complete this puzzle quickly after finding all calendars to access the other two versions of Hinako's house:
Shimizu Residence III
- Enter Hinako's room and check the bookcase, opening the book slotted between the two blood-soaked cardboard boxes for the Block of Wax.
- Grab the Propane Tube from the room opposite the locked bird pattern door.
Shimizu Residence I
- Go to the room on the bottom-left side of the house and insert the Propane Tube and Block of Wax to get the Fletching Key.
Shimizu Residence II
- Go to the right side of the house and defeat the four-legged monster patrolling the corridor. Head to the end of the corridor and enter the room to pick up Hinako's picture.
- Enter the room on the lower, far-left side of the house to find the scale puzzle. Place the headless figure on the left scale and the remaining four figures on the right to get the Scales Plate.
Shimizu Residence III
- Find the bird pattern door on the left-hand side of the house and insert the Fletching Key to get the Black Bird and Sword Plate.
Shimizu Residence I
- Enter the room with the family and friends photographs, round the corner from Hinako's locked room and crest puzzle. Place Hinako's photo on the wall and rotate hers upside down, keeping the rest upright.
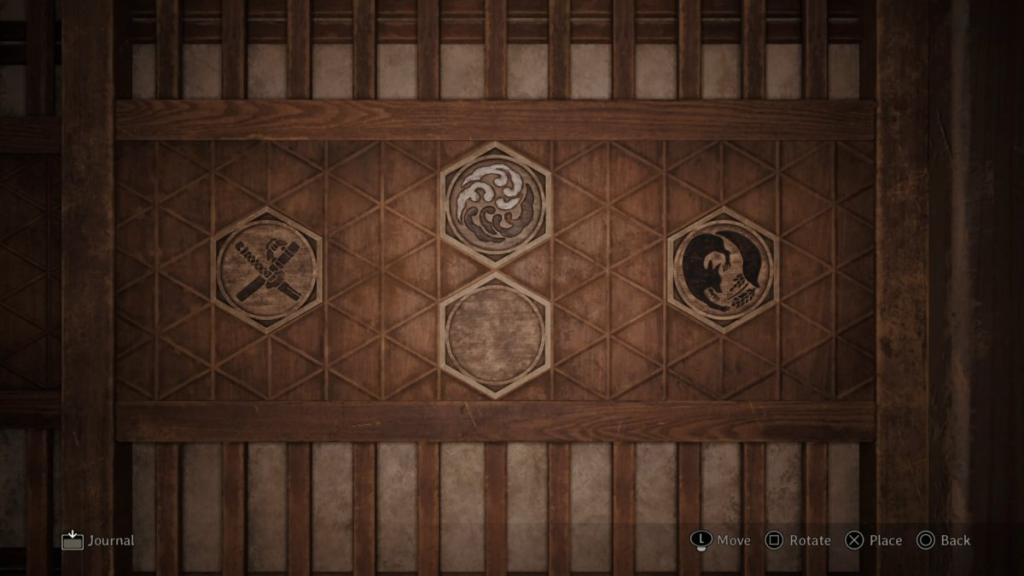
Place the plates in this order: Sword (left), Land (up), Fox (right), and rotate Scales Plate so it's blank (down).
Mural
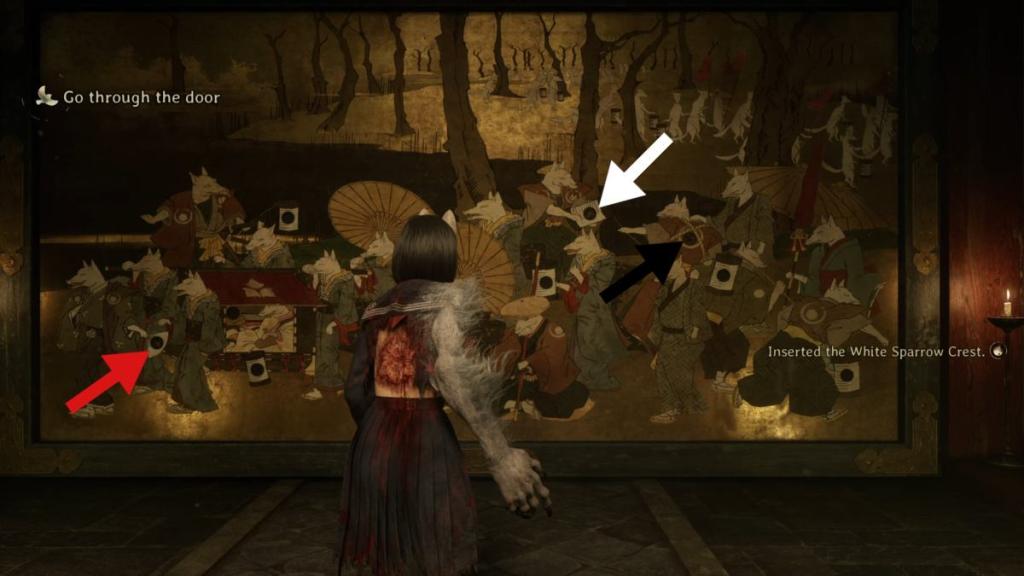
Find the three crests: White Bird, Black Bird, and Fox, hidden in talisman boxes behind the three doors surrounding the fox mural. You must defeat all enemies in each area to remove the talisman and grab the crest. Once you have all crests, insert them into these slots:
- Fox Crest: Fan on the first fox pictured at the far-left corner of the mural.
- White Sparrow Crest: Inside the lantern, on the fox standing between the two trees, wearing red and black.
- Black Sparrow Crest: Into the back of the fox, looking at the White Sparrow fox at the back of the group, wearing res with a yellow circle and ropes on the back.
The Fox Wets Its Tail
My Room
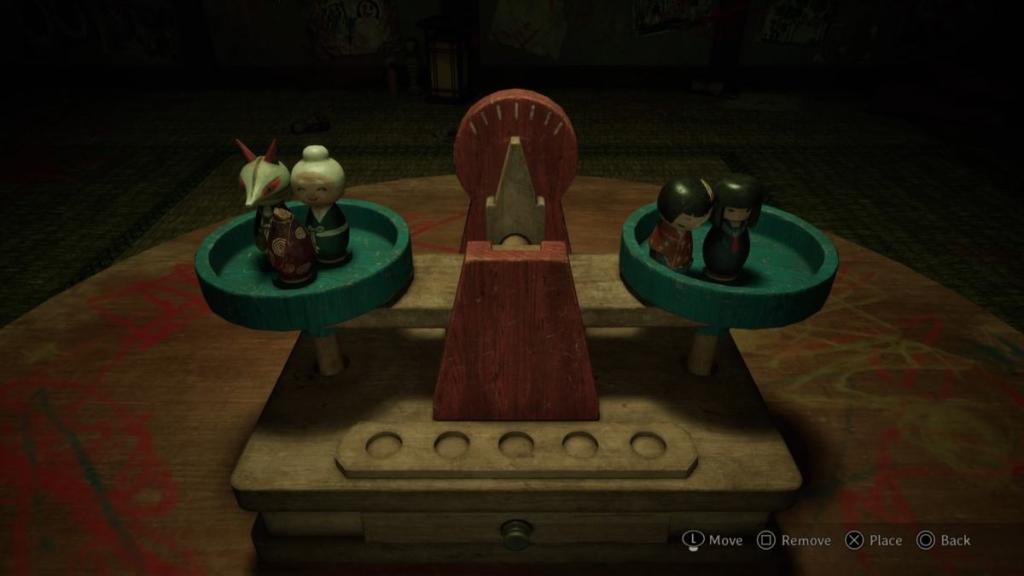
Locate the three crests, one found in each version of the Shimizu Residence. What's neat about this version is that the method stays the same on where and how to get each plate, but the scenes of Hinako's memories as she moves throughout this location change, giving us new lore to enjoy and analyze.
This version, however, changes the scale and ominous photo puzzles. This time, you need to place the two girl figures on the right scale and the fox, headless figure, and elderly woman on the scale to the left to get the Scales Plate.
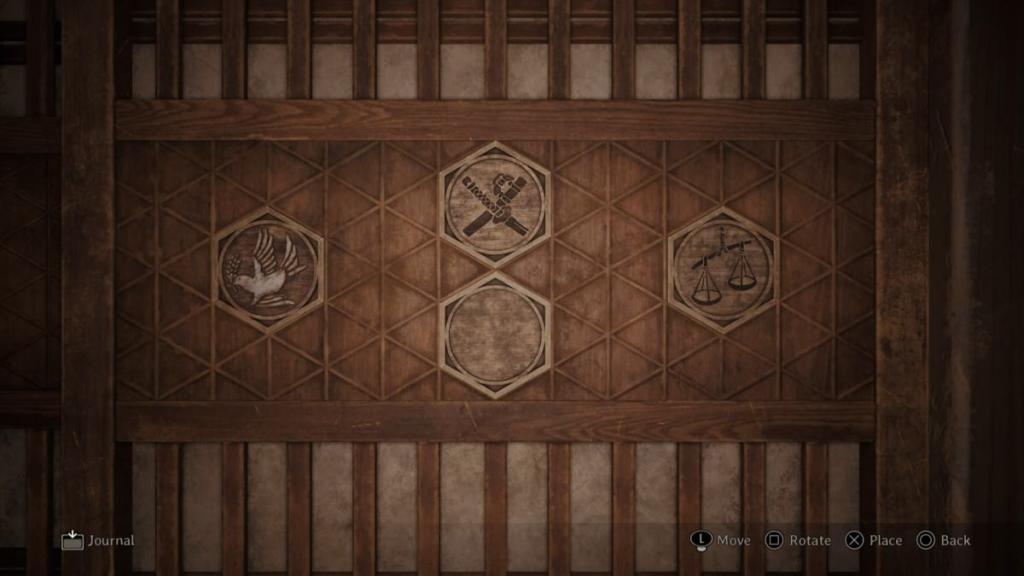
Place the plates in this order when you have all plates: White Bird (left), Sword (up), Scales (right), and rotate Land Plate so it's blank (down).
Mural
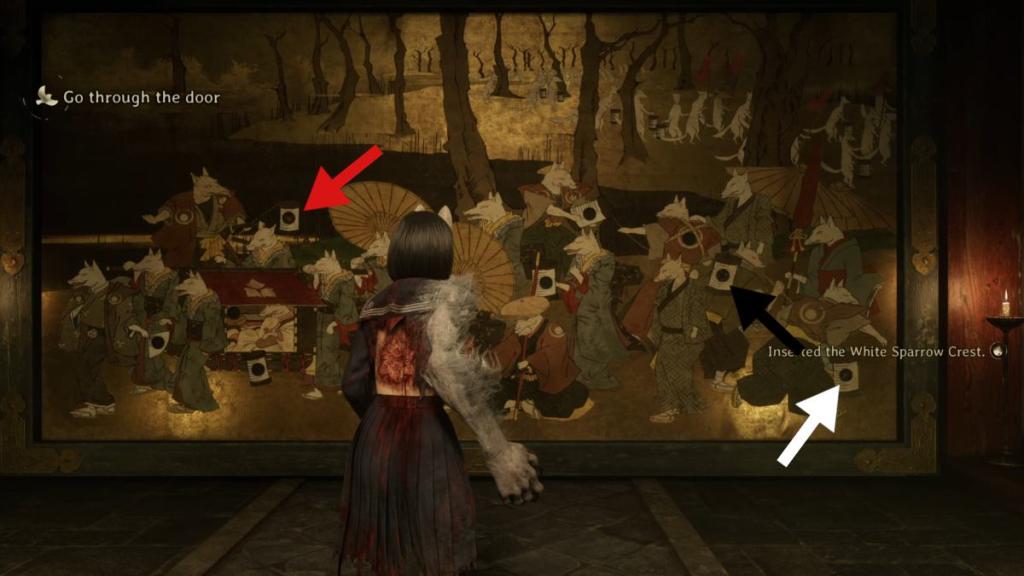
Insert the crests you found behind the three surrounding doors in these slots:
- Fox Crest: Into the lantern held by the red robe-wearing fox on the far left of the mural.
- White Sparrow Crest: Into the lantern in the far-right corner of the mural, where the fox is wearing a muted brown shirt with two circles on his back, facing away from the rest of the group.
- Black Sparrow Crest: Into the lantern being carried by the fox, directly behind the one we placed the White Bird emblem inside. This fox is wearing a green shirt with a white circle on either sleeve and is also facing away from the group.
Like our content? Set Destructoid as a Preferred Source on Google in just one step to ensure you see us more frequently in your Google searches!
The post All Silent Hill f puzzle solutions (Hard and Lost in the Fog) appeared first on Destructoid.
