It's almost warm enough to contemplate ditching the gloves. But the weather is so changeable, it's useful to have some sort of woollies on standby in your bag.
I may have committed to making and altering my own clothes this year, but that hasn't stopped me window-shopping. I like to call it browser-shopping, because I've taken to doing it online from the comfort of my own home.
One of my favourite places to buy winter clothes is the Scottish cashmere shop, Brora. But cashmere is expensive, so I've only bought items in the past from its clearance section after wandering into a store.
This week I was tempted to head back to Brora, so I did. Online. And that was where I spotted some gorgeous cashmere wristwarmers.
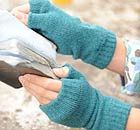
£32 seemed rather a high price to pay for warm wrists, but luckily I had some sleeves left over from an old cashmere jumper I had made into a hot water bottle cover. With a bit of modification, the sleeves became dead ringers for the Brora wristwarmers, at a fraction of the cost. Now I almost hope the cold weather hangs around for a bit longer ...
What do you need?
An old jumper
Wool or ribbon
A needle
What will it cost?
Less than a pound.
How long will it take?
Mine took one episode of Mad Men.
What do I do?
1. First cut the sleeves off an old jumper.
2. Stitch along the cut edge of the sleeve to prevent fraying.
3. Turn the end of the sleeve under to create a seam. Thread the wool or ribbon on to a needle and then pull it through from the bottom to the top of the seam, about one centimetre in from the edge.
4. Sew one centimetre inside the seam with a blanket stitch. Use the ribs in the jumper to create even stitches. When you have gone around the whole edge, pull the wool or ribbon to tighten the sleeve - but use your arm and hand as a template so you don't make it too tight.
5. Repeat steps three and four at the top of the sleeve.
6. If you wish to have a thumb hole, you can cut one in the side, fold over the material on the inside, and stitch around it.