When you connect a mechanical hard drive (HDD), solid-state drive (SSD), or external USB storage to Windows 10, the system usually sets it up automatically. However, there are times when the new drive doesn’t show up in File Explorer. This issue can occur for a variety of reasons, some simple, others more complex.
For instance, there could be a physical problem with the power or data cable. In other cases, the drive might be offline, disabled, or missing a drive letter. If you're using a drive that was previously set up on another computer, its partition might be unreadable due to corruption or because it’s formatted using a file system that Windows 10 doesn’t recognize. You might also be dealing with a raw drive that hasn't been initialized or formatted yet, which makes it invisible to File Explorer.
Whatever the cause, Windows 10 offers several built-in tools to help you diagnose and resolve the issue. You can use Device Manager, Disk Management, or advanced command-line utilities like DiskPart to bring the drive back online and make it accessible again.
In this how-to guide, I'll outline the different ways to troubleshoot a hard drive that refuses to appear in File Explorer.
How to fix missing hard drive in File Explorer using physical troubleshooting
On Windows 10, if a traditional mechanical hard drive (HDD) or solid-state drive (SSD) does not appear in File Explorer, there are many reasons to why this is happening, but before checking and modifying the system settings, try these troubleshooting steps:
- Confirm that the hard drive is properly connected to the computer and receiving power.
- If it's an external USB hard drive, disconnect it and try a different USB port.
- Avoid using a USB hub during troubleshooting, and connect the drive directly to the computer.
- If it's an internal hard drive, ensure both the data and power cables are securely connected to the drive, motherboard, and power supply. If this is a newer NVMe SSD drive, make sure it's sitting propertly in the slot and secure the screw. (Always power off and unplug the computer before inspecting or handling internal components.)
- Try connecting the drive to another computer to check if the issue is with the device itself.
- Access the computer’s BIOS or UEFI firmware and verify that the system detects the storage device. (Since firmware interfaces vary by manufacturer and model, refer to the device’s support website for specific instructions on accessing and navigating BIOS or UEFI.)
Once you determine that it is not a physical problem, you can use the following recommendations to fix the most common problem preventing File Explorer from showing a hard drive.
How to fix missing hard drive in File Explorer using Device Manager
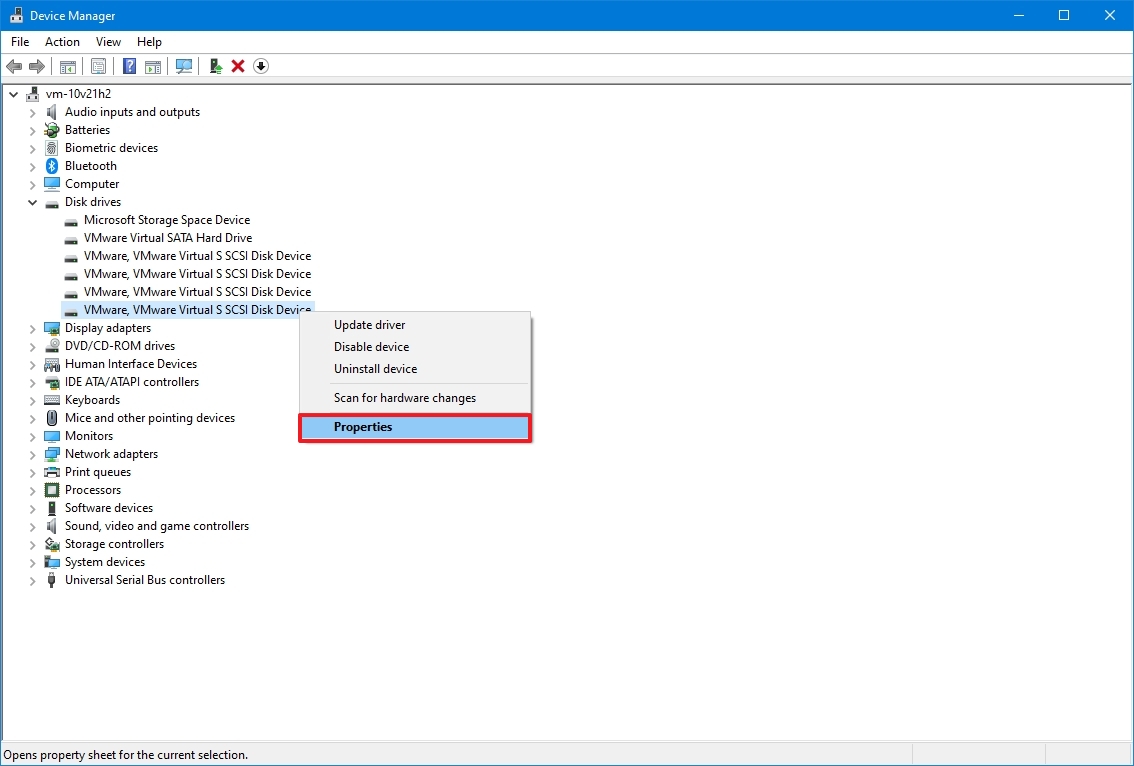
In the rare case that the storage does not appear in Disk Management or File Explorer, it may mean that the hard drive is disabled. If this is the case, you can enable it quickly using Device Manager.
To enable a hard drive using Device Manager on Windows 10, use these steps:
- Open Start.
- Search for Device Manager and click the top result to open the app.
- Expand the Disk drives branch.
- Right-click the hard drive in question and select the Properties option.
- Click the Driver tab.
- Click the Enable Device button.
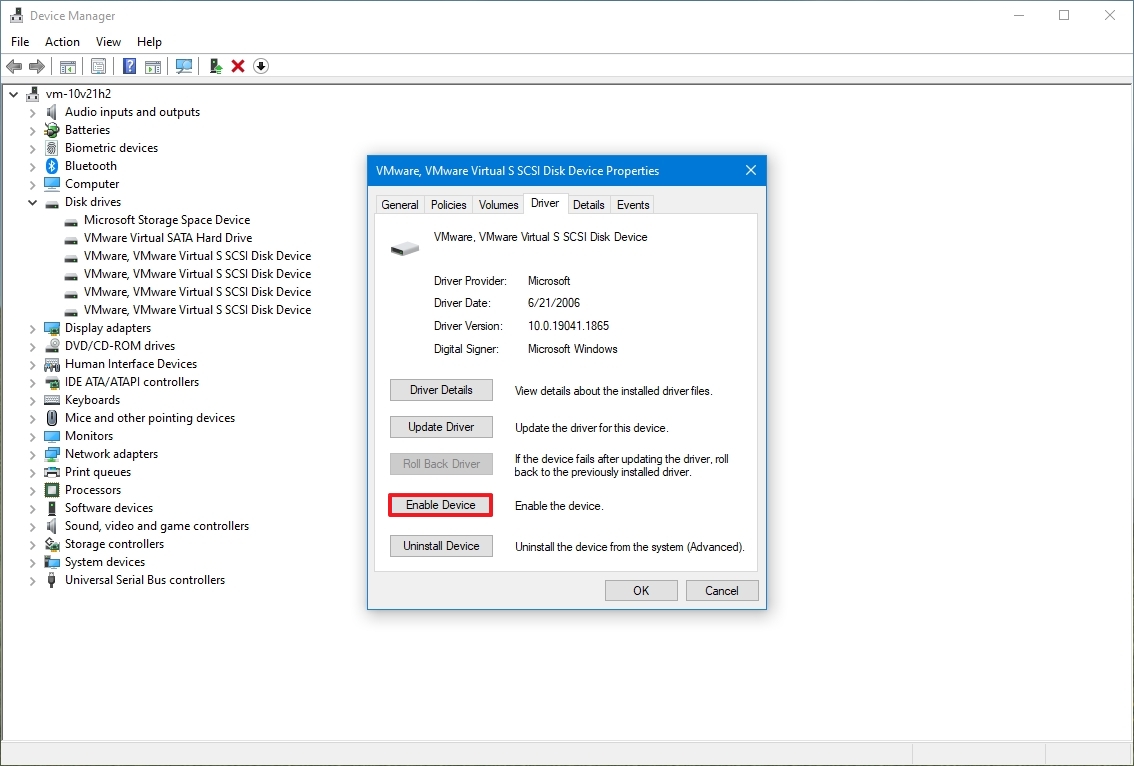
- Click the OK button.
After you complete the steps, the hard drive and data should be accessible on the computer.
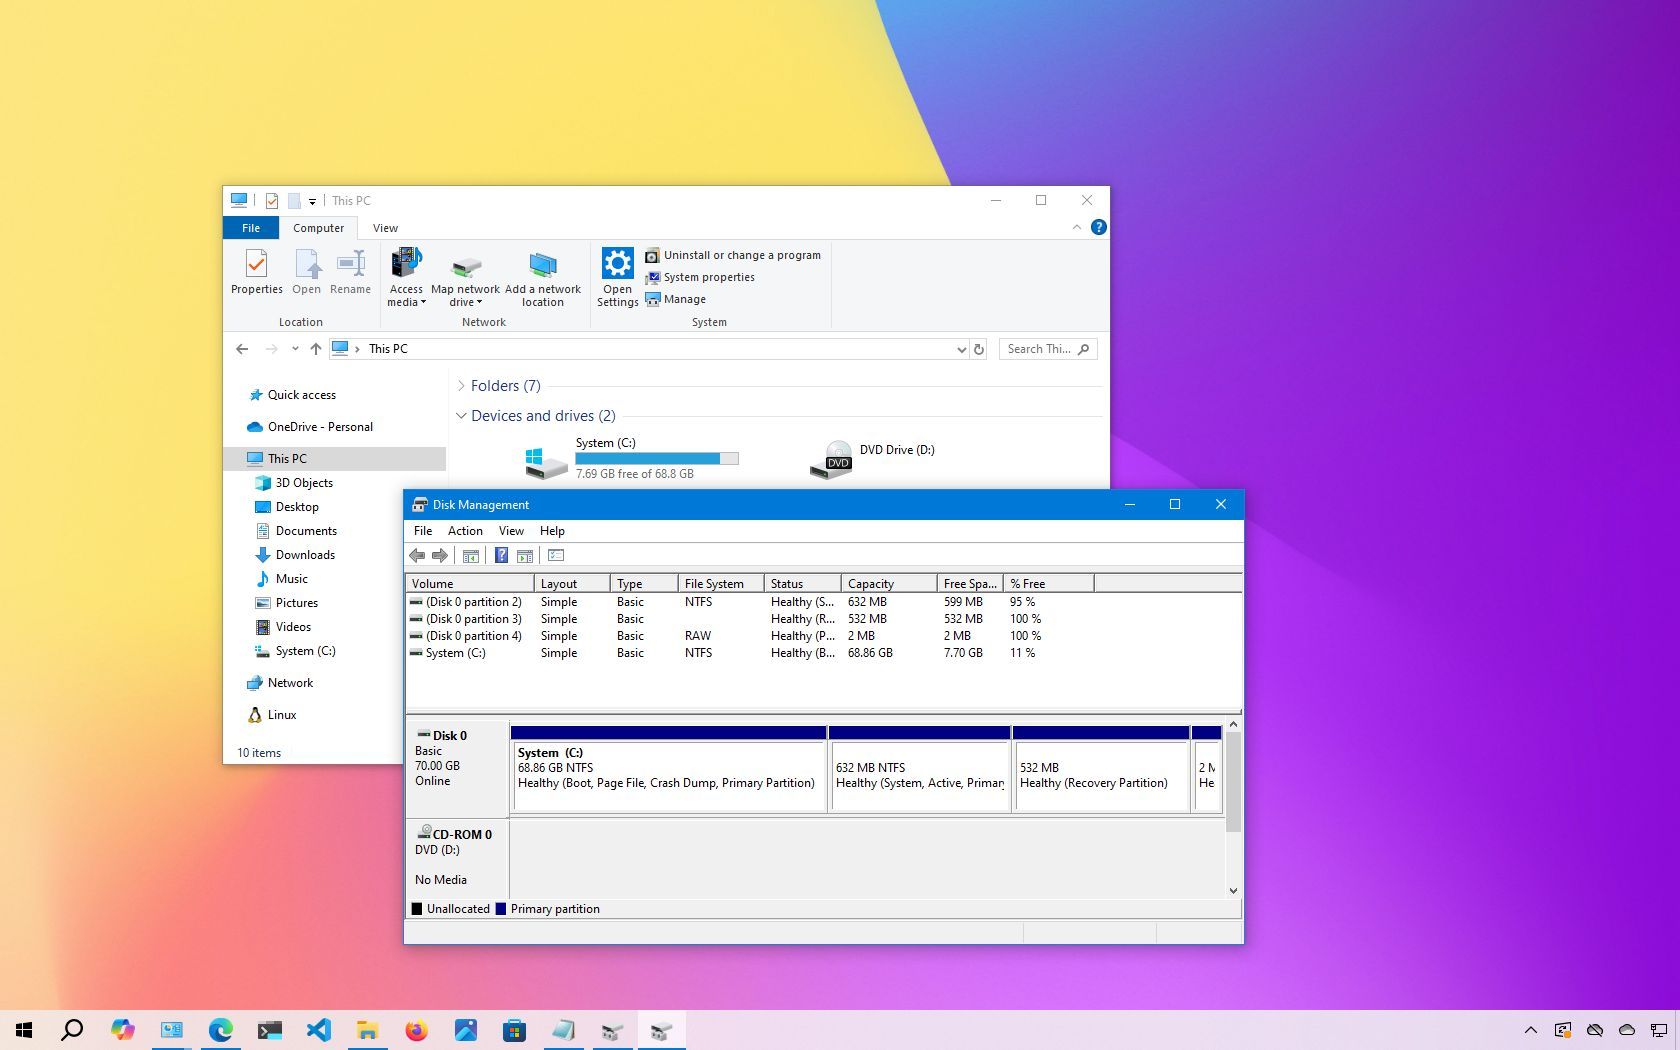
How to fix missing hard drive in File Explorer using Disk Management
There are a few requirements for a hard drive to be available in File Explorer. The device must be online and initialized. It needs to have a partition properly configured. It also needs to have a drive letter assigned, or it should be mounted as a folder.
If you are dealing with any of these problems, the steps below will help you troubleshoot and fix the most common issues with Disk Management.
Set drive online
To bring a hard drive online, use these steps:
- Open Start.
- Search for Disk Management and click the top result to open the app.
- Right-click the disk with the "Offline label" and select the Online option.
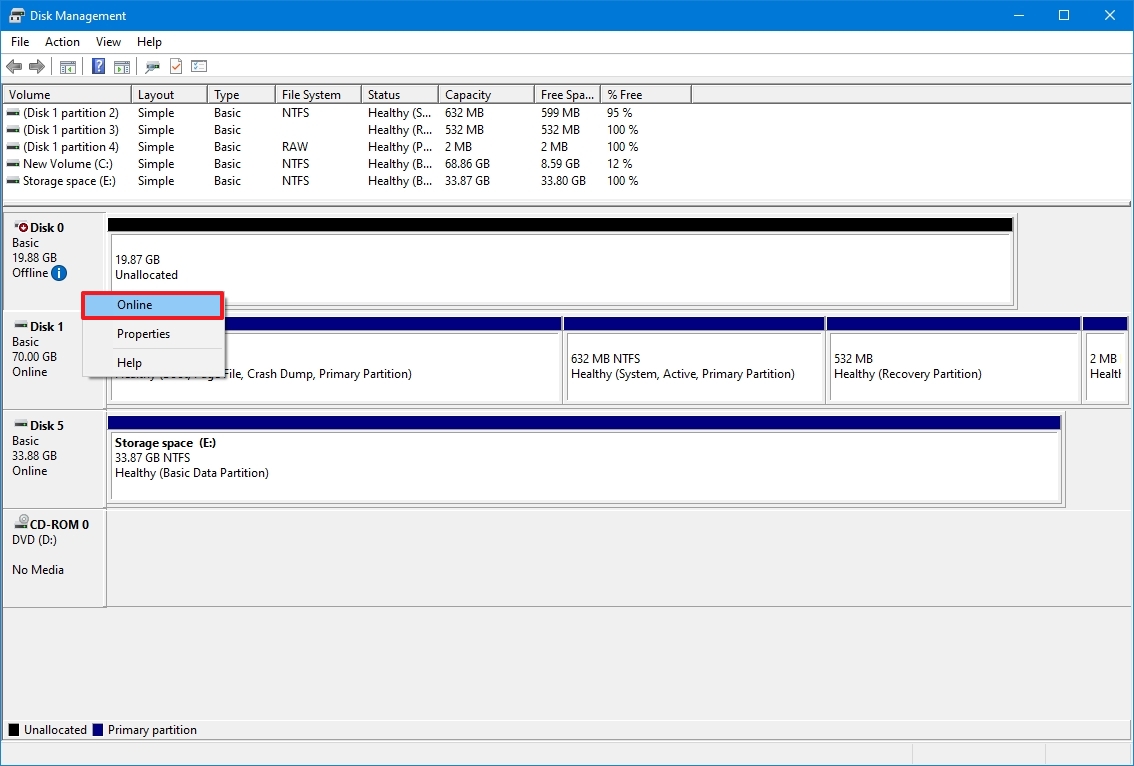
After you complete the steps, if the hard drive was offline and previously configured, it should appear in File Explorer. If the storage was offline but never configured, continue with the steps below.
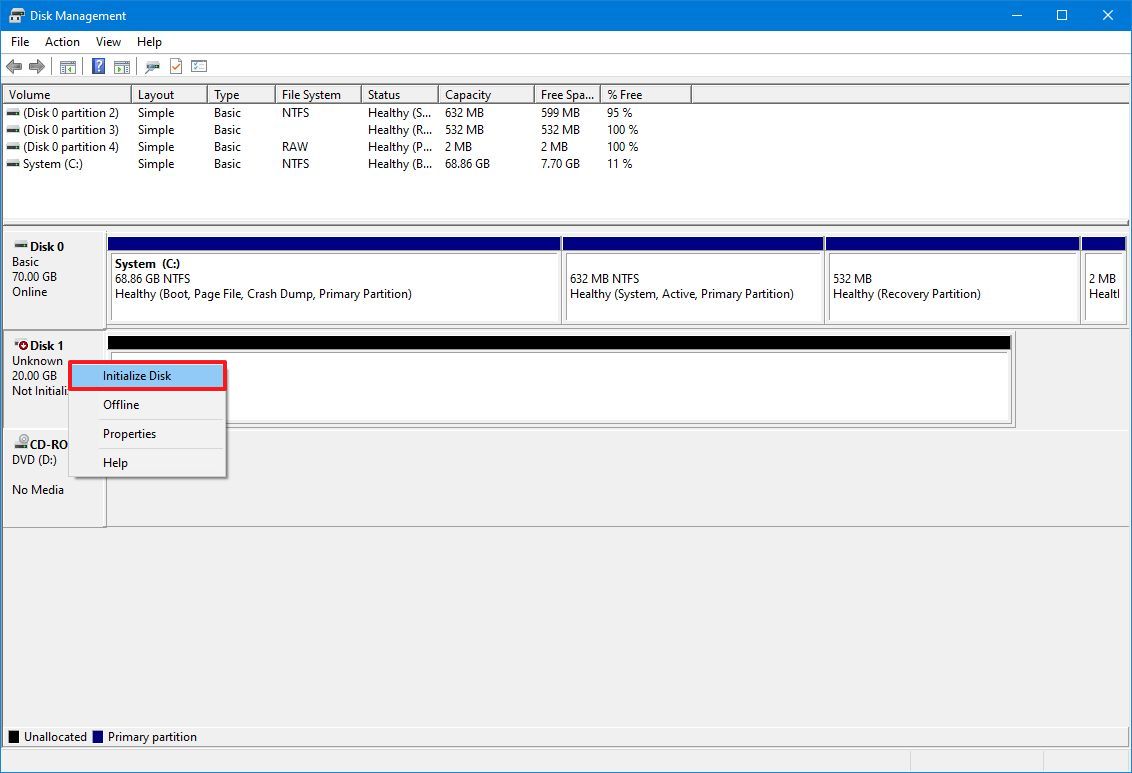
Initialize drive
To initialize a hard drive on Windows 10, use these steps:
- Open Start.
- Search for Disk Management and click the top result to open the app.
- Right-click the disk with the "Unknown" label and select the Initialize Disk option.
- Check the drive you want to initialize under the "Select disks" section.
- Select the "GPT (GUID Partition Table)" option.
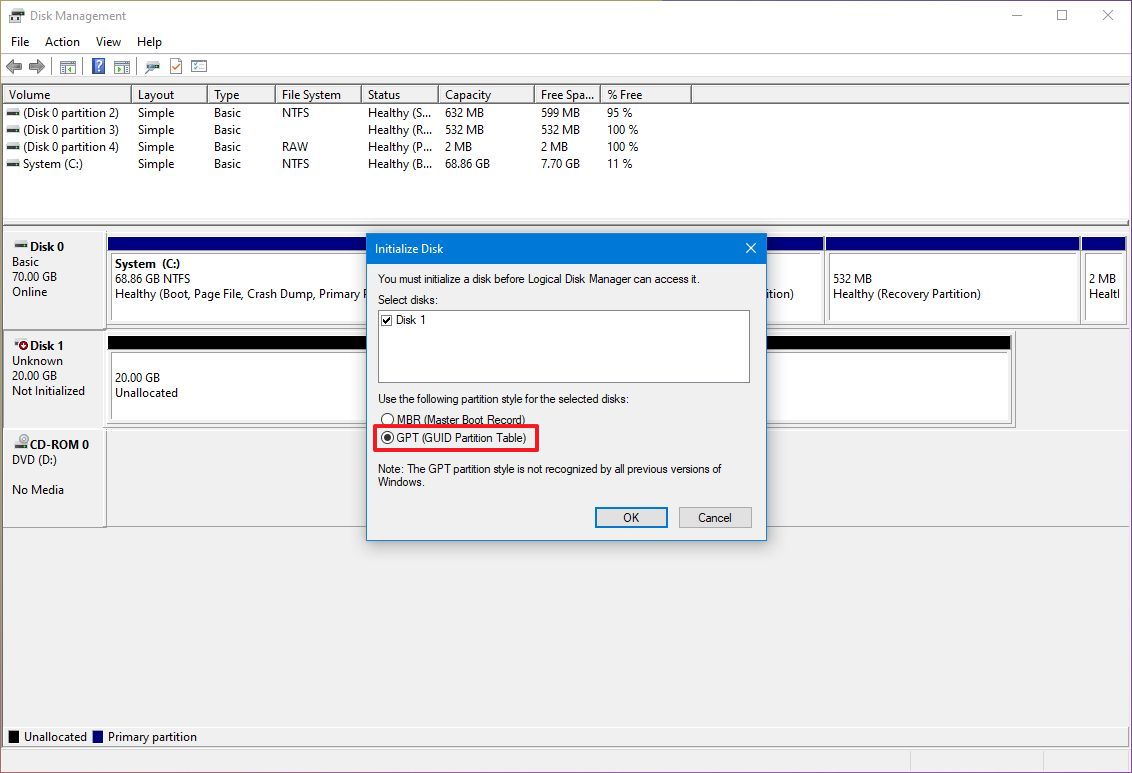
- Click the OK button.
Once you complete the steps, this action will erase everything on the drive and prepare it for formatting if the storage was never initialized.
Import foreign drive
If the drive was configured as a dynamic disk on another computer, it will appear as a foreign drive on a different device, and you will need to import it using the Disk Management console. This process should grant you access to the data without destroying it, but creating a backup of the data is still recommended, if possible.
To import a hard drive with a dynamic configuration to make it accessible through File Explorer, use these steps:
- Open Start.
- Search for Disk Management and click the top result to open the app.
- Right-click the disk with the "Dynamic" label and select the "Import Foreign Disks" option.
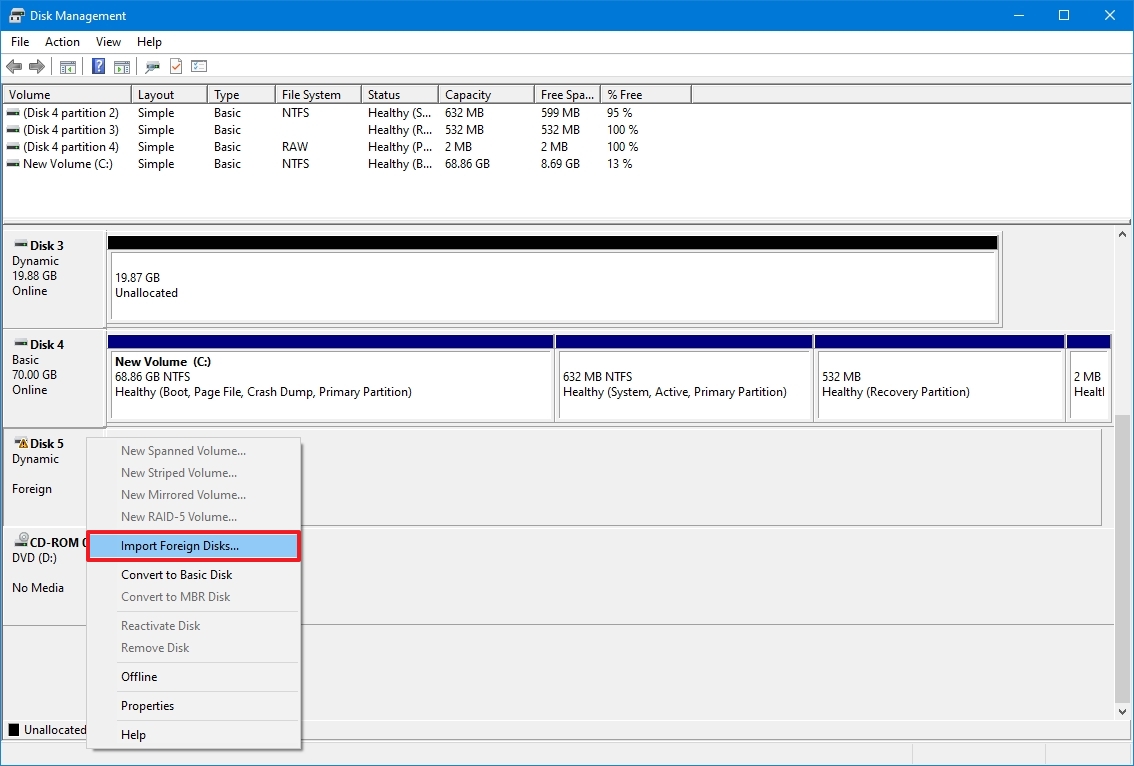
- Select the "Foreign disk group (1 of 1 disks)" item under the "Disk groups" section.

- Click the OK button.
- Click the OK button again.
Once you complete the steps, the hard drive will be imported, and the data will be accessible from File Explorer or any other application.
Configure drive letter
On Windows 10, when the hard drive is online and initialized and does not appear in the system, it's usually for one of two reasons. The drive does not have a drive letter. Or, if it was connected to another computer, the new system is now trying to assign the same drive letter that is already assigned to another drive on the machine.
To assign a drive letter to the storage on Windows 10, use these steps:
- Open Start.
- Search for Disk Management and click the top result to open the app.
- Right-click the partition on the hard drive without a drive letter and select the "Change Drive Letter and Paths" option.
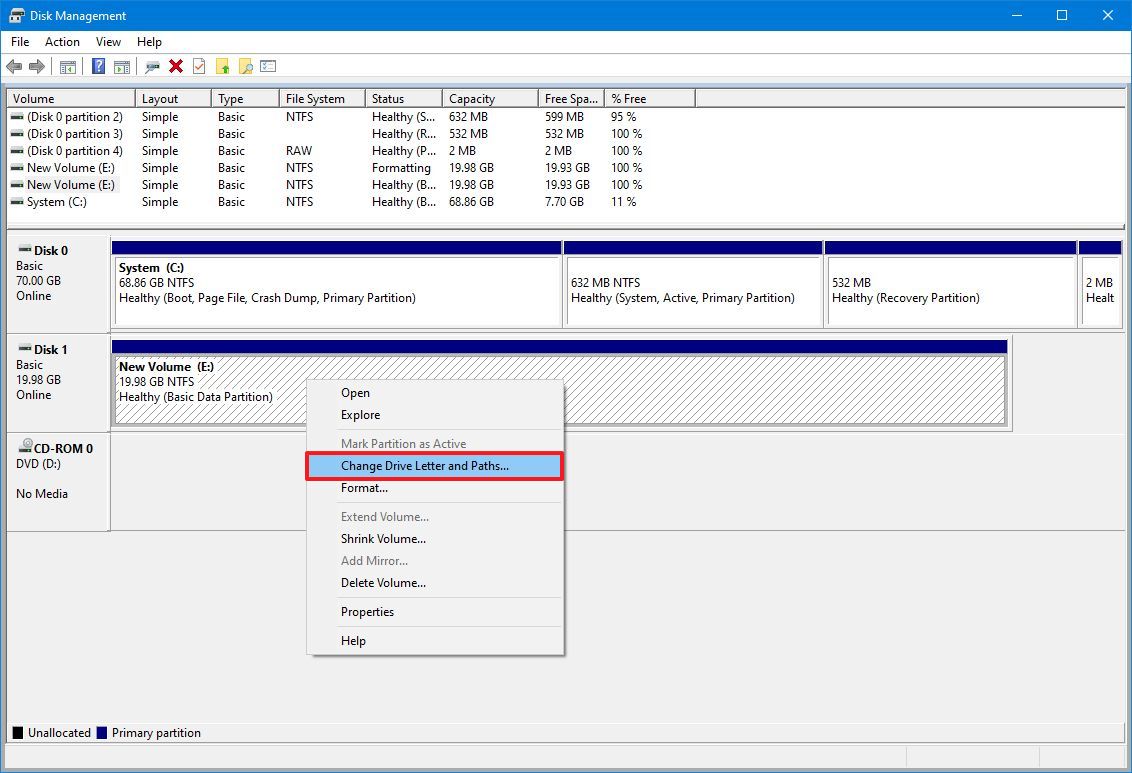
- Click the Add button.
- Select the "Assign the following driver letter" option.
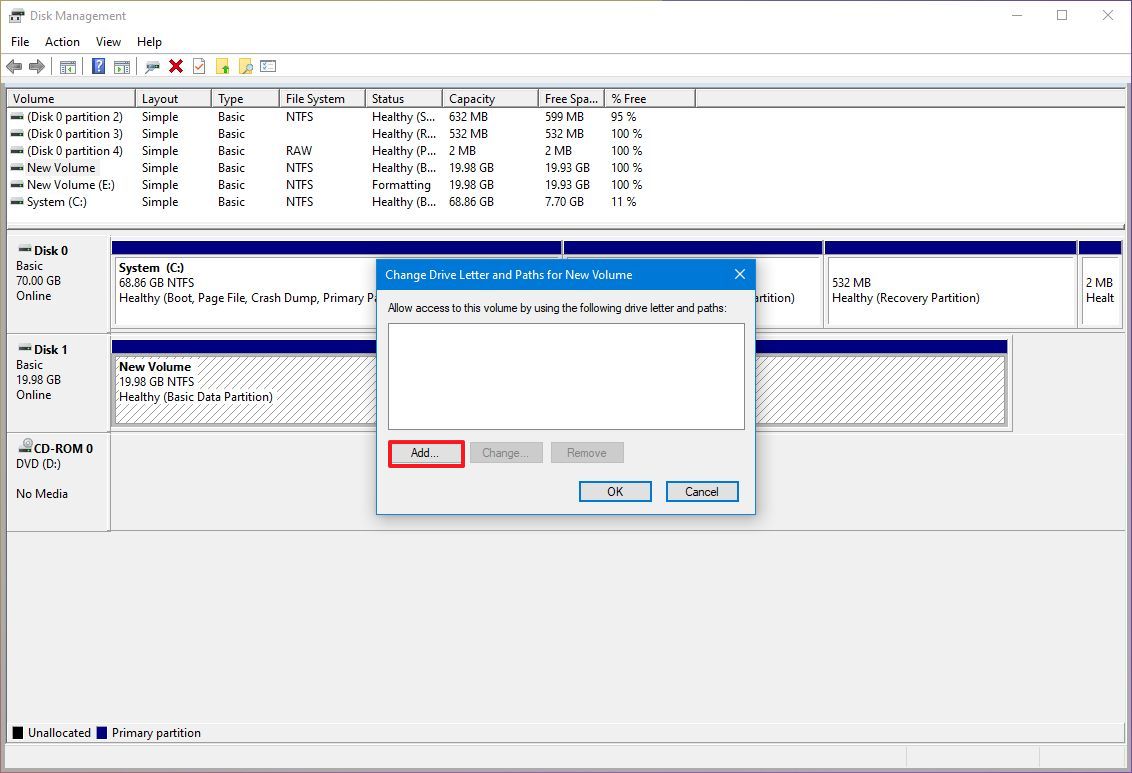
- Use the drop-down menu option and select a drive letter – for example, Z, X, or Y.
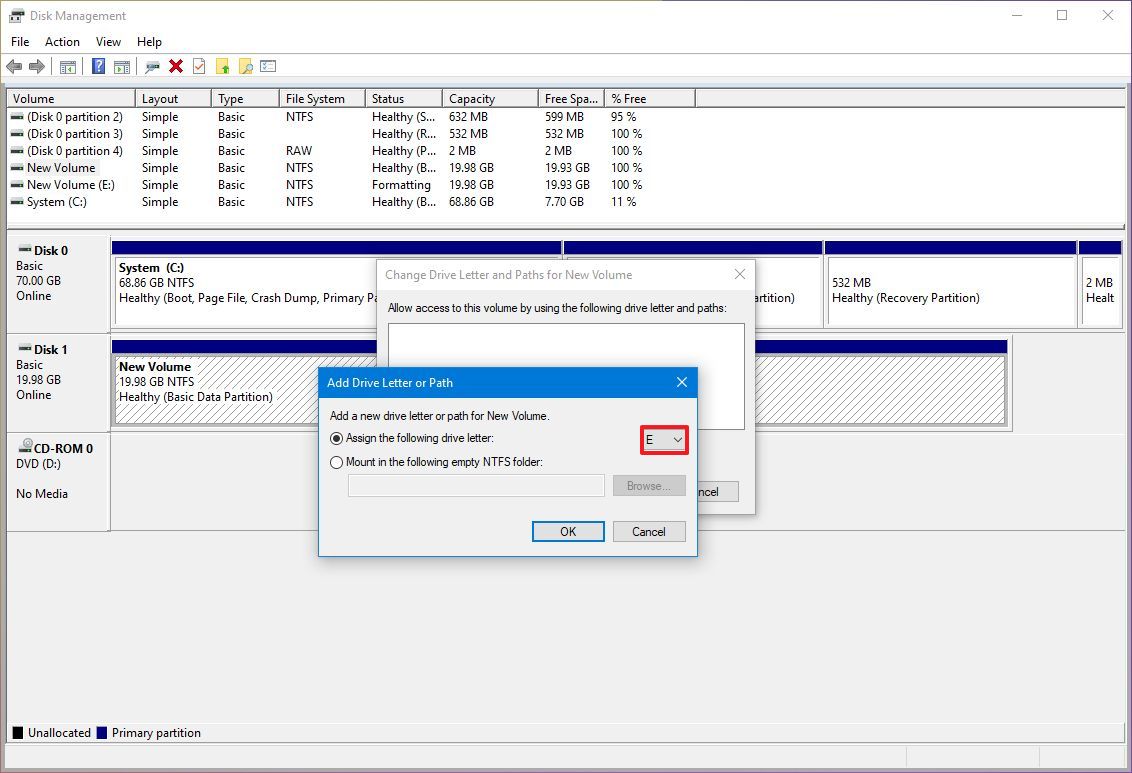
- Click the OK button.
After you complete the steps, the hard drive data should now be accessible using File Explorer.
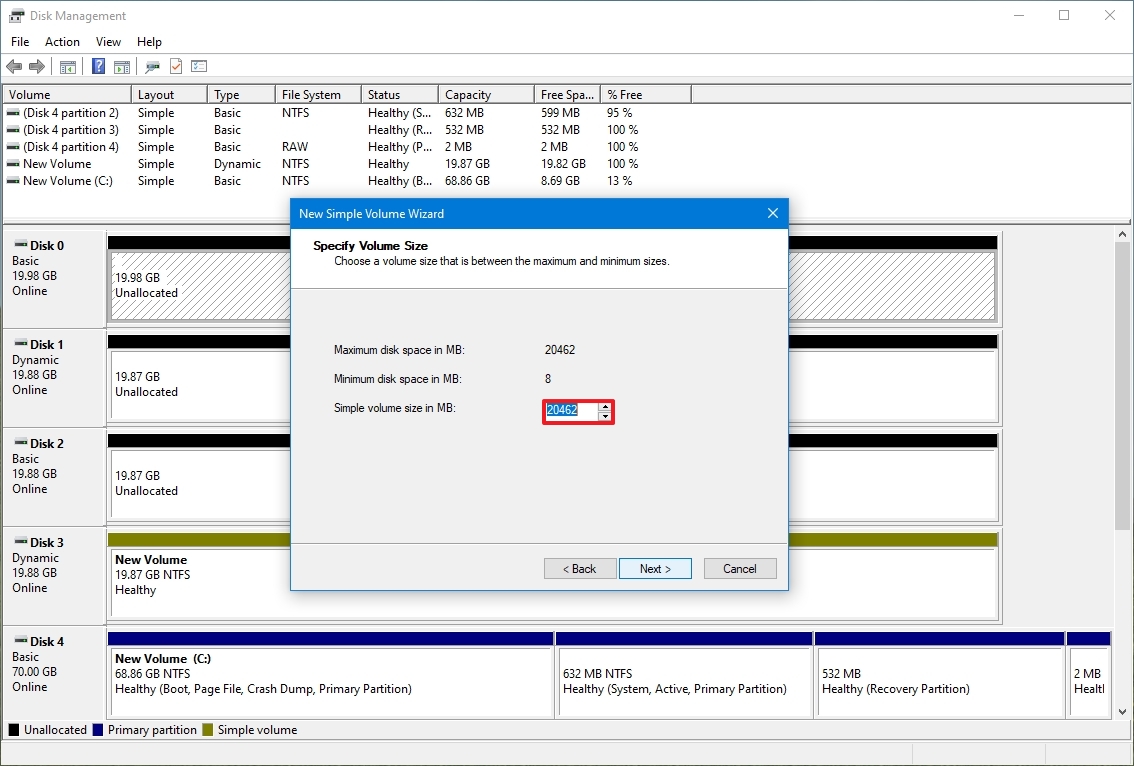
Configure new partition
If the drive is online and initialized, the drive may not have a formatted partition. In this case, you can use the Disk Management wizard to configure and assign a letter to the partition.
To set up and format a hard drive to allow it to appear in File Explorer, use these steps:
- Open Start.
- Search for Disk Management and click the top result to open the app.
- Right-click the partition on the hard drive without a drive letter and select the "New Simple Volume" option.
- Quick tip: Usually, the "basic" drive will have a blue stripe indicating the beginning and end of the partition. Also, select the correct storage, as the following steps will erase everything on the hard drive you choose.
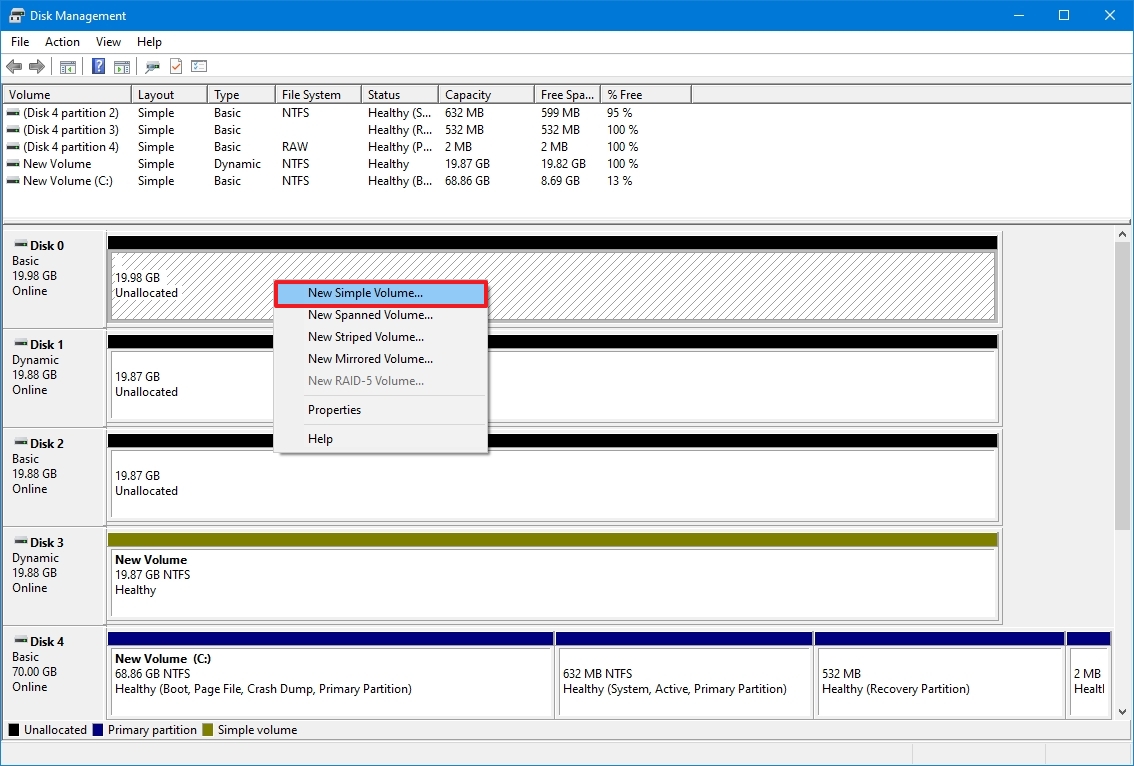
- Click the Next button.
- Click the Next button to use all the available space for the partition. Otherwise, specify the size in the "Simple volume size in MB" option.
- Select the "Assign the following driver letter" option.
- Use the drop-down menu option and select a drive letter – for example, Z, X, or Y.
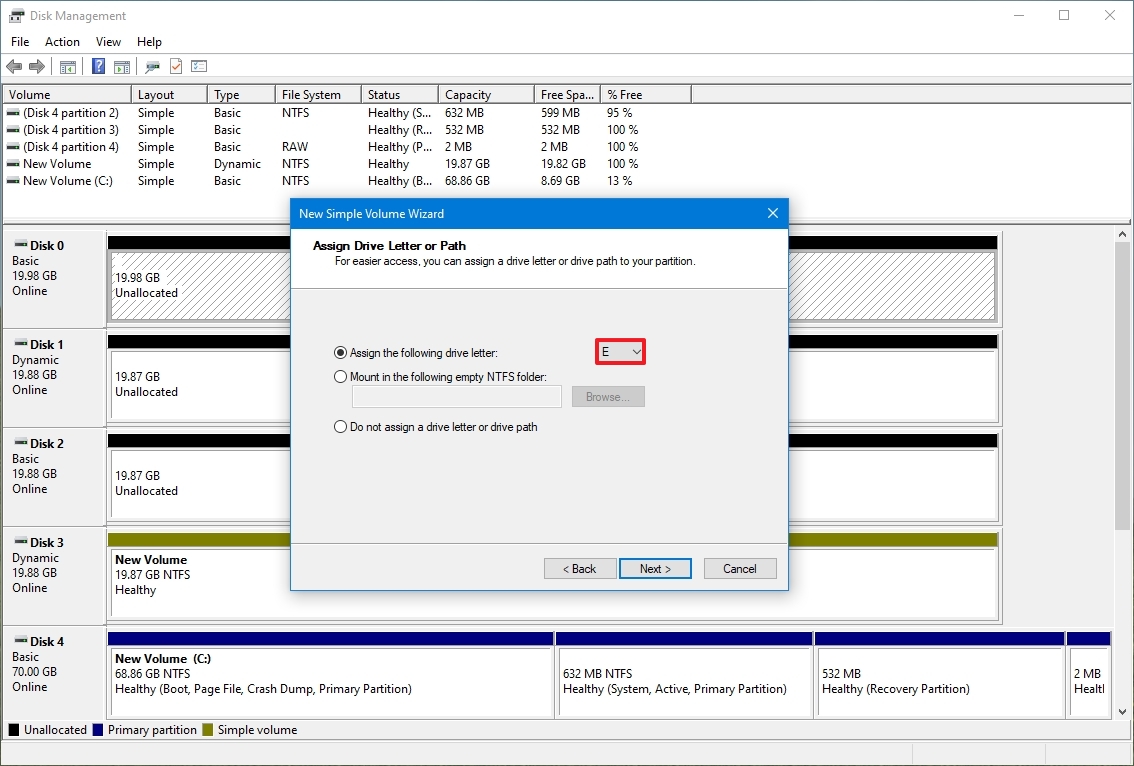
- Click the Next button.
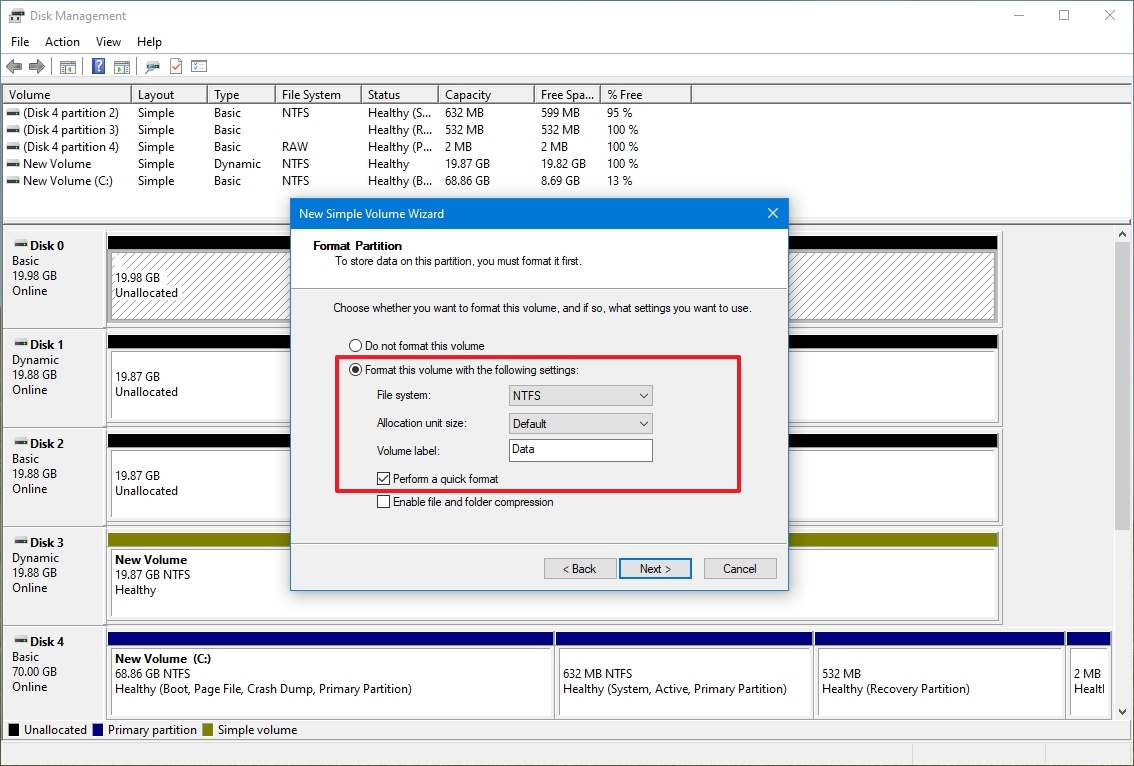
- Select the "Format this volume with the following settings" option.
- Select the NTFS option in the "File system" setting.
- Select the Default option in the "Allocation unit" setting.
- In the "Volume label" field, enter a descriptive name for the drive – for example, "data".
- Check the "Perform a quick format" option.
- Click the Next button.
- Click the Finish button.
Once you complete the steps, the hard drive will be listed on the "This PC" page of File Explorer, and you can start saving files in it.
How to fix missing hard drive in File Explorer updating driver
If the problem is related to the storage driver, you can reinstall or update the driver to the latest version to resolve the issue.
To reinstall the hard drive driver, use these steps:
- Open Start.
- Search for Device Manager and click the top result to open the app.
- Expand the Disk drives branch.
- Right-click the hard drive in question and select the Uninstall device option.
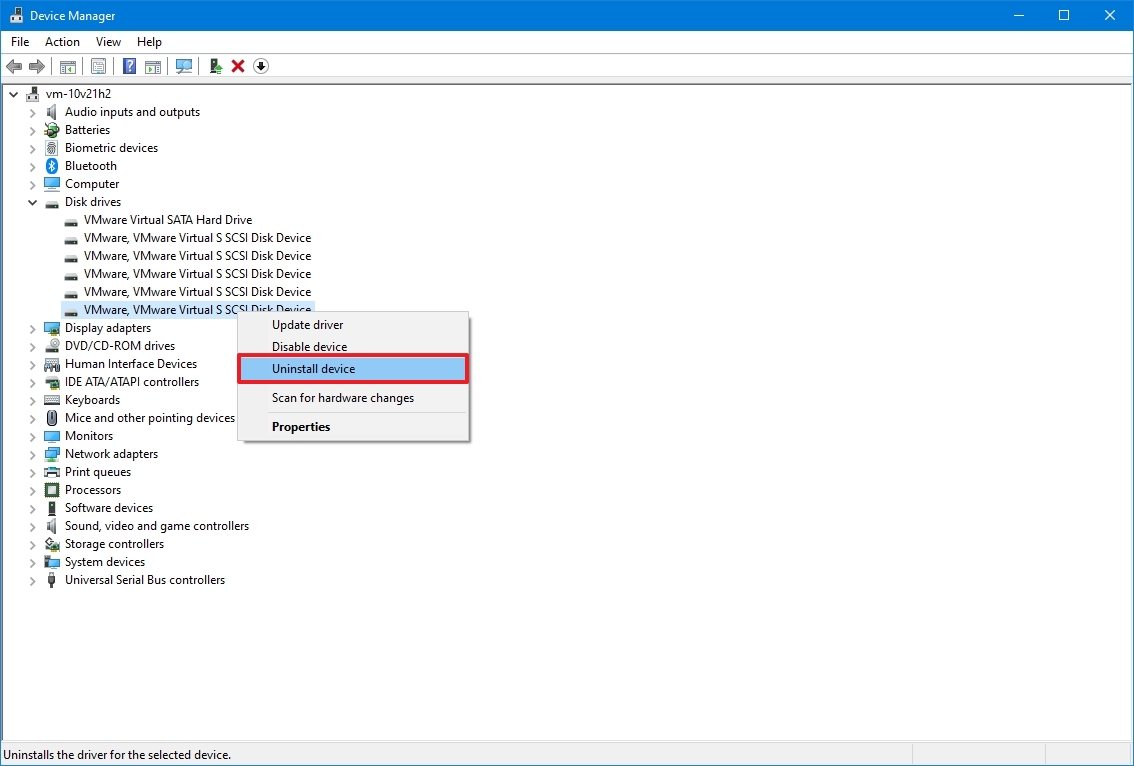
- Click the Uninstall button.
- Restart the computer
Once you complete the steps, Windows 10 should reinstall the driver automatically, and the hard drive should now appear in File Explorer.
Update hard drive driver
If the problem persists, it is recommended to download the latest available driver from the drive manufacturer's support website and use their instructions to update the driver.
If the support website does not offer any instructions, unpack the driver zip folder and then use these steps:
- Open Start.
- Search for Device Manager and click the top result to open the app.
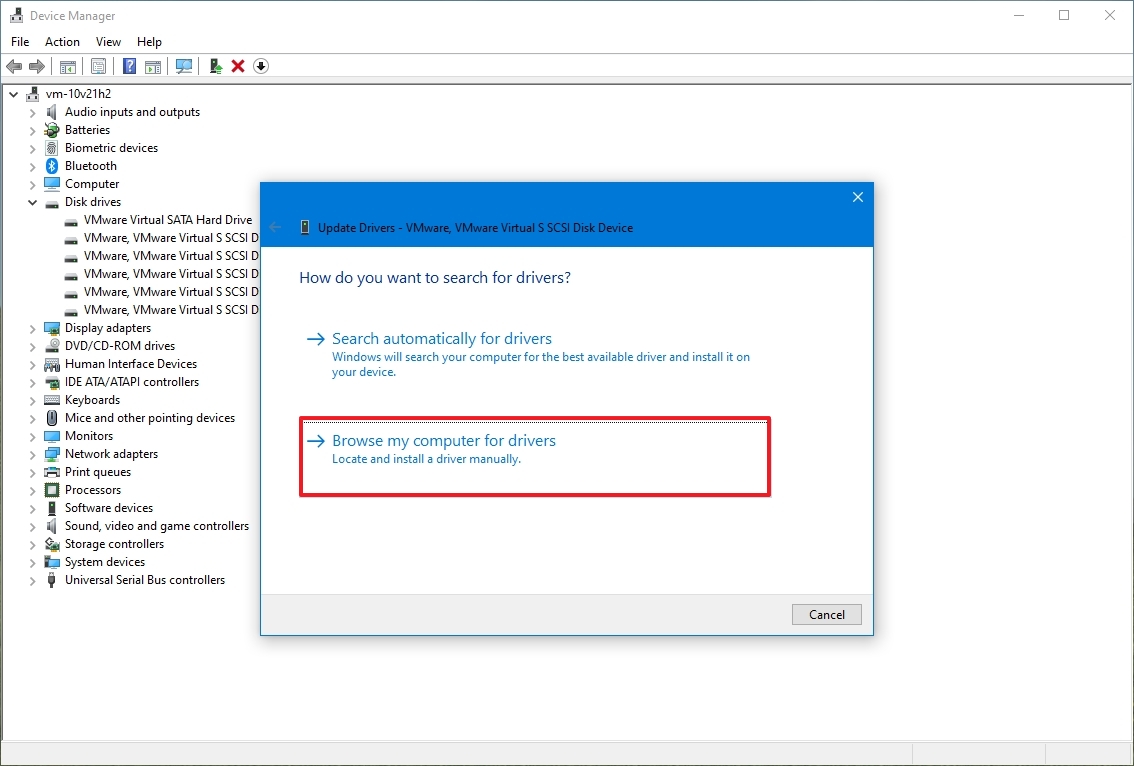
- Expand the Disk drives branch.
- Right-click the hard drive in question and select the Update driver option.

- Select the "Browse my computer for drivers" option.
- Click the Browse button.
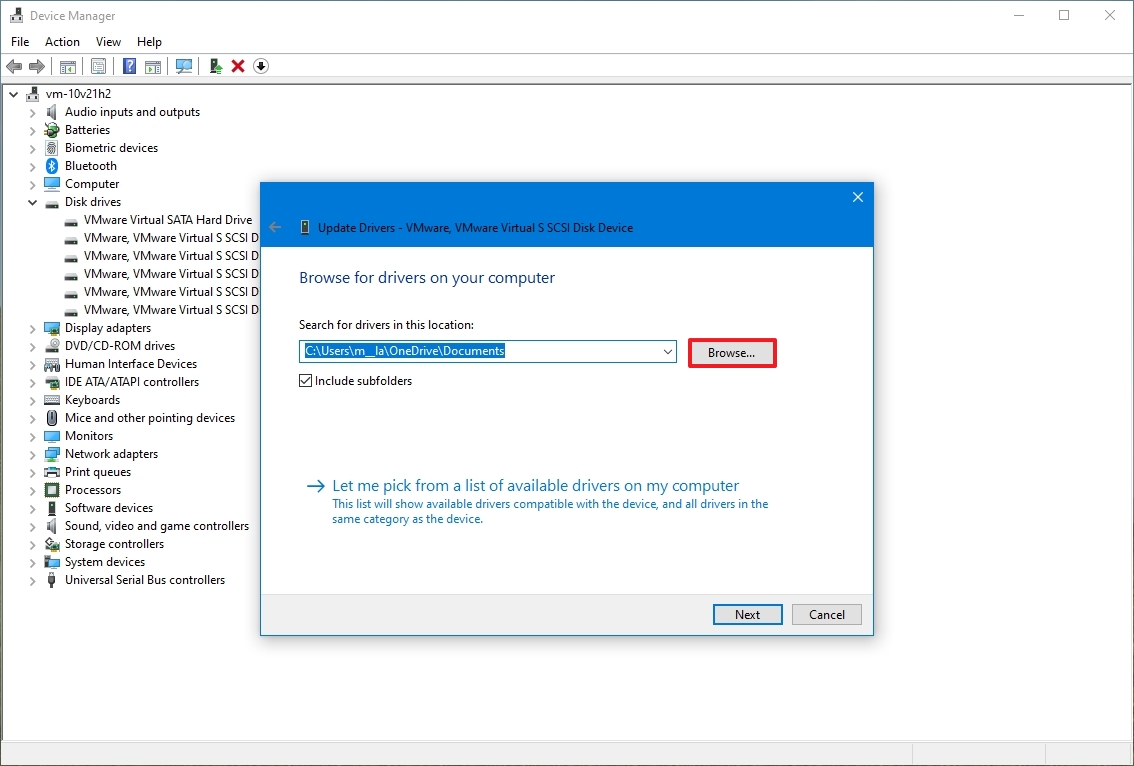
- Select the folder with the extracted driver files.
- Click the OK button.
- Check the Include subfolders option.
- Click the Next button.
- Click the Close button.
After you complete the steps, the driver will install, and the hard drive should be accessible on Windows 10.
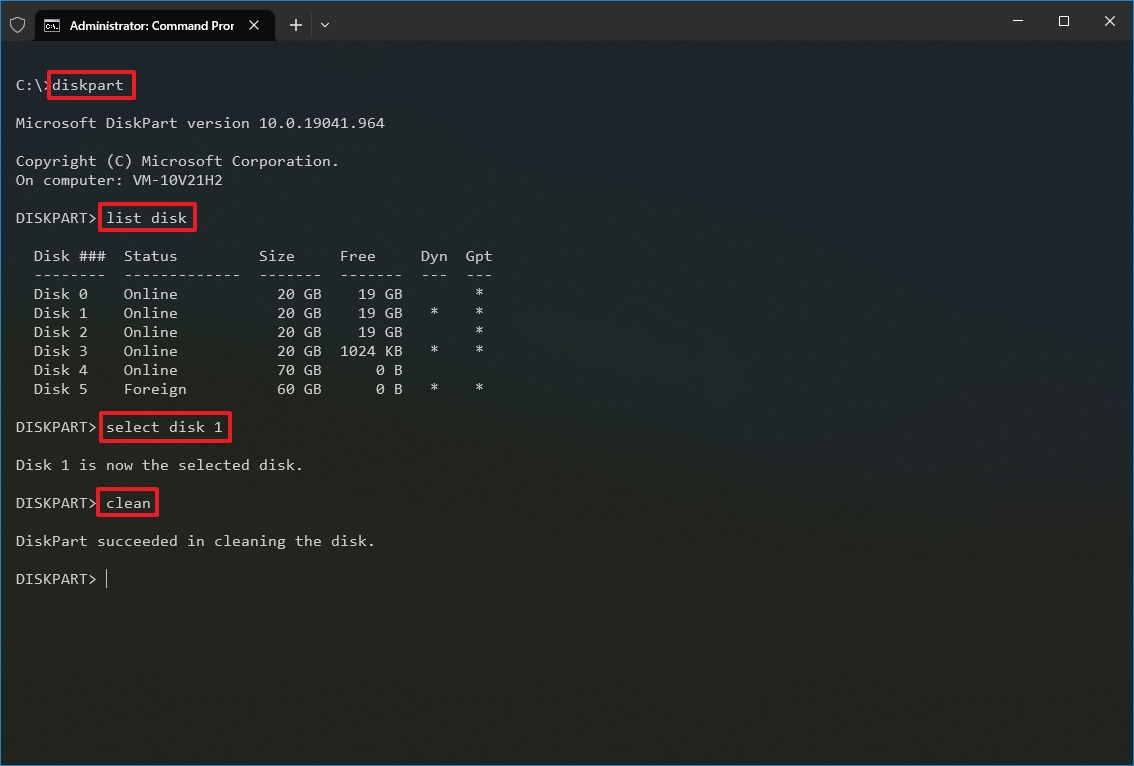
How to fix missing hard drive in File Explorer using DiskPart
Alternatively, if the hard drive appears in Disk Management but the storage is unusable, meaning you cannot access the data and cannot use the format option or assign a drive letter, then it may be a logical problem. If this is the case, you can use DiskPart to clean the drive and start from scratch. Here's how:
- Open Start.
- Search for Command Prompt, right-click the top result, and select the Run as administrator option.
- Type the following command to launch the diskpart tool and press Enter: diskpart
- Type the following command to list the available disks and press Enter: list disk
- Type the following command to select the hard drive not showing up in File Explorer and press Enter: select disk 1
In the command, make sure to select the correct drive. Otherwise, you may end up erasing the data in the wrong storage, which cannot be undone.
- Type the following command to completely erase the drive and press Enter: clean
- Warning: The "clean" command will erase everything, including data, partitions, and the drive will appear blank with the label "Unknown" and not initialized.
- Type the following command to create a partition using the available space and press Enter: create partition primary
- Type the following command to select the newly created partition and press Enter: select partition 1
- Type the following command to set the partition as active and press Enter: active
- Type the following command to format the partition with the NTFS file system and press Enter: format FS=NTFS
- Type the following command to assign a drive letter and press Enter: assign letter=Z
In the command, change "Z" for another drive letter not already in use.
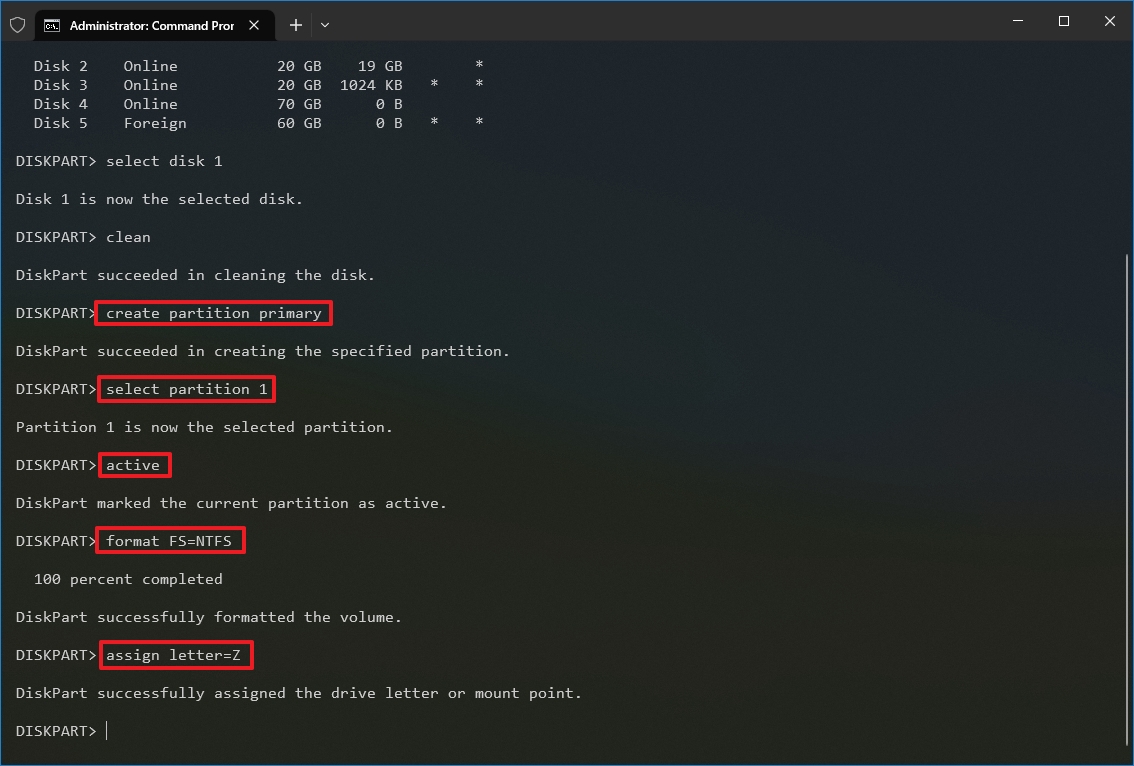
- Type the following command to close diskpart and press Enter: exit
Once you complete the steps, the hard drive will be formatted with a new drive letter, and it should now appear in File Explorer.
More resources
For more helpful articles, coverage, and answers to common questions about Windows 10, visit the following resources: