
If you’re trying to fire up Call of Duty on your PC and getting blocked by a TPM 2.0 error, don’t worry, you’re not the only one. CoD Black Ops 7 and Warzone have tightened their security measures, and one of those requirements is having TPM 2.0 enabled. It’s a small hardware-based security feature that works in the background to protect your system and make it harder for cheaters or malicious software to interfere with the game.
The good news is, turning on TPM 2.0 isn’t nearly as complicated as it sounds. In this guide, we break down what TPM 2.0 does, why Call of Duty insists on having it active, and give you a simple, step-by-step process to enable it. By the end, you’ll be ready to jump back into your matches without any frustrating roadblocks.
Here’s everything you need to know about enabling TPM 2.0 for CoD BO7.
What is TPM 2.0 and why is it important for CoD?

TPM 2.0, short for Trusted Platform Module 2.0, is a small but powerful security chip that’s built into most modern PC motherboards. Think of it as a digital lockbox inside your computer that stores sensitive encryption keys and performs security checks to ensure your system hasn’t been tampered with. This makes it much harder for hackers, cheats, or malicious programs to gain control over your PC.
While TPM 2.0 has been around for years, it became a hot topic when Microsoft made it a mandatory requirement for Windows 11. But it’s not just your operating system that relies on it. Many modern multiplayer games, including Call of Duty: Warzone and Black Ops 7, use anti-cheat systems that depend on TPM 2.0 to verify the integrity of your hardware and prevent unfair play.
If TPM 2.0 isn’t enabled on your system, you’ll likely run into frustrating error messages, failed launches, or outright game lockouts. In short, without it, CoD won’t even start. However, enabling TPM 2.0 is usually quick and straightforward, and once it’s switched on, you’ll be able to enjoy your matches without any interruptions.
How to enable TPM 2.0

Here’s the series of steps you need to follow to enable TPM 2.0 on your Windows PC:
- Restart your PC and boot into the BIOS using the respective hotkey.
- Find the TPM settings in the BIOS. It is usually available under the Security, Advanced, or Trusted Computing tab.
- Intel CPUs: Look for “PTT” (Platform Trust Technology) or “Intel Platform Trust Technology.”
- AMD CPUs: Look for “fTPM,” “AMD PSP fTPM,” or simply “TPM.”
- Flip the setting from Disabled to Enabled.
- Some systems might offer you to choose between Firmware TPM and Discrete TPM. Choose Firmware TPM in such cases.
- Make sure to save your configuration before you exit the BIOS. You can usually do so directly by pressing the F10 key.
- Your computer will restart now, and TPM 2.0 should be active on your PC.
You can also double-check whether TPM 2.0 is activated or not before jumping into the action in Call of Duty.
How to check if TPM 2.0 is enabled
Here’s a step-by-step guide on how to check whether TPM 2.0 is enabled on your PC or not:
- Press the Windows and R keys together to launch the Run dialog box.
- Type tpm.msc and hit Enter to run the command.
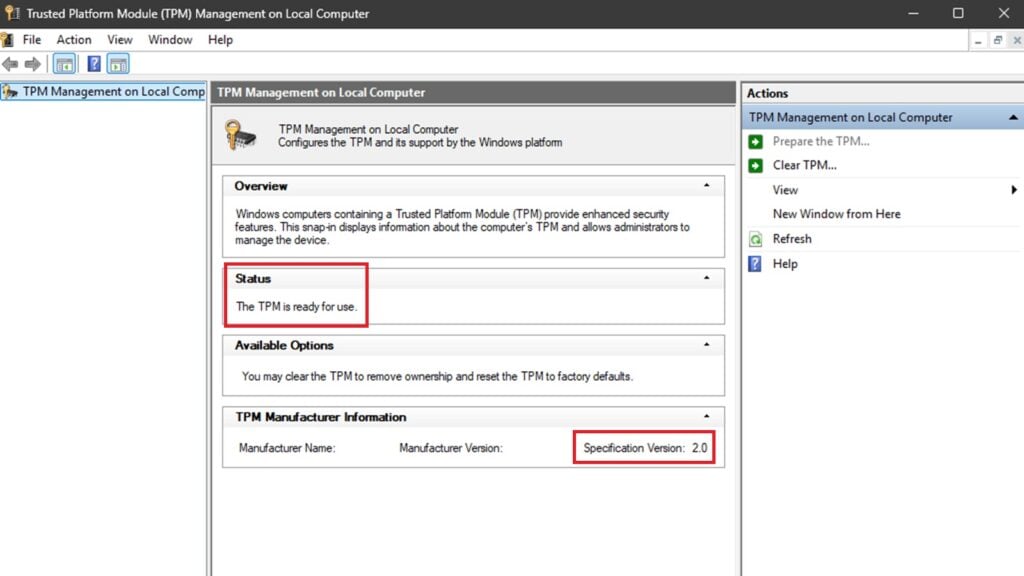
- In the window that pops up, check for these two statements as marked in the image above.
- “Status: The TPM is ready for use.”
- “Specification Version: 2.0”
As long as you can find both these texts, it means that TPM 2.0 is up and running on your PC. You can now launch whichever edition of Call of Duty, including Black Ops 7, you wish to dive into and experience a much better quality of life.
For more on Call of Duty, check out our guides on the best PC graphics settings and controller settings for BO7.

.png?w=600)