Being in possession of a turntable is, it’s safe to say, pretty neat. The world of physical media never really left, but it feels more “back” than ever in 2026 – particularly with an especially loaded Record Store Day dropping on 18 April. Owning a record player is your front door into this world; a world of tactile sound, active listening, and analogue fidelity, a world apart from the lossy audio of lesser streaming platforms.
But if you’re new to the world of turntable ownership, you might not know that you could be missing out on getting the very best from your deck. There are many different things that impact how good your records sound, from the quality of your hi-fi amp to that of your speakers – but before you start spending away on new hi-fi bits and pieces, your first port of call should probably be to make sure your record player is set up and calibrated correctly.
Maybe you’ve bought your first turntable, or invested in a vintage one. Maybe you’re installing a new cartridge on your existing turntable, and need to set everything back up again.
Whatever the reason – and even if there’s no reason – you should know how to calibrate your turntable.
Why calibrate your turntable at all?
Turntables are not altogether complicated in design, construction or operation, but their performance is heavily impacted by a number of complicated-seeming variables. If your stylus isn’t where it should be when you play a record, it could be wearing one side of the record’s groove out; if your tonearm’s weighing heavy on your vinyl, you could be damaging both record and stylus. Phasing, crosstalk, distortion, bounce-outs – these problems and more are all mitigated by calibrating your turntable, the results of which are like night and day.
Here, a small caveat: you might not have a turntable that needs much, if any, calibration. Newer, quality budget turntables are increasingly designed with out-of-the-box functionality firmly in mind; for instance, if you’re a proud owner of something like Audio-Technica’s LP70XBT automatic turntable, you’ll find it pre-calibrated in all the ways that count. But in most cases, when you’re working with a turntable above the entry level, there’ll be some key adjustments you can make for the betterment of your records, your equipment and your ears.
What do you need?
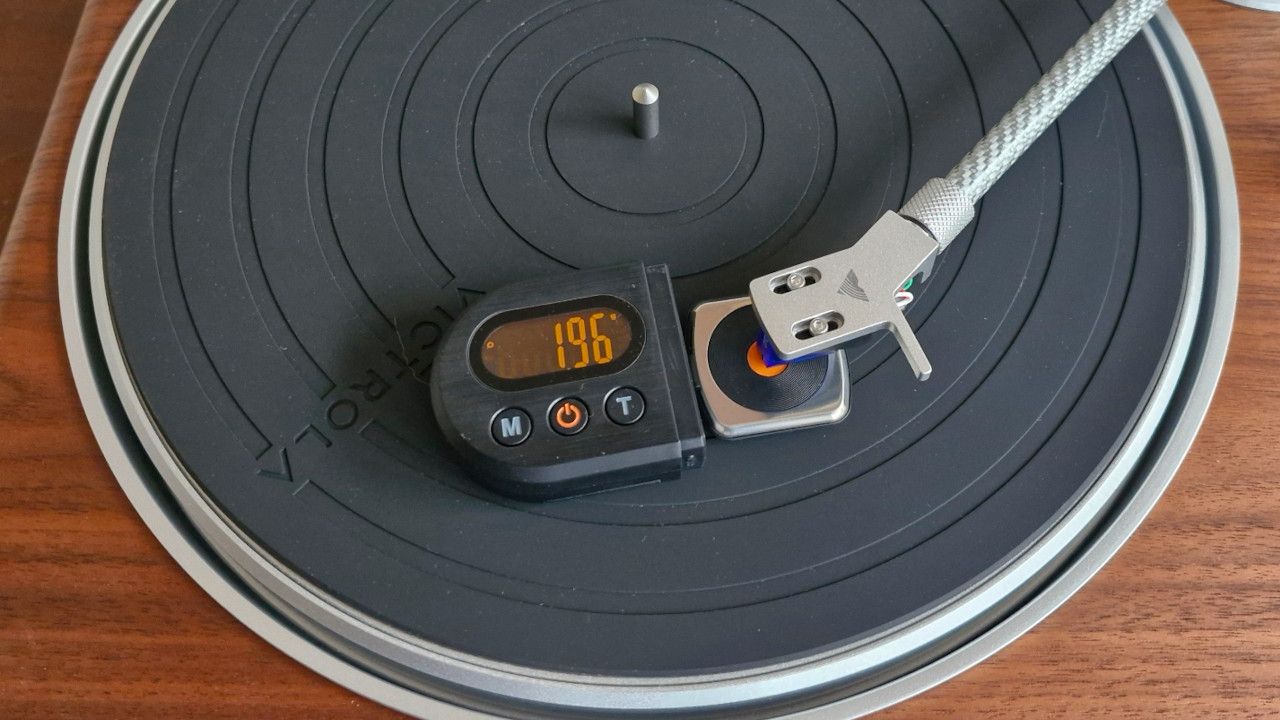
First, you’ll need something called a tracking force gauge, for measuring the weight of your stylus as it applies to the records you play. Any digital scale with a precision of 0.01g will do here, but you can find quite a few scales online that are specifically designed for this task.
The next thing you’ll need is something called a cartridge alignment protractor. This is a measuring tool which sits on your turntable’s platter, anchored by the spindle, and which allows you to perform most of your cartridge alignment steps. There are a few different types you can get, and some you can print off yourself, which can use any of three different alignment standards (more on which later).
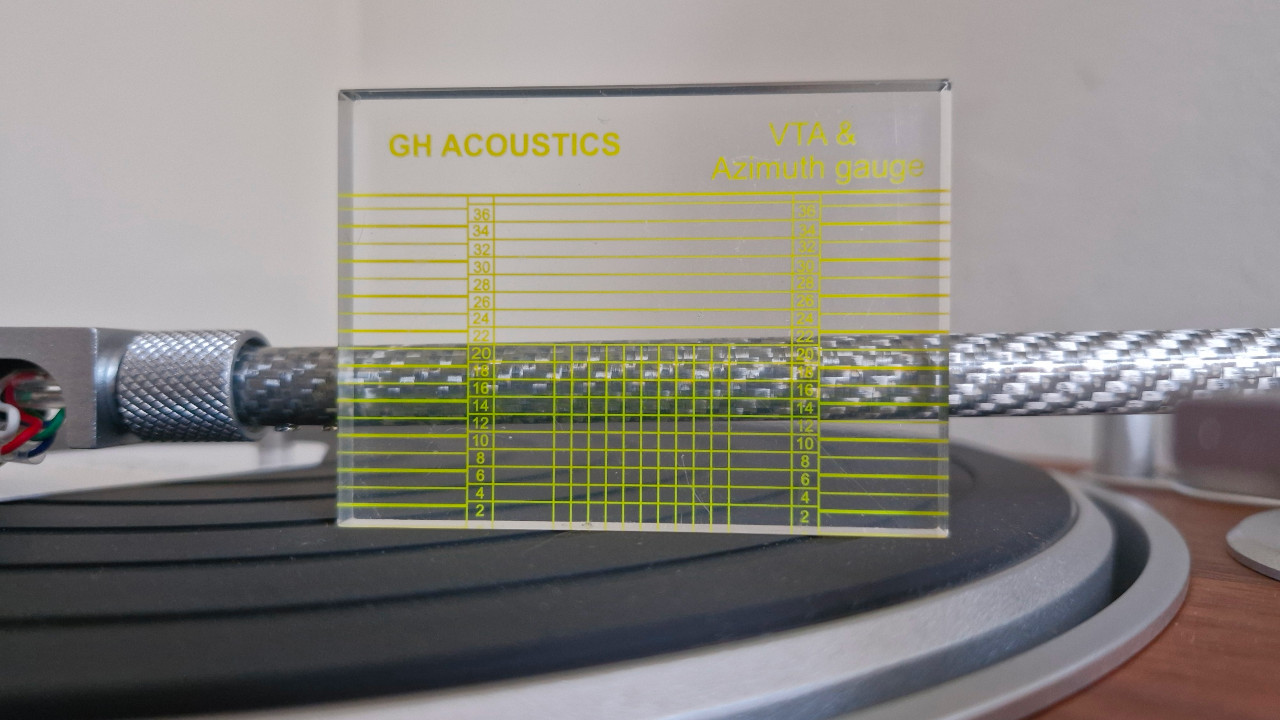
Finally, you may want to pick up something called an azimuth ruler. This is typically a clear plastic or glass block which sits vertically on your platter, designed to butt up against the front of your cartridge and the side of your tonearm, so as to quickly measure and adjust azimuth and VTA respectively. These aren’t hugely necessary, but they are decent for getting quick results!
Step 1: Set your tracking force
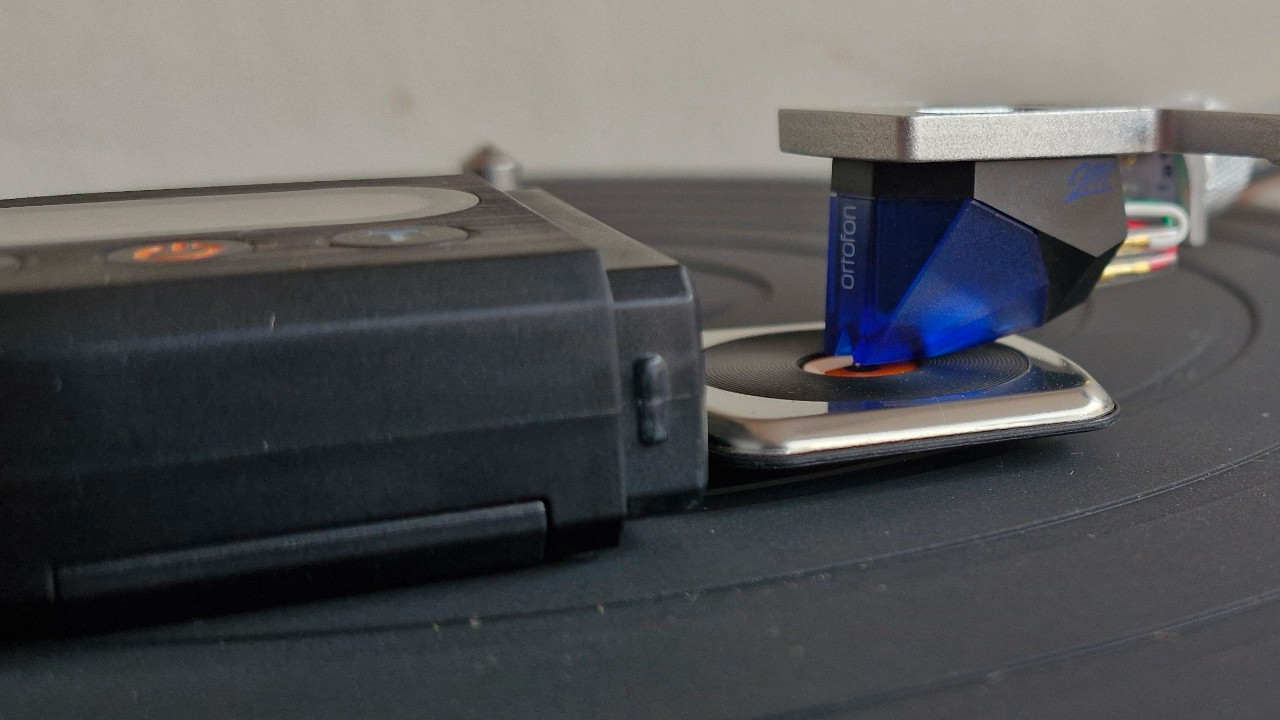
The tracking force is calibrated by adjusting the counterweight to the rear of your tonearm. Too light and your stylus is more likely to bounce out and skate around your record, risking damage to the wax. Too heavy and your needle will actively abrade the interior surfaces of your groove, ruining your records and eventually ruining itself.
The ideal tracking force is defined by the cartridge you’re using. For instance, the ideal tracking force for an Audio-Technica VM-95E cart is between 1.8 and 2.2mm; as such, you’d be aiming for 2mm tracking force. Set your counterweight such that your tonearm is balancing on its pivot – and if it has a numbered indicator ring, set that to 0.
Now, place your tracking force gauge on the platter (ensuring it’s calibrated and properly zeroed), move your counterweight in a little, and set your stylus down on the gauge. Keep reseating the counterweight until you get the desired weight, and with that your tracking force will be set.
Step 2: Align your cartridge
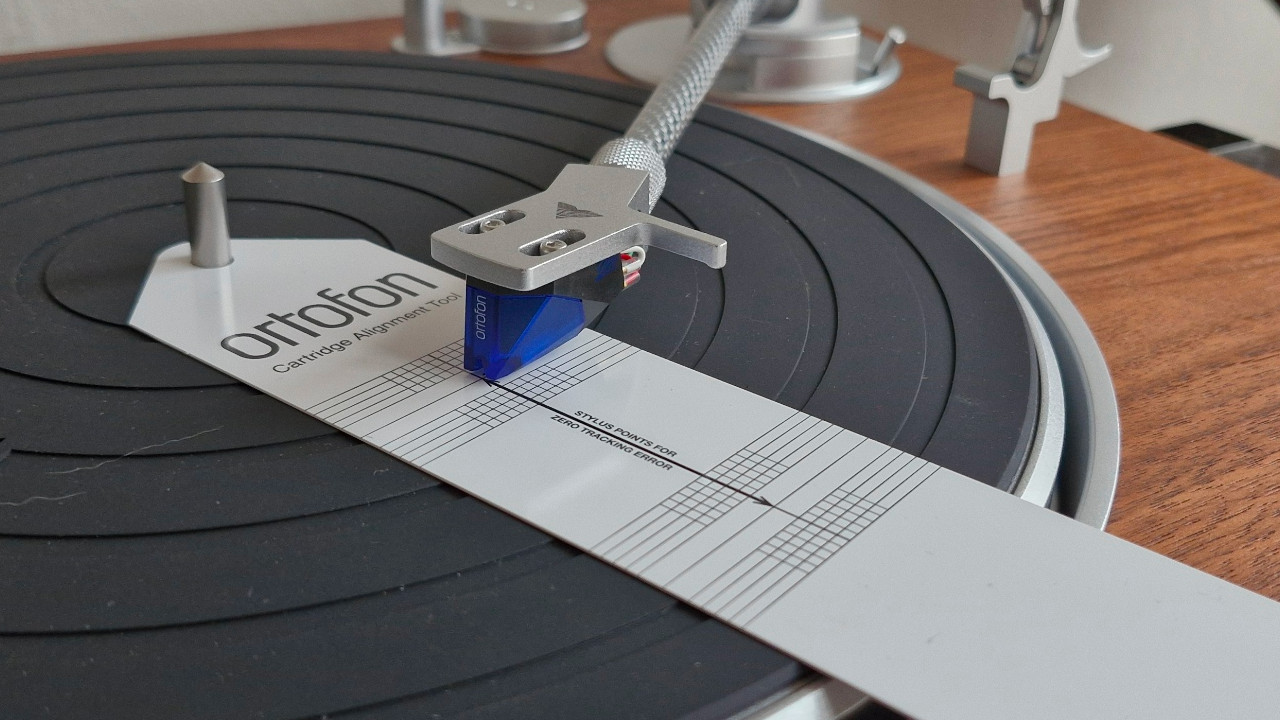
To cut a long story short, your stylus’ relationship to the record groove changes as it sweeps into the centre. The more it changes, the more the sound of your records can be impacted, typically by distortion and harsh sibilance.
The ideal relationship between your stylus and groove is tangential – that is, that your stylus is neither digging inwards nor facing outwards. But with pivoting tonearms, this can only happen at two points on a given record. As such, you’re aligning your cartridge to get the best possible results, using these two ‘null points’ as a guide.
The position of these null points, and hence the sound of your record as a whole, is dependent on two things: stylus overhang, and alignment angle (or zenith angle). Your alignment protractor is your template for setting these, and will be itself calibrated to one of three standards: Baerwald, Stevenson and Lofgren B (though Technics turntables have their own calibration standard altogether). For most, the Baerwald standard is the happiest medium – and the standard used on most basic alignment protractors.
Place your protractor on the platter, loosen the screws holding your cartridge in place a little, and then pull your tonearm over to the first null point on the protractor. You want to line the stylus up with the dot at the centre, and then twist the cartridge so that the cantilever is parallel with the lines. Lightly tighten it into place, then move the stylus over the second null point towards the centre – and repeat the same steps. Go back and forth until you’ve found a happy medium between the two, and Bob’s your uncle!
Step 3: Set your cartridge azimuth
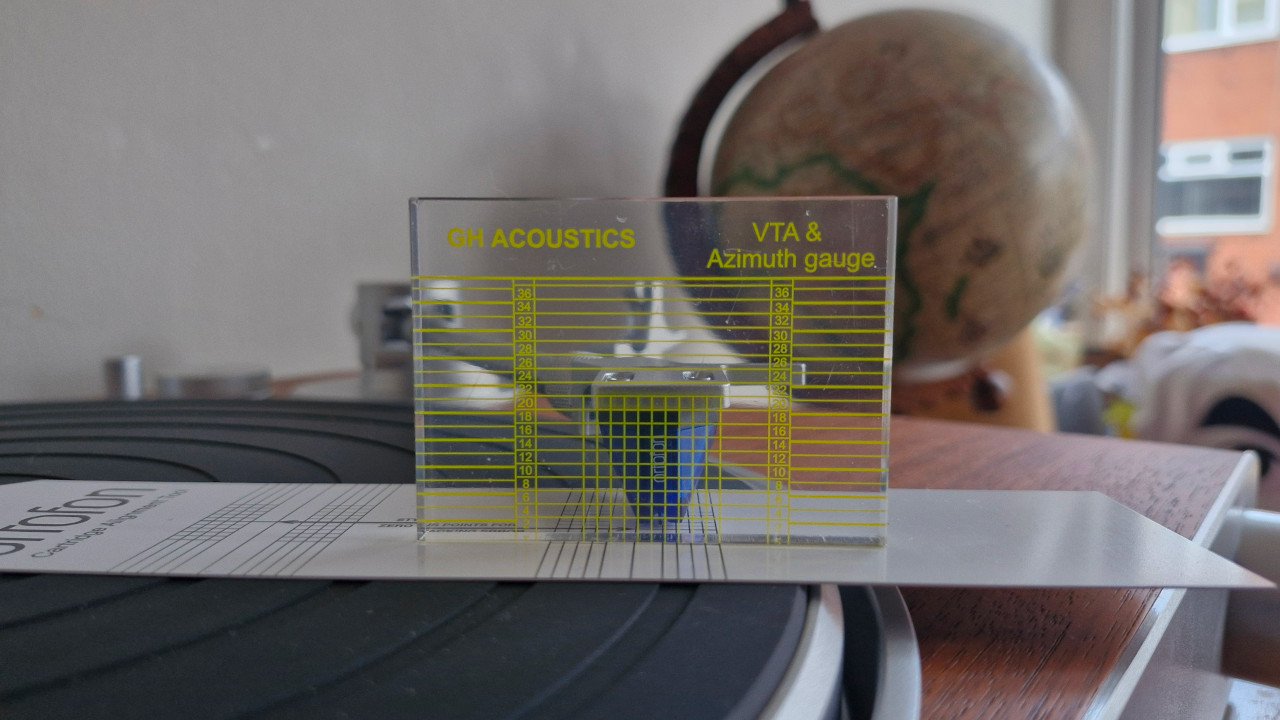
Your cartridge’s azimuth is how it sits horizontally, when you face it end-on. Adjusting the azimuth adjusts how the stylus sits in the groove; you want the stylus to be vertical, and hence reading the left and right channels of encoded audio somewhat equally. If it isn’t vertical, you’ll get more crosstalk and a less focused stereo image in your speakers. For most systems, you won’t need to do much here; but for peace of mind, you can use an azimuth ruler to reference and adjust your cartridge against.
Butt your ruler up to the end of the cartridge, and see if the cart lines up with the markings; if it doesn’t, shim one of the screws holding the cartridge to its headshell to tilt it slightly. This isn’t the most accurate method, though, as most styli aren’t perfectly perpendicular to their respective cartridge body. Theoretically, then, you’d get better results from placing the stylus down on a small mirror to establish its perpendicularity.
If you’re seriously serious about your hi-fi – or if you’ve invested in a high-quality line-contact stylus – you’ll want to measure the level of crosstalk in your turntable’s outputs with an oscilloscope or digital multimeter, and make more informed adjustments accordingly – generally, you’re aiming for as close to complete channel separation as you can manage.
Step 4: Set your Vertical Tracking Angle (VTA)
The vertical tracking angle (VTA) is the angle made between your record and the cantilever that holds your stylus, adjusted by lifting or lowering the tonearm at its base. Some record-playing fossils would have you believe that setting it correctly is a matter of life and death. Luckily, it isn’t!
Each record has its own ‘ideal’ VTA relating to the way its master disc was cut – besides which, there are a great many variables, from the subtle warp of some records to the thickness of the vinyl itself. To maintain the ideal VTA, you’d be adjusting your tonearm height practically every time you changed the record – which some people do! Still, each to their own.
For most cases, you can safely set your tonearm to be pretty-much parallel with your record, in order to achieve an acceptable VTA; your azimuth ruler will also have long horizontal lines for checking VTA against, so use these to reference and set your tonearm angle.
I take a somewhat cavalier approach to VTA, as you may have surmised – but there are times it really does matter. Again, if you’ve invested in a line-contact stylus, you need to think a bit more carefully about VTA and its corresponding SRA (stylus rake angle), in order to ensure you’re getting the precision your stylus is capable of.
Step 5: Do it all again
Just kidding. Well, half-kidding. Every change you make will have knock-on impacts on other aspects of your calibration, most obviously with setting your stylus overhang and setting your tracking force. Thankfully, you won’t need to make any major moves – all you’re doing is making sure that everything’s still where you left it, and adjusting accordingly.
Step 6: Set your anti-skate
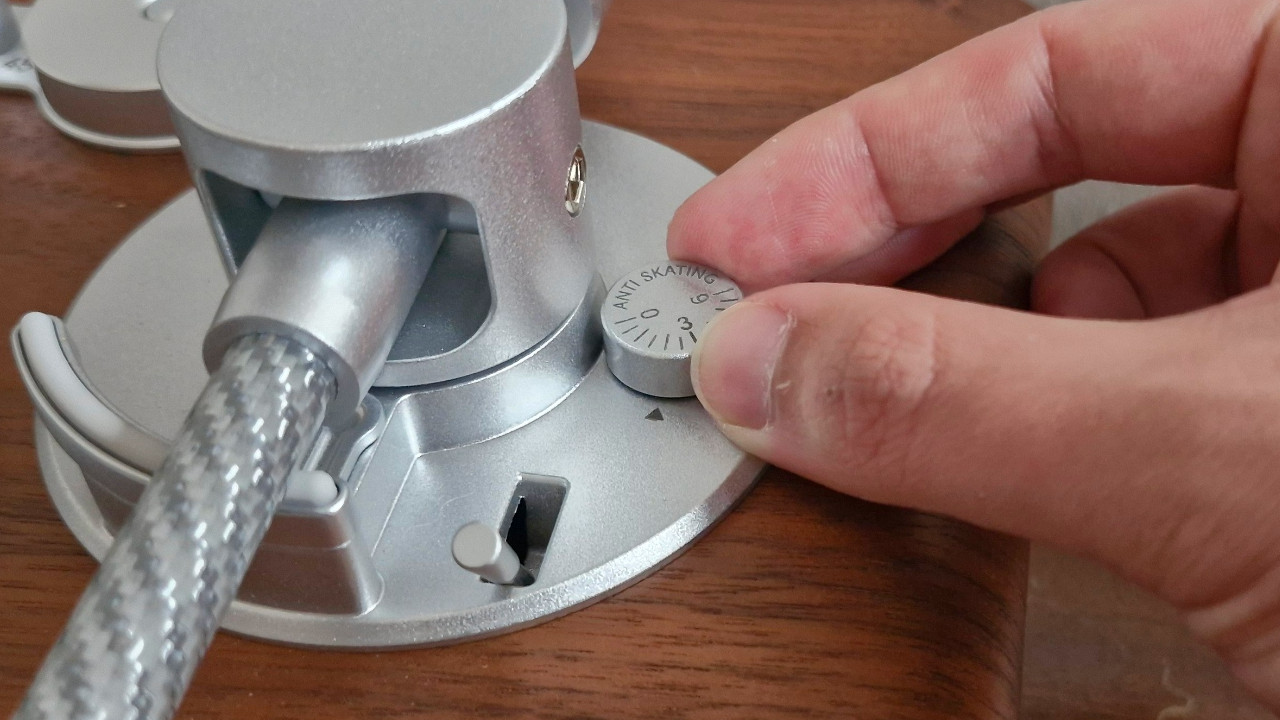
The final piece of the puzzle is your record player’s anti-skate – the outward-pushing mechanism that counters your tonearm’s inertiatic desire to yeet itself towards the spindle during play. Most turntables have a dial for setting this, but some Pro-Ject turntables use a wire-suspended weight with a notched post for changing its leverage.
Many guides will tell you to set your anti-skate one-to-one with your cartridge’s recommended tracking force – and many seasoned audiophiles will tell you that 10% of your cartridge’s tracking force is closer to the money. The real answer is somewhere between these extremes, and a good rule of thumb would be: the costlier your cartridge, the less anti-skate you’re likely to need.
Hey, you did it! It’s a bit of work getting a turntable fully calibrated, but that bit of work is hugely worth it – whether improving the sound from your hi-fi, or simply protecting your records for the long term. The next record you play will be a reward in and of itself, for the sheer difference you’ll hear in your system.
Key terms
Unsure about some of the terminology I've used in this guide? Here's a brief explanation of the key terms:
Alignment Protractor
A measurement scale placed on a record player’s platter, which enables cartridge alignment.
Anti-skate
A mechanism on turntables that counteracts the centrifugal force experienced by the tonearm, keeping the stylus from pressing against one side of the groove.
Azimuth
The ‘tilt’ of the cartridge, as you look at it head-on; this describes the verticality of the stylus as it sits in the groove, with respect to the groove walls.
Bounce-out
When a large bump or ridge in a record’s groove, or warping of the record itself, causes a record player’s stylus to physically bounce out of the groove.
Cartridge
The assembly at the end of the tonearm, which houses the stylus, the cantilever on which it is mounted, and the pickup that converts the stylus’ movements into electrical signals.
Cartridge Alignment
The tangential alignment of the cartridge with the groove, at two pre-determined ‘null points’ on a record; this is done with an alignment protractor, by loosening the cartridge’s attachment screws and ‘twisting’ it in its headshell.
Counterweight
The weight at the rear of the tonearm, on the other side of its pivot point
Cross-talk
The extent to which one channel of stereo audio can be heard in the other. In ideal circumstances, left and right audio signals are completely separate from one another; where a stylus’ azimuth is not set perfectly, information from one side of the groove can appear in the signal of the other side.
Distortion
The alteration of an audio signal, by way of clipping or saturation.
Headshell
The bracket onto which the cartridge is affixed, and which itself affixes to the end of the tonearm. Most turntables have a ½” headshell; some budget turntables have no headshell, favouring an integrated tonearm and cartridge assembly.
Platter
The rotating plate on which a vinyl record is placed, on a record player.
Spindle
The vertical spoke at the centre of a record player’s platter, which receives the hole at the centre of a given vinyl record.
SRA
Stands for Stylus Rake Angle, referring to the verticality of the stylus as it sits in the groove, with respect to the direction the groove travels.
Stylus
The needle at the end of the cartridge, which ‘feels’ bumps and ridges in a record’s groove and translates them to kinetic energy, later translated to electrical signals by the cartridge.
Tonearm
A pivoting arm that holds the cartridge and its stylus, enabling the stylus to travel inwards as a record progresses.
Tracking force
The weight applied by the stylus to the record’s surface; this is adjustable using a tonearm’s counterweight, and needs to be adjusted to the ideal tracking force for the cartridge.
VTA
Stands for Vertical Tracking Angle, referring to the angle at which the tonearm dips relative to horizontal.
Read more:
- Does vinyl really sound better than other formats?
- CD vs vinyl: Which sounds better and why it matters
- Cool vinyl record storage ideas
- How to store vinyl: Tips on keeping your collection in great condition
- Direct-drive vs belt-drive turntables: What's the difference?
- Best vinyl record cleaners: Keep your vinyl collection in prime condition