
Air quality is a big concern. We take the air that we breathe for granted, and sometimes that air is full of pollution. Forest fires in Canada and hill fires in the United Kingdom are all recent examples of fire polluting our air, so how can we check that it is safe to go out?
In this how to we’ll build a project that uses air quality data from the OpenWeather API to give us an indication of air quality before we leave home. The data is visualized using a Raspberry Pi Pico W, a $6 microcontroller that can go online, get the data and then display the data using a strip of NeoPixel RGB LEDs.
Building the Circuit
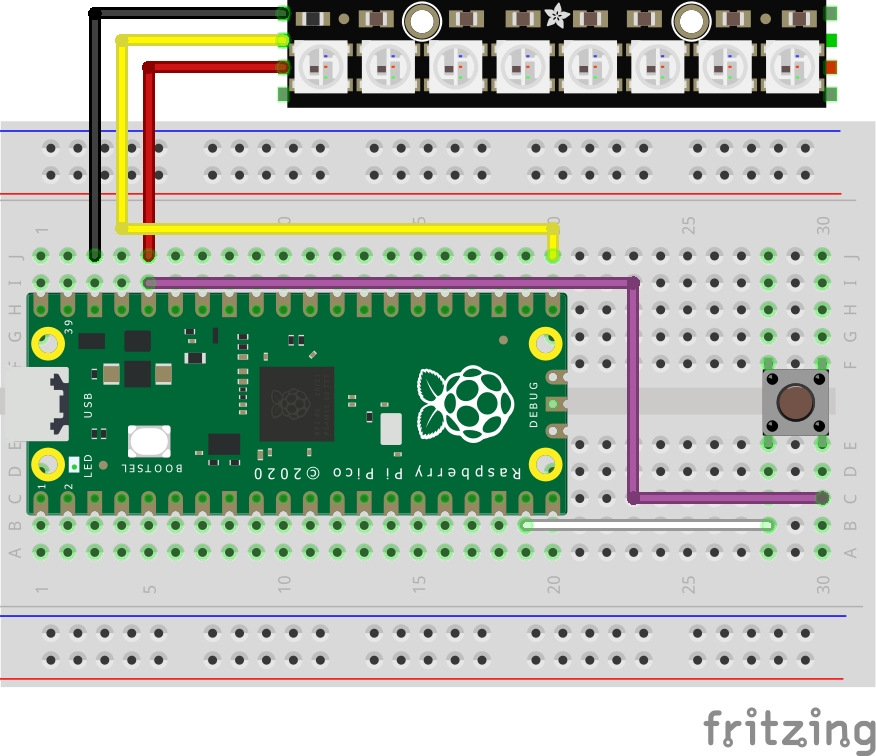
The circuit is made up of two sections. The input and the output. The input is a simple push button connected to GPIO14 and to the 3V3 pin of the Pico W. The normal state of GPIO14 is pulled down to Ground, essentially 0V. When we press the button we connect the 3V3 pin to GPIO14, causing it to pull the pin high (to 3.3V). This change of state is what our code looks for. The output is a NeoPixel strip connected to 3V3, GND and GPIO16. GPIO16 is used to send data to the NeoPixels, changing their color as required.
The GPIO pins on the Raspberry Pi Pico W and the NeoPixel stick will need to be soldered and using one of the best soldering irons or soldering stations will make the job a breeze.
For This Project You Will Need
Writing the Code
The code for this project is broken down into what is necessary to make a connection to the Internet and download data from an API, code to wait for user input, and finally code to interpret the data via RGB LEDs.
1. Follow these steps to download the latest version of MicroPython for the Raspberry Pi Pico W. The most important steps are to download and install the UF2 firmware image and to set up Thonny. The rest are optional.
2. Open Thonny and click on the Stop button to refresh the connection. This ensures that the Python Shell is open and working correctly.
3. Create a new file and paste the contents of this link. Save the file as neopixel.py to the root of the Raspberry Pi Pico W.
4. Create a new file for the project code.
5. Import a series of modules essential to the project. Network enables the Pico W to connect to Wi-Fi, time is used to control the timings of the project code, urequests is used to fetch data from the API. Machine contains “Pin” which is used to get and set the status of a GPIO pin, NeoPixel enables control of a NeoPixel RGB LED strip.
import network
import time
import urequests
from machine import Pin
from neopixel import Neopixel
6. Create an object, button, and create a connection to GPIO14, and using the internal resistor for that pin, pull the pin down (to GND).
button = Pin(14, Pin.IN, Pin.PULL_DOWN)7. Create an object, pixels, which makes a connection between the code and the eight NeoPixels connected to GPIO16. Note that the pixels are in GRB (Green, Red, Blue) order for our module. If yours differ change this to RGB.
pixels = Neopixel(8, 0, 16, "GRB")8. Create an object, wlan, and use it to make a connection to your Wi-Fi access point. Change SSID and PASSWORD to match your AP. Add a short pause to allow the connection to be made and stable.
wlan = network.WLAN(network.STA_IF)
wlan.active(True)
wlan.connect("SSID", "PASSWORD")
time.sleep(5)
9. Print the connection status to the Python shell.
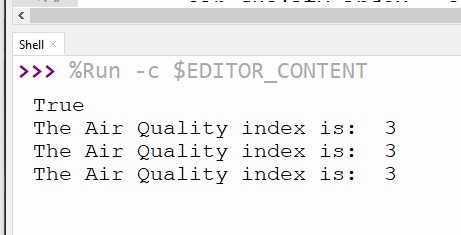
print(wlan.isconnected())10. Using a conditional statement, set the NeoPixels to blink green 10 times to signify that the connection has been successful.
if wlan.isconnected() == True:
   for i in range(10):
       pixels.fill((0, 64, 0))
       pixels.show()
       time.sleep(0.1)
       pixels.fill((0, 0, 0))
       pixels.show()
       time.sleep(0.1)
11. If unsuccessful, use a for loop to blink the NeoPixels red 10 times.
else:
       for i in range(10):
           pixels.fill((64, 0, 0))
           pixels.show()
           time.sleep(0.1)
           pixels.fill((0, 0 , 0))
           pixels.show()
           time.sleep(0.1)
12. Create an infinite loop, and check the status of the button. If unpressed, the code will stop here. Once pressed, the indented will run.
while True:
   if button.value():
13. Create an object, aq, and store the latest air quality data. Pressing the button triggers the code to download the latest air pollution data from OpenWeather using a free API key. Note that you will have to sign up for a free account, then click on your username and select My API Keys. Generate a new API key called AirPollution. Copy the API key and replace it in the URL below. Also change the lat (latitude) and lon (longitude) to match your location. This can be found via Google Maps, ours is set to New York City.
aq = urequests.get("http://api.openweathermap.org/data/2.5/air_pollution/forecast?lat=40.714272&lon=-74.005966&appid=YOUR API KEY HERE").json()14. From the returned data, slice out the Air Quality Index and save it to the object, air_quality_index. The returned data is in JSON format, which is almost identical to Python’s dictionary data storage objects. This means we can read the exact data using a specific sequence of keys. These are documented in the OpenWeather API reference.
air_quality_index = aq['list'][0]['main']['aqi']15. Print the air quality index value to the Python shell as a sentence. This is for debug purposes. The value can be between 1 and 5. Where 1 = Good, 2 = Fair, 3 = Moderate, 4 = Poor, 5 = Very Poor.
print("The Air Quality index is: ",str(air_quality_index))16. If the air quality is 1, Good. Set the LEDs to flash green 10 times with a half second delay.
       if air_quality_index == 1:
           for i in range(10):
               pixels.fill((0, 64, 0))
               pixels.show()
               time.sleep(0.5)
               pixels.fill((0, 0, 0))
               pixels.show()
               time.sleep(0.5)
17. If the air quality is 2, Fair. Set the LEDs to flash blue 10 times with a half second delay.
       elif air_quality_index == 2:
           for i in range(10):
               pixels.fill((51,255,255))
               pixels.show()
               time.sleep(0.5)
               pixels.fill((0, 0, 0))
               pixels.show()
               time.sleep(0.5)
18. If the air quality is 3, Moderate. Set the LEDs to flash purple 10 times with a half second delay.
       elif air_quality_index == 3:
           for i in range(10):
               pixels.fill((153, 51, 255))
               pixels.show()
               time.sleep(0.5)
               pixels.fill((0, 0, 0))
               pixels.show()
               time.sleep(0.5)
19. If the air quality is 4, Poor. Set the LEDs to flash orange 10 times with a half second delay.
       elif air_quality_index == 4:
           for i in range(10):
               pixels.fill((255,153,51))
               pixels.show()
               time.sleep(0.5)
               pixels.fill((0, 0, 0))
               pixels.show()
               time.sleep(0.5)
20. If the air quality is 5, Very Poor. Set the LEDs to flash red 10 times with a half second delay.
       elif air_quality_index == 5:
           for i in range(10):
               pixels.fill((255, 0, 0))
               pixels.show()
               time.sleep(0.5)
               pixels.fill((0, 0, 0))
               pixels.show()
               time.sleep(0.5)
21. Finally set the else condition, activated if there is no returned air quality data, to pass, enabling the loop to go back and wait for user input.
       else:
           pass
22. Save the code as main.py to the Raspberry Pi Pico W. In MicroPython, the main.py file is run each time the Pico boots.
23. Click on Run to start the code. The NeoPixels should flash green to confirm a Wi-Fi connection. If not, then check your SSID and password are correct.
24. Press the button to trigger the Pico W to go online and download the latest air pollution data. The NeoPixels will show the data via the five colors and the Python shell will show the exact air quality value.
Complete Code Listing
import network
import time
import urequests
from machine import Pin
from neopixel import Neopixel

button = Pin(14, Pin.IN, Pin.PULL_DOWN)
pixels = Neopixel(8, 0, 16, "GRB")

wlan = network.WLAN(network.STA_IF)
wlan.active(True)
wlan.connect("SSID", "PASSWORD")
time.sleep(5)
print(wlan.isconnected())
if wlan.isconnected() == True:
    for i in range(10):
        pixels.fill((0, 64, 0))
        pixels.show()
        time.sleep(0.1)
        pixels.fill((0, 0, 0))
        pixels.show()
        time.sleep(0.1)
else:
        for i in range(10):
            pixels.fill((64, 0, 0))
            pixels.show()
            time.sleep(0.1)
            pixels.fill((0, 0 , 0))
            pixels.show()
            time.sleep(0.1)
while True:
    if button.value():
        aq = urequests.get("http://api.openweathermap.org/data/2.5/air_pollution/forecast?lat=40.714272&lon=-74.005966&appid=YOUR API KEY HERE").json()
        air_quality_index = aq['list'][0]['main']['aqi']
        print("The Air Quality index is: ",str(air_quality_index))
        if air_quality_index == 1:
            for i in range(10):
                pixels.fill((0, 64, 0))
                pixels.show()
                time.sleep(0.5)
                pixels.fill((0, 0, 0))
                pixels.show()
                time.sleep(0.5)
        elif air_quality_index == 2:
            for i in range(10):
                pixels.fill((51,255,255))
                pixels.show()
                time.sleep(0.5)
                pixels.fill((0, 0, 0))
                pixels.show()
                time.sleep(0.5)
        elif air_quality_index == 3:
            for i in range(10):
                pixels.fill((153, 51, 255))
                pixels.show()
                time.sleep(0.5)
                pixels.fill((0, 0, 0))
                pixels.show()
                time.sleep(0.5)
        elif air_quality_index == 4:
            for i in range(10):
                pixels.fill((255,153,51))
                pixels.show()
                time.sleep(0.5)
                pixels.fill((0, 0, 0))
                pixels.show()
                time.sleep(0.5)
        elif air_quality_index == 5:
            for i in range(10):
                pixels.fill((255, 0, 0))
                pixels.show()
                time.sleep(0.5)
                pixels.fill((0, 0, 0))
                pixels.show()
                time.sleep(0.5)
        else:
            pass