Vintage wooden chests are beautiful objects, particularly if they’re stamped with attractive marks. Find them at flea markets, eBay or thrift stores. For the seat, hardwearing cottons work well: try John Lewis’s new Puritan check in Quince or Räsymatto (660) by Marimekko from skandium.com. To make the lid, cut a piece of plywood the same size as the box (most DIY stores will do this for you), and sand the edges. Cut a piece of foam to size, followed by a length of wadding, and finally your chosen fabric. Lay the fabric face down on the floor, centre the wadding and the foam on top and cover with your plywood lid, pulling the wadding and the fabric tightly over the edges and secure on all sides with a staple gun. Cut off any excess fabric. Finally, screw castors (try castors-online.co.uk) to each corner of the base of the chest. Photograph: Johnny Miller
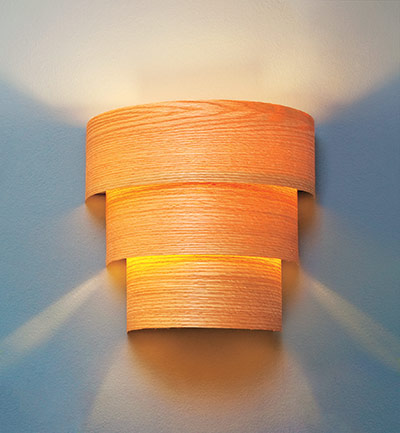
First, make a base: line up three pieces of 4x1 timber, measuring 30cm/25cm/20cm each, on a flat work surface, making sure the centres are aligned. Make a crossbar by screwing a fourth piece of 4x1, measuring 25cm, down the centre. Drill a 0.635cm hole through the base, about one-third up the cross bar. Screw a light socket to the front and pull the wires to the back through the hole. Next, attach a sawtooth hanger to the top centre point of the crossbar. For the veneer front, cut a piece of 10.15cm-wide wood veneer into three strips, measuring 45cm/40cm/35cm each. Glue, then tack to the base, starting with the shortest piece. Sand any rough edges and stain to taste. Using electrical tape, secure the wires at the back of the base to those coming out of the wall. Gently push the wires into the wall. Screw a lightbulb into the fixture. Insert a plasterboard screw into the wall and hang your light using the sawtooth hanger.
Photograph: Derek Fagerstrom & Lauren Smith
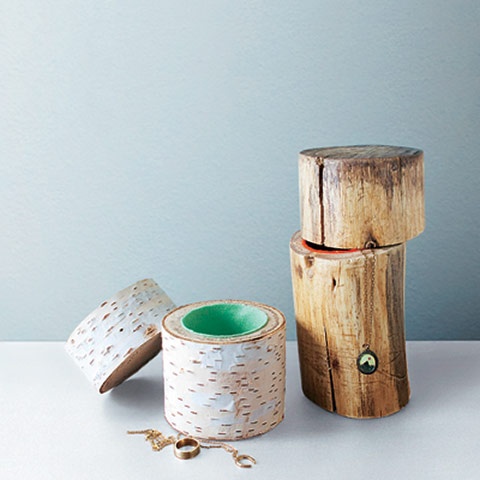
These real wood log “jars” tap into the current trend for rustic materials. Saw your log to the desired height (you may also need to saw off a level base). Make a lid by sawing a smaller section off the top. To make the hole, clamp the log into a table vice (wrap a towel around it to protect it) and drill into the centre using a two-and-half-inch drill bit, until you have a hole 5.08cm (2in) deep. You might need to blow off sawdust as you go along. Sand any rough edges and wipe the surfaces clean. Apply a thin layer of sealant to all the cut edges, the top and bottom of the base and lid, and inside the hole. Leave to dry. Cut a circle of felt large enough to fit the base of the cavity, then another to wrap around the sides, and glue in place using a hot glue gun. Trim off any excess. Photograph: Derek Fagerstrom & Lauren Smith
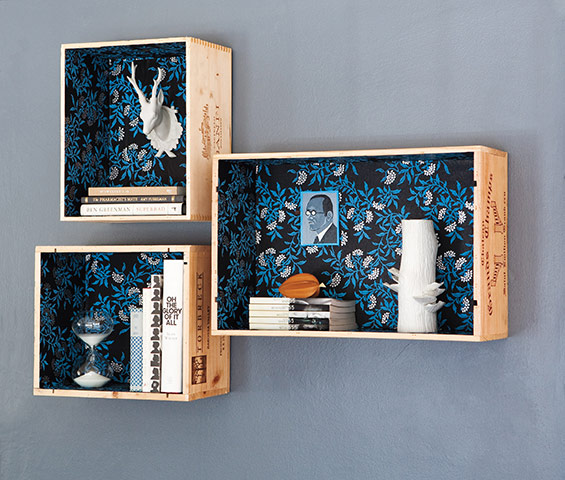
Nothing says artful living like a pair of recycled wine crates put to creative use. Flea markets are full of them. Measure the back and sides of the inside of the crate, then mark out the panels on the back of your chosen paper, leaving a short border. Cut out the panels, fold sharply along the borders and mitre the interior corners by cutting a 45-degree angle from the outside edge in. Next, stick the paper to the crate with spray glue, beginning with the long edges and finishing with the back. Then nail a sawtooth hanger to top edge of the back of each crate and stick adhesive pads to the bottom corners so the crates hang flat against the wall.
Design*Sponge at Home by Grace Bonney, is published on 6 September by Artisan, priced £20. To order a copy for £16, with free UK p&p, go to guardianbookshop.co.uk; designsponge.com Photograph: Derek Fagerstrom & Lauren Smith