The EVGA’s Z790 Dark K|ngp|n (written henceforth as Kingpin), designed by Vince Lucido among others from EVGA, is aimed squarely at those aiming for extreme overclocks. It sports robust power delivery, three M.2 sockets, eight SATA ports, 2.5 and 10 GbE (and integrated Wi-Fi 6E), and a premium (though last-gen) audio solution. Priced at $800, there’s a lot to like on the Z790 Dark, even more so if you’re a hardcore overclocker trying to get the most out of their hardware.
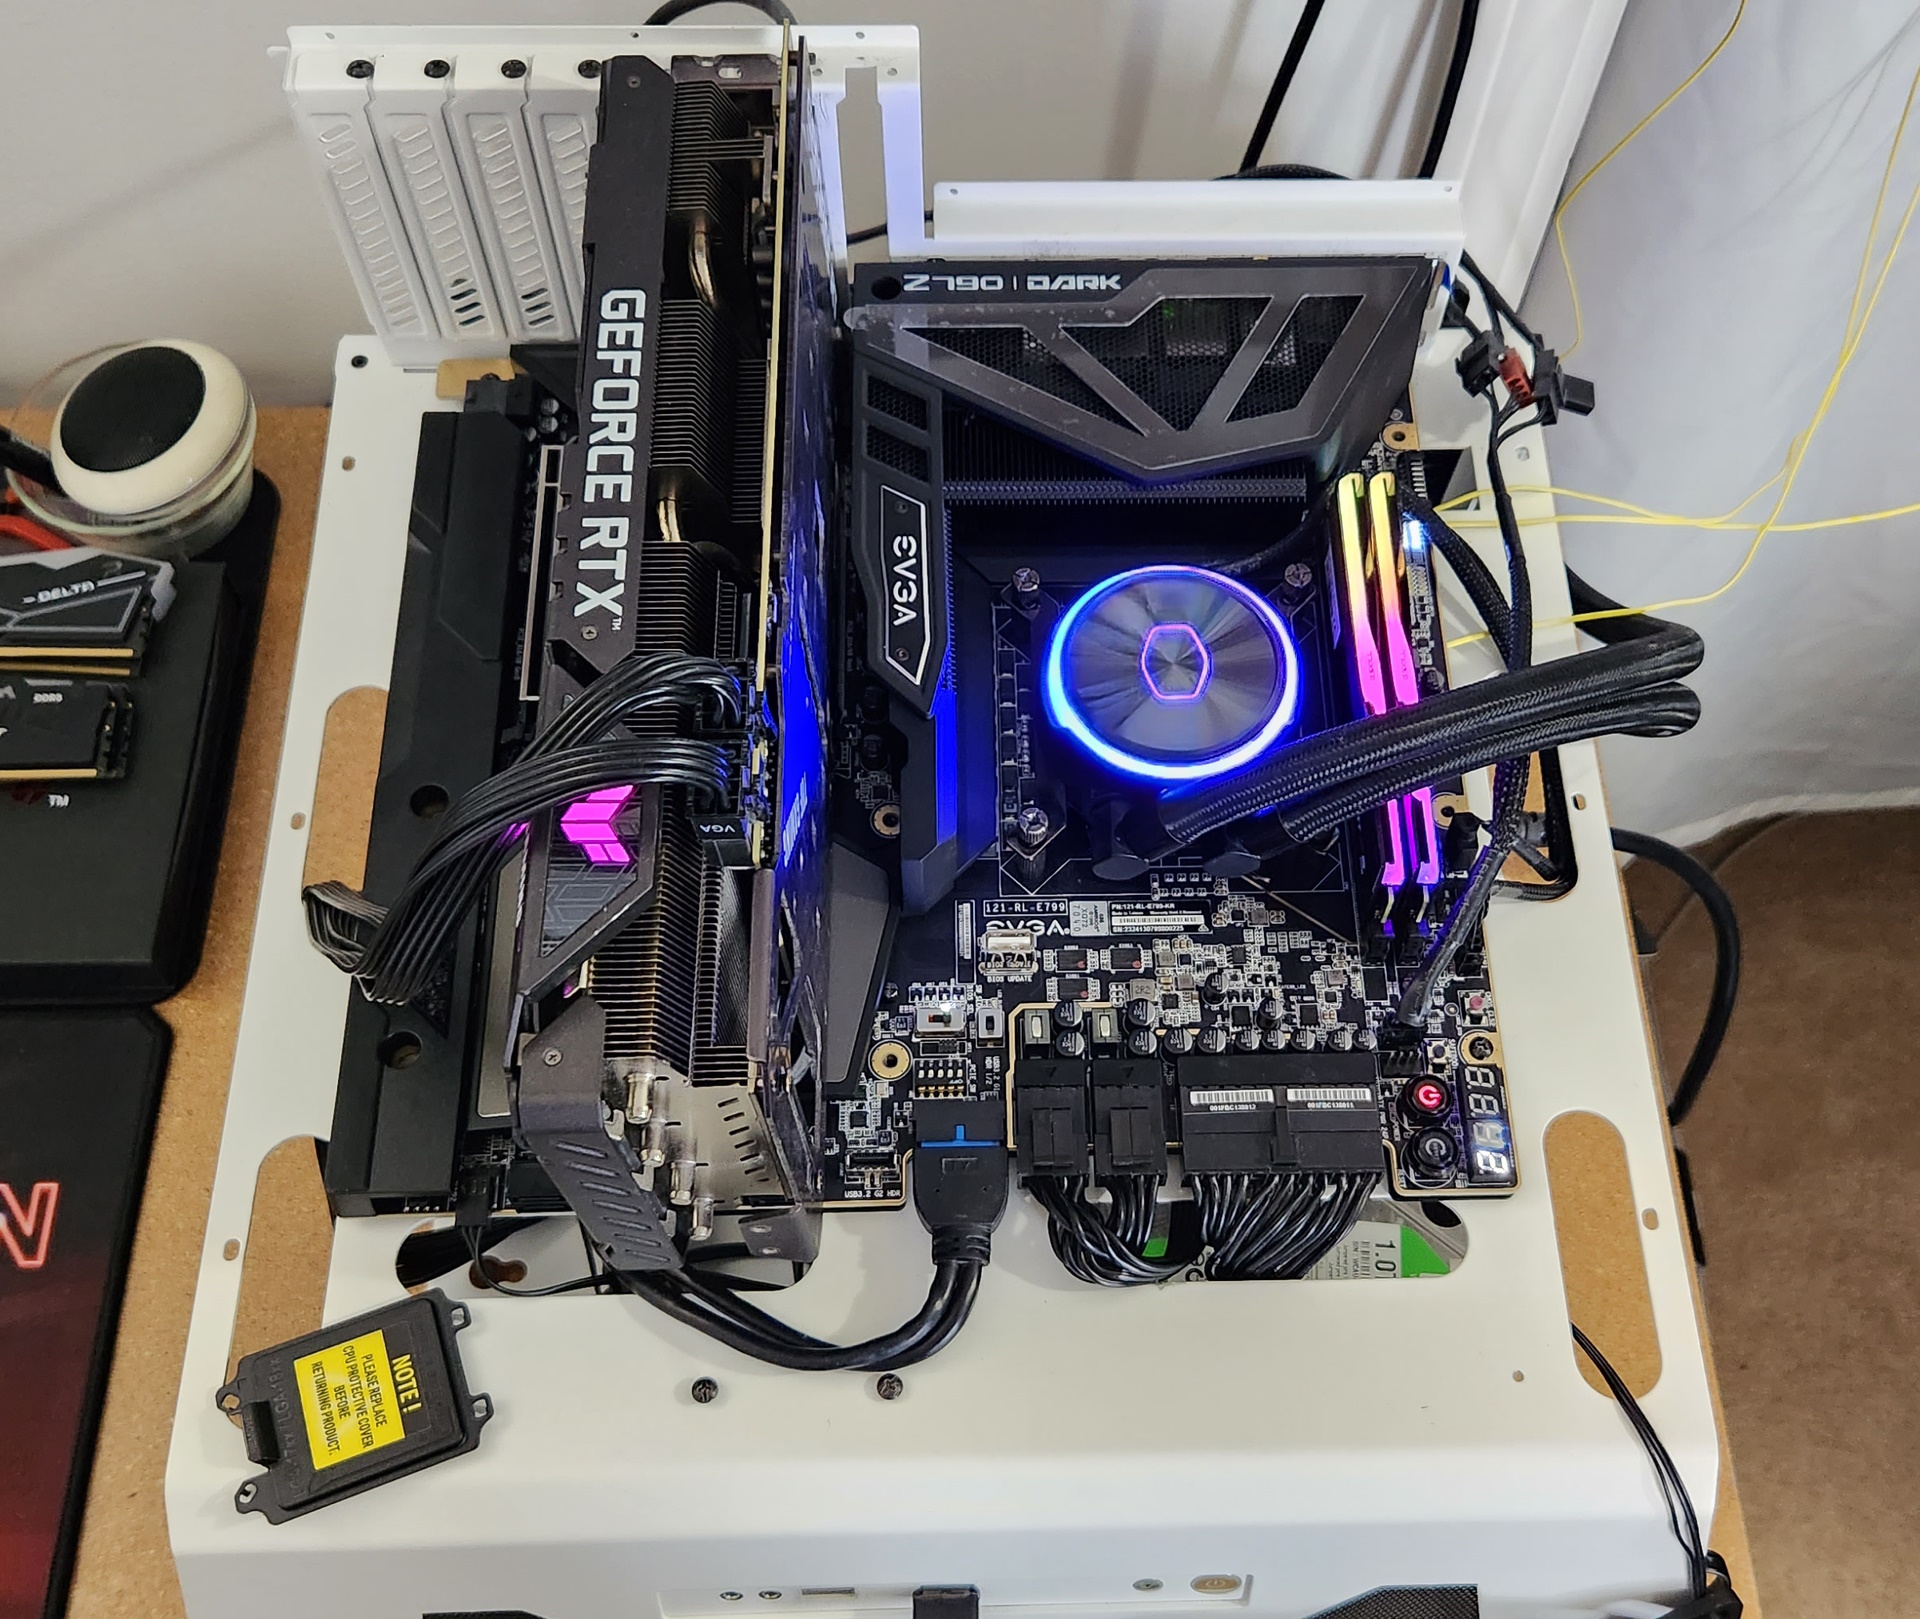
As far as looks go, a lack of integrated RGB lighting could be a turnoff (but there are headers to add your own). However, I personally think it’s one of the better-looking boards for the platform. The simple black-on-black look with gold accents gives off premium vibes and stands out from the rest.
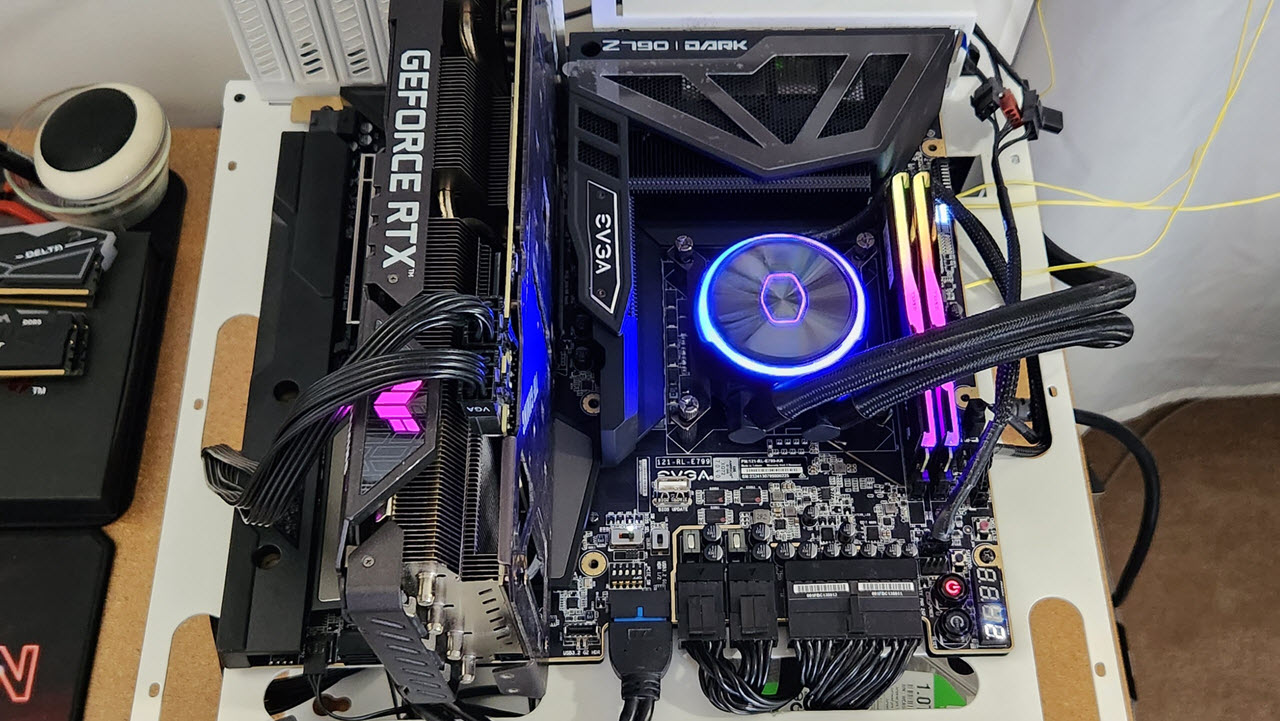
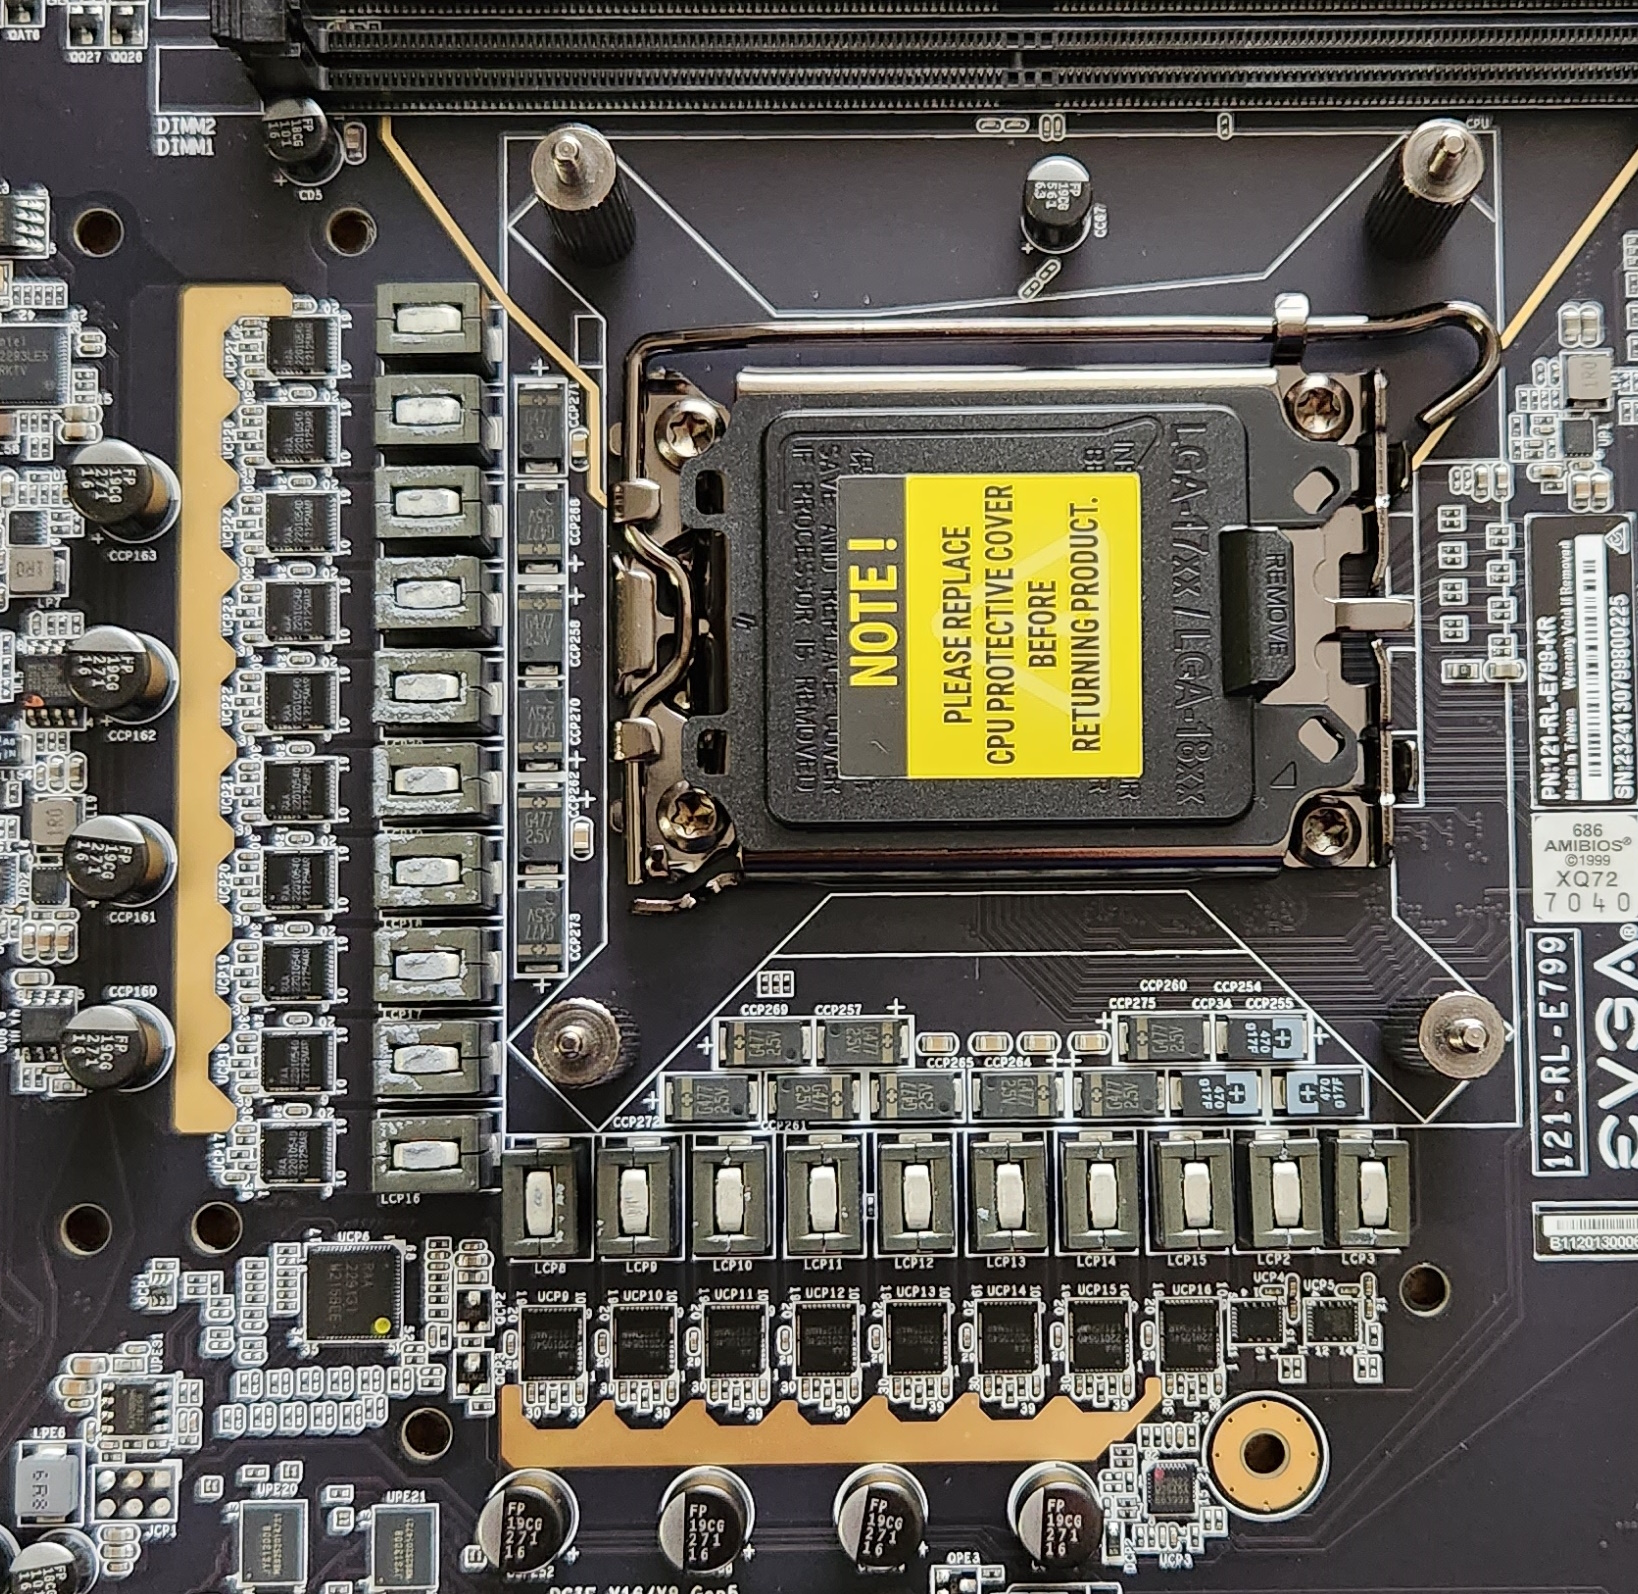
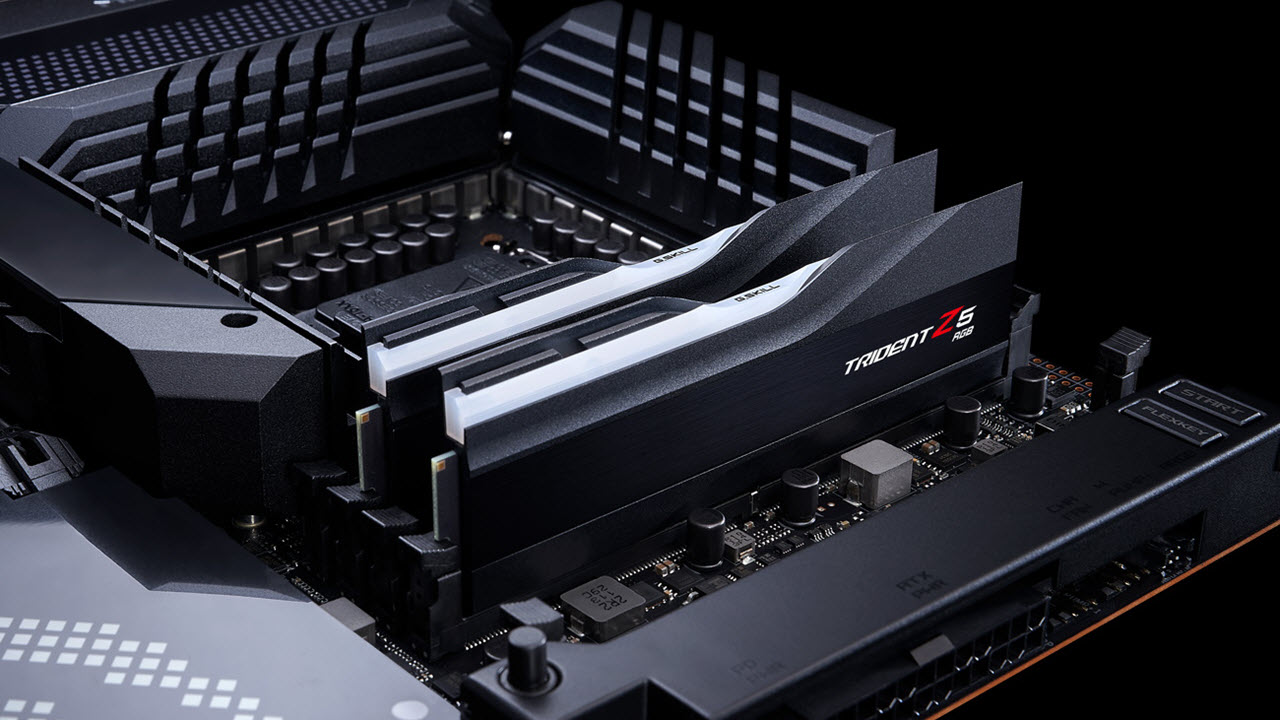
Unique to this board is the socket area, which gets rotated 90 degrees so that the two memory slots are on top and the VRM runs along the left and bottom instead of left and top. Most connectors along the board’s edge lay flat, which allows for better cable management on the E-ATX board.
Performance-wise, the Dark Kingpin did well across most of our tests, ending up right around average. We saw some of the best results in our AIDA memory testing, and it did well in Procyon Office tests. The overclocking-centric board also did well with games, performing as good or better than most other boards we’ve tested. In short, the Z790 Dark Kingpin doesn’t disappoint when it comes to performance.
Below, we’ll dig into the details of the board and see if this beast has what it takes to make our Best Motherboards list. But before we get into the details, here are the detailed specifications from the MSI website.
Specifications: EVGA Z790 Dark Kingpin
Inside the Box of the EVGA Z790 Dark Kingpin
That Dark Kingpin includes some accessories inside the box to get you started. It’s a bit paltry for an $800 board, and half the items are geared toward benchmarking rather than daily use. Still, you get what’s needed, plus useful tools for pushing the limits of your hardware. Below is a complete list of the included accessories.
- (10) Standoffs and baseplate screws
- (2) SATA Data Cables
- (3) M.2 screw kits
- ProbeIt connector
- Benchstand with visual aids
- USB flash drive (drivers)
- Case badge
- Visual installation guide
Design of the Z790 Dark Kingpin
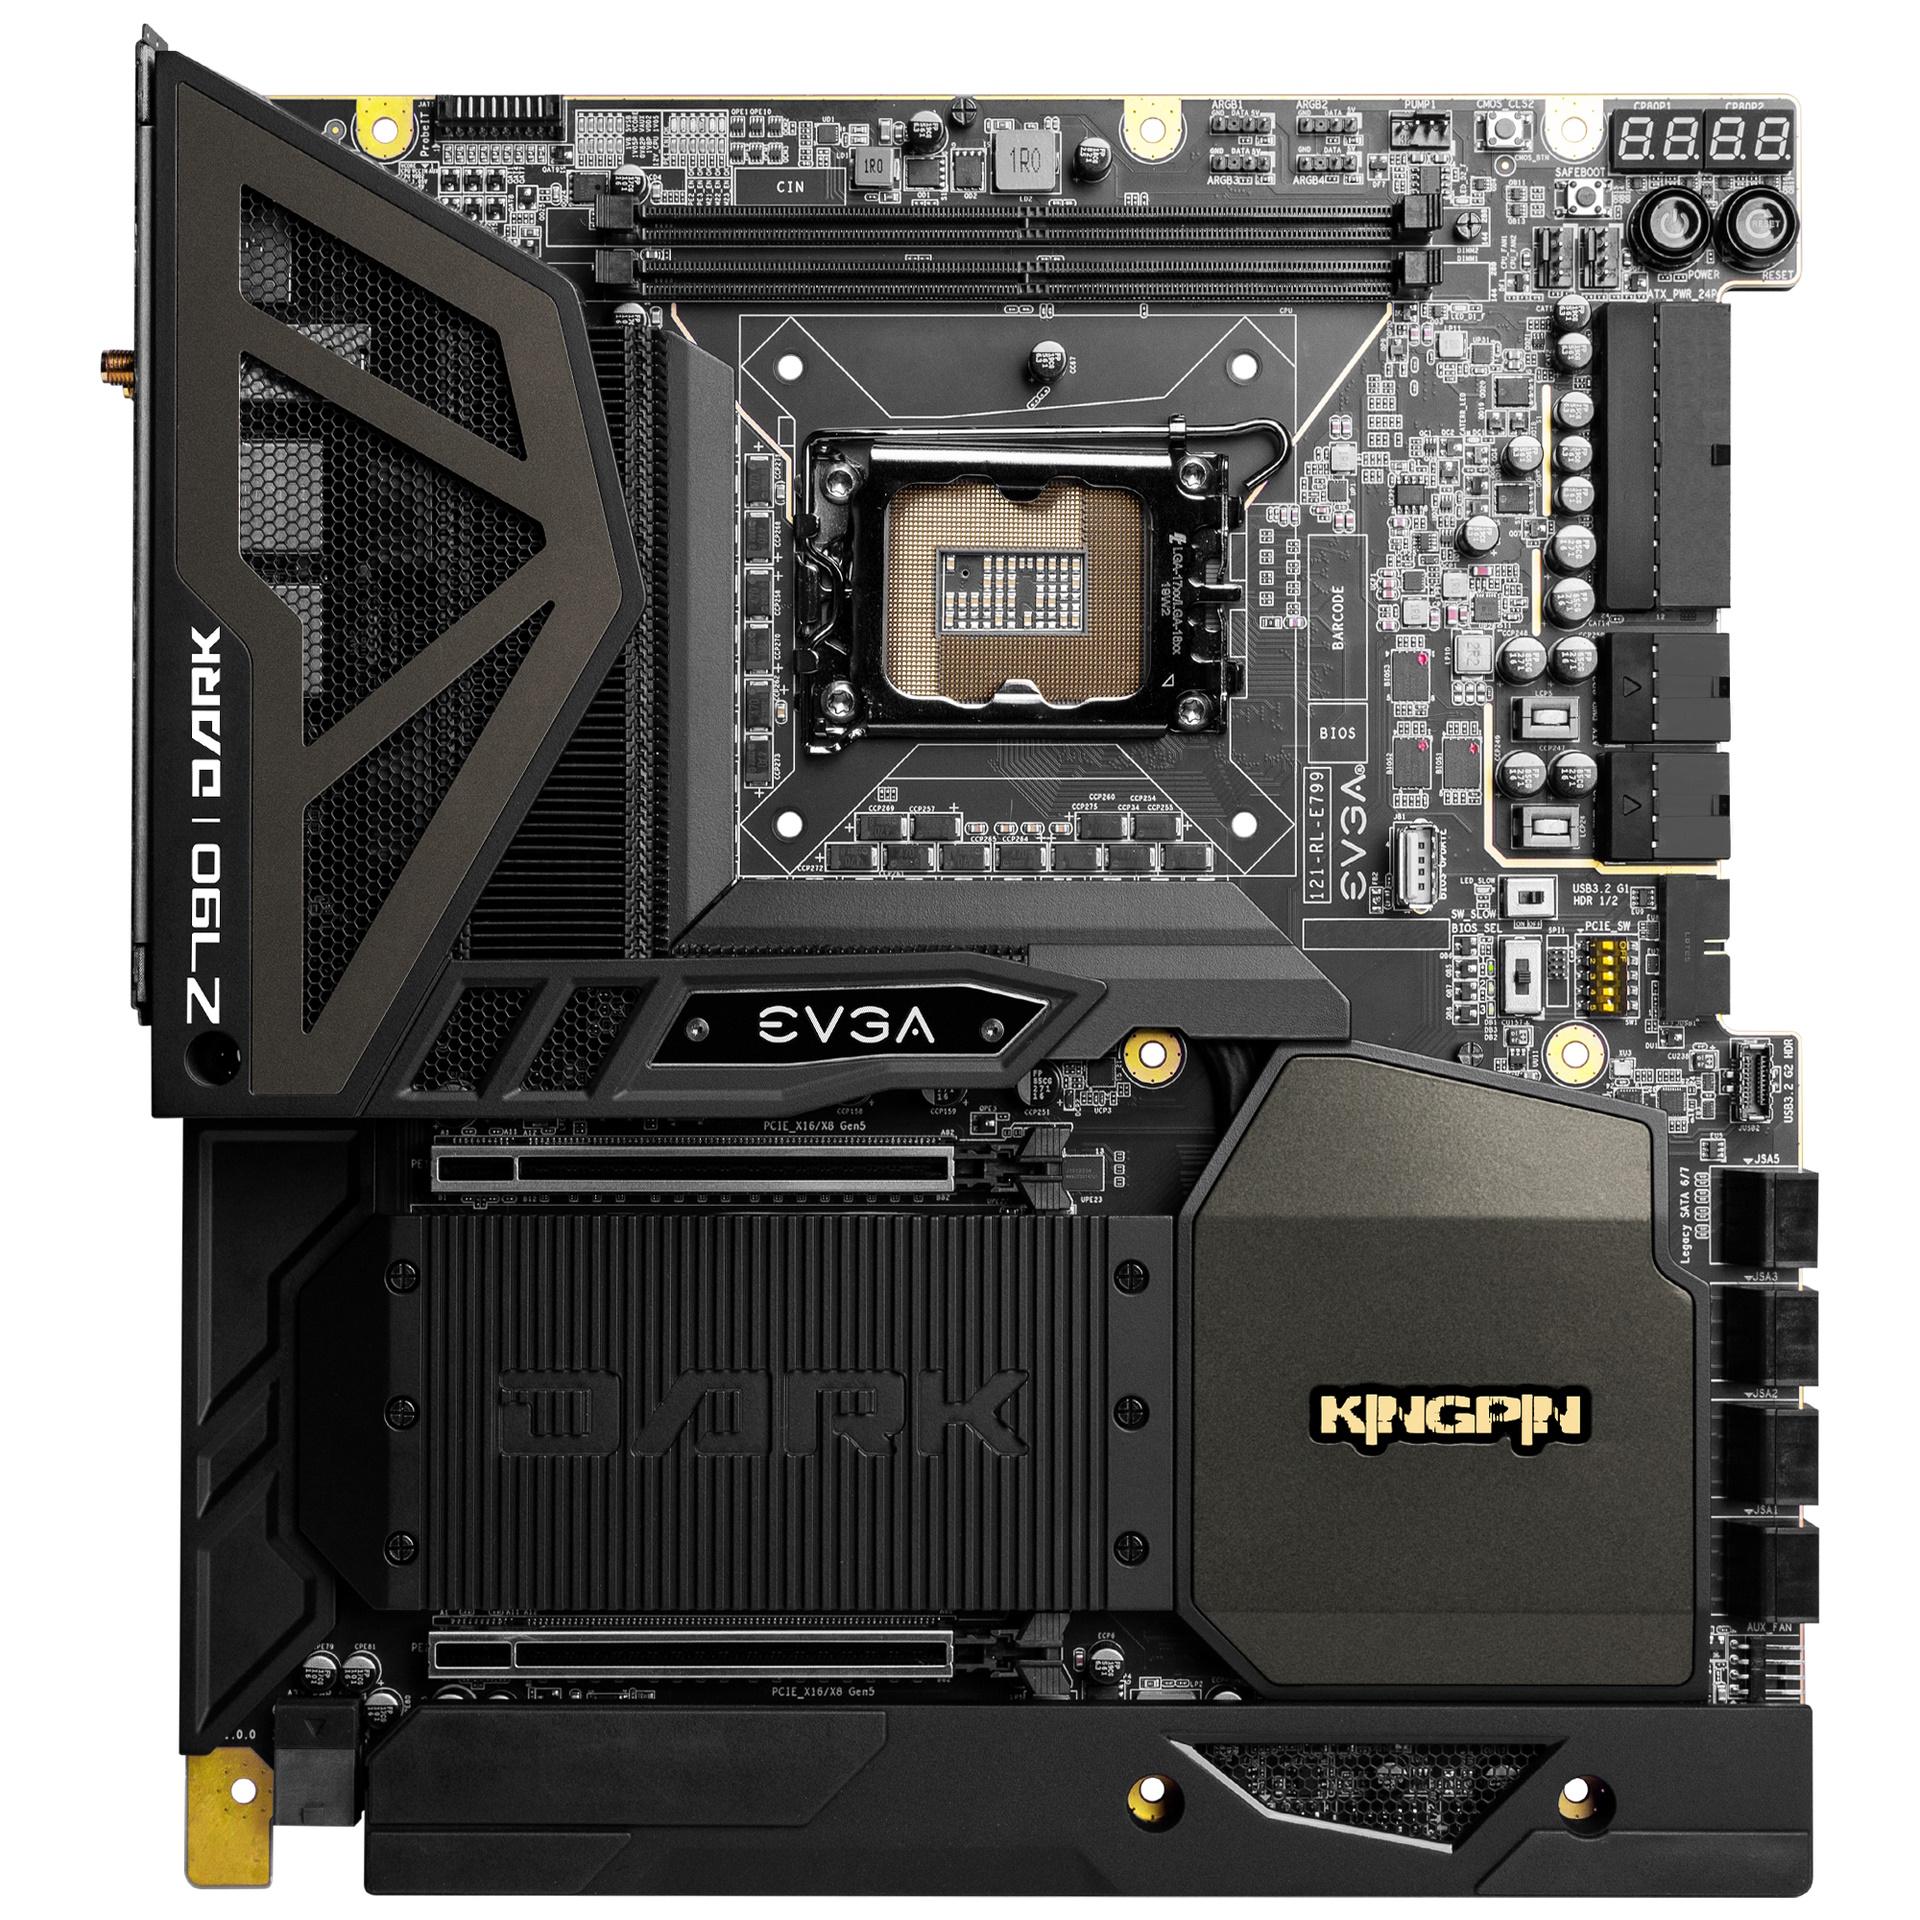
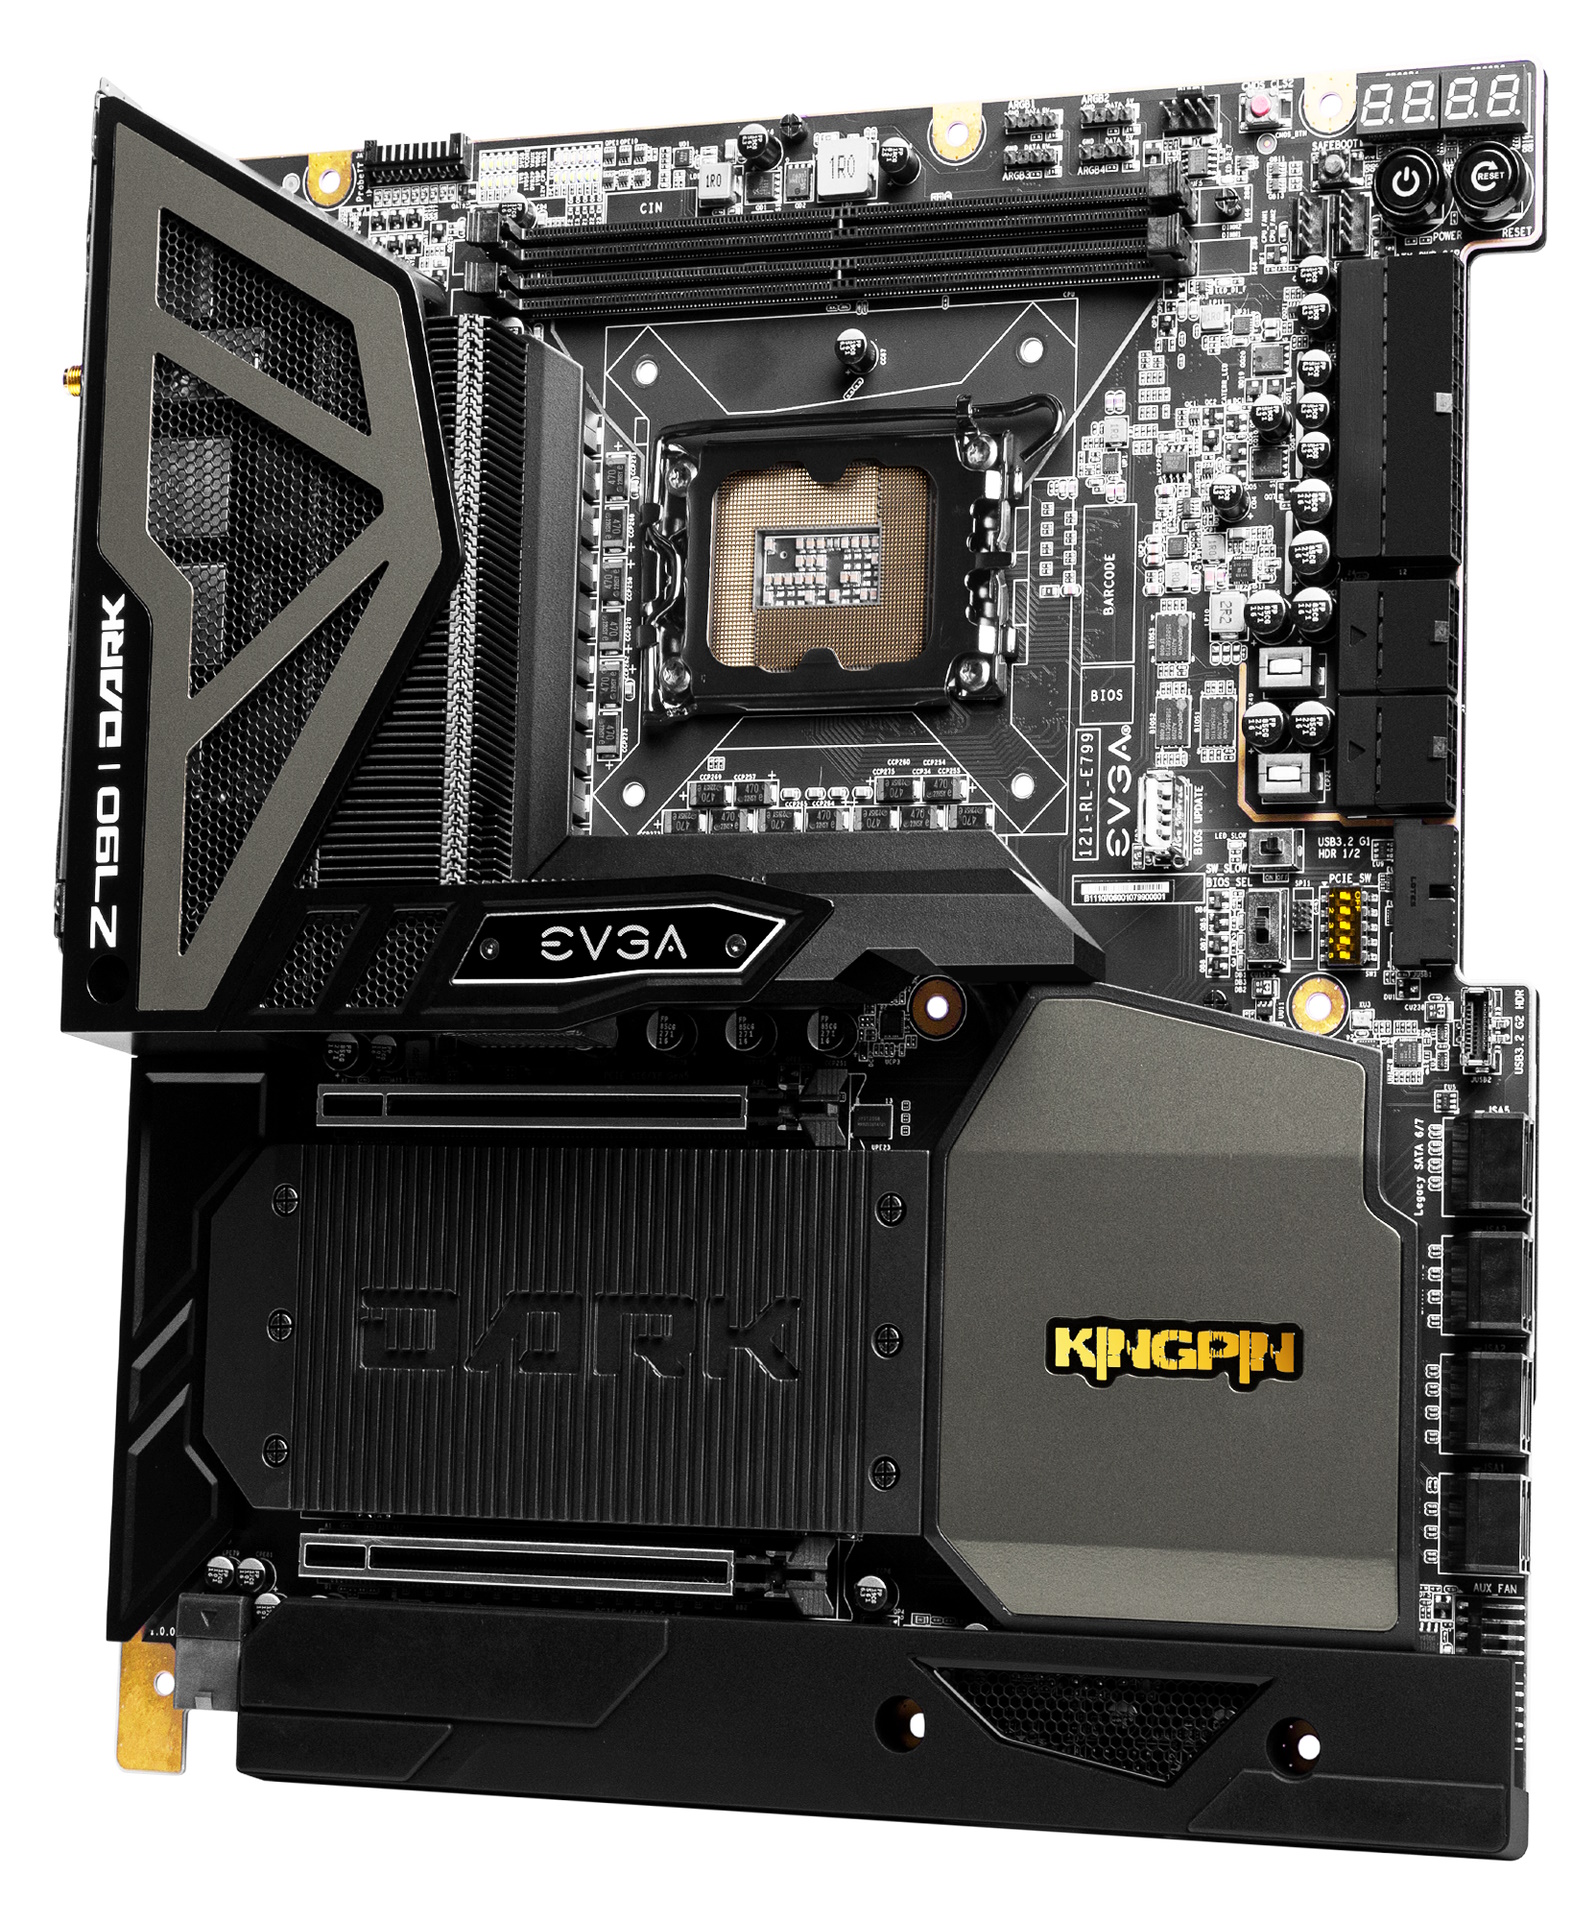
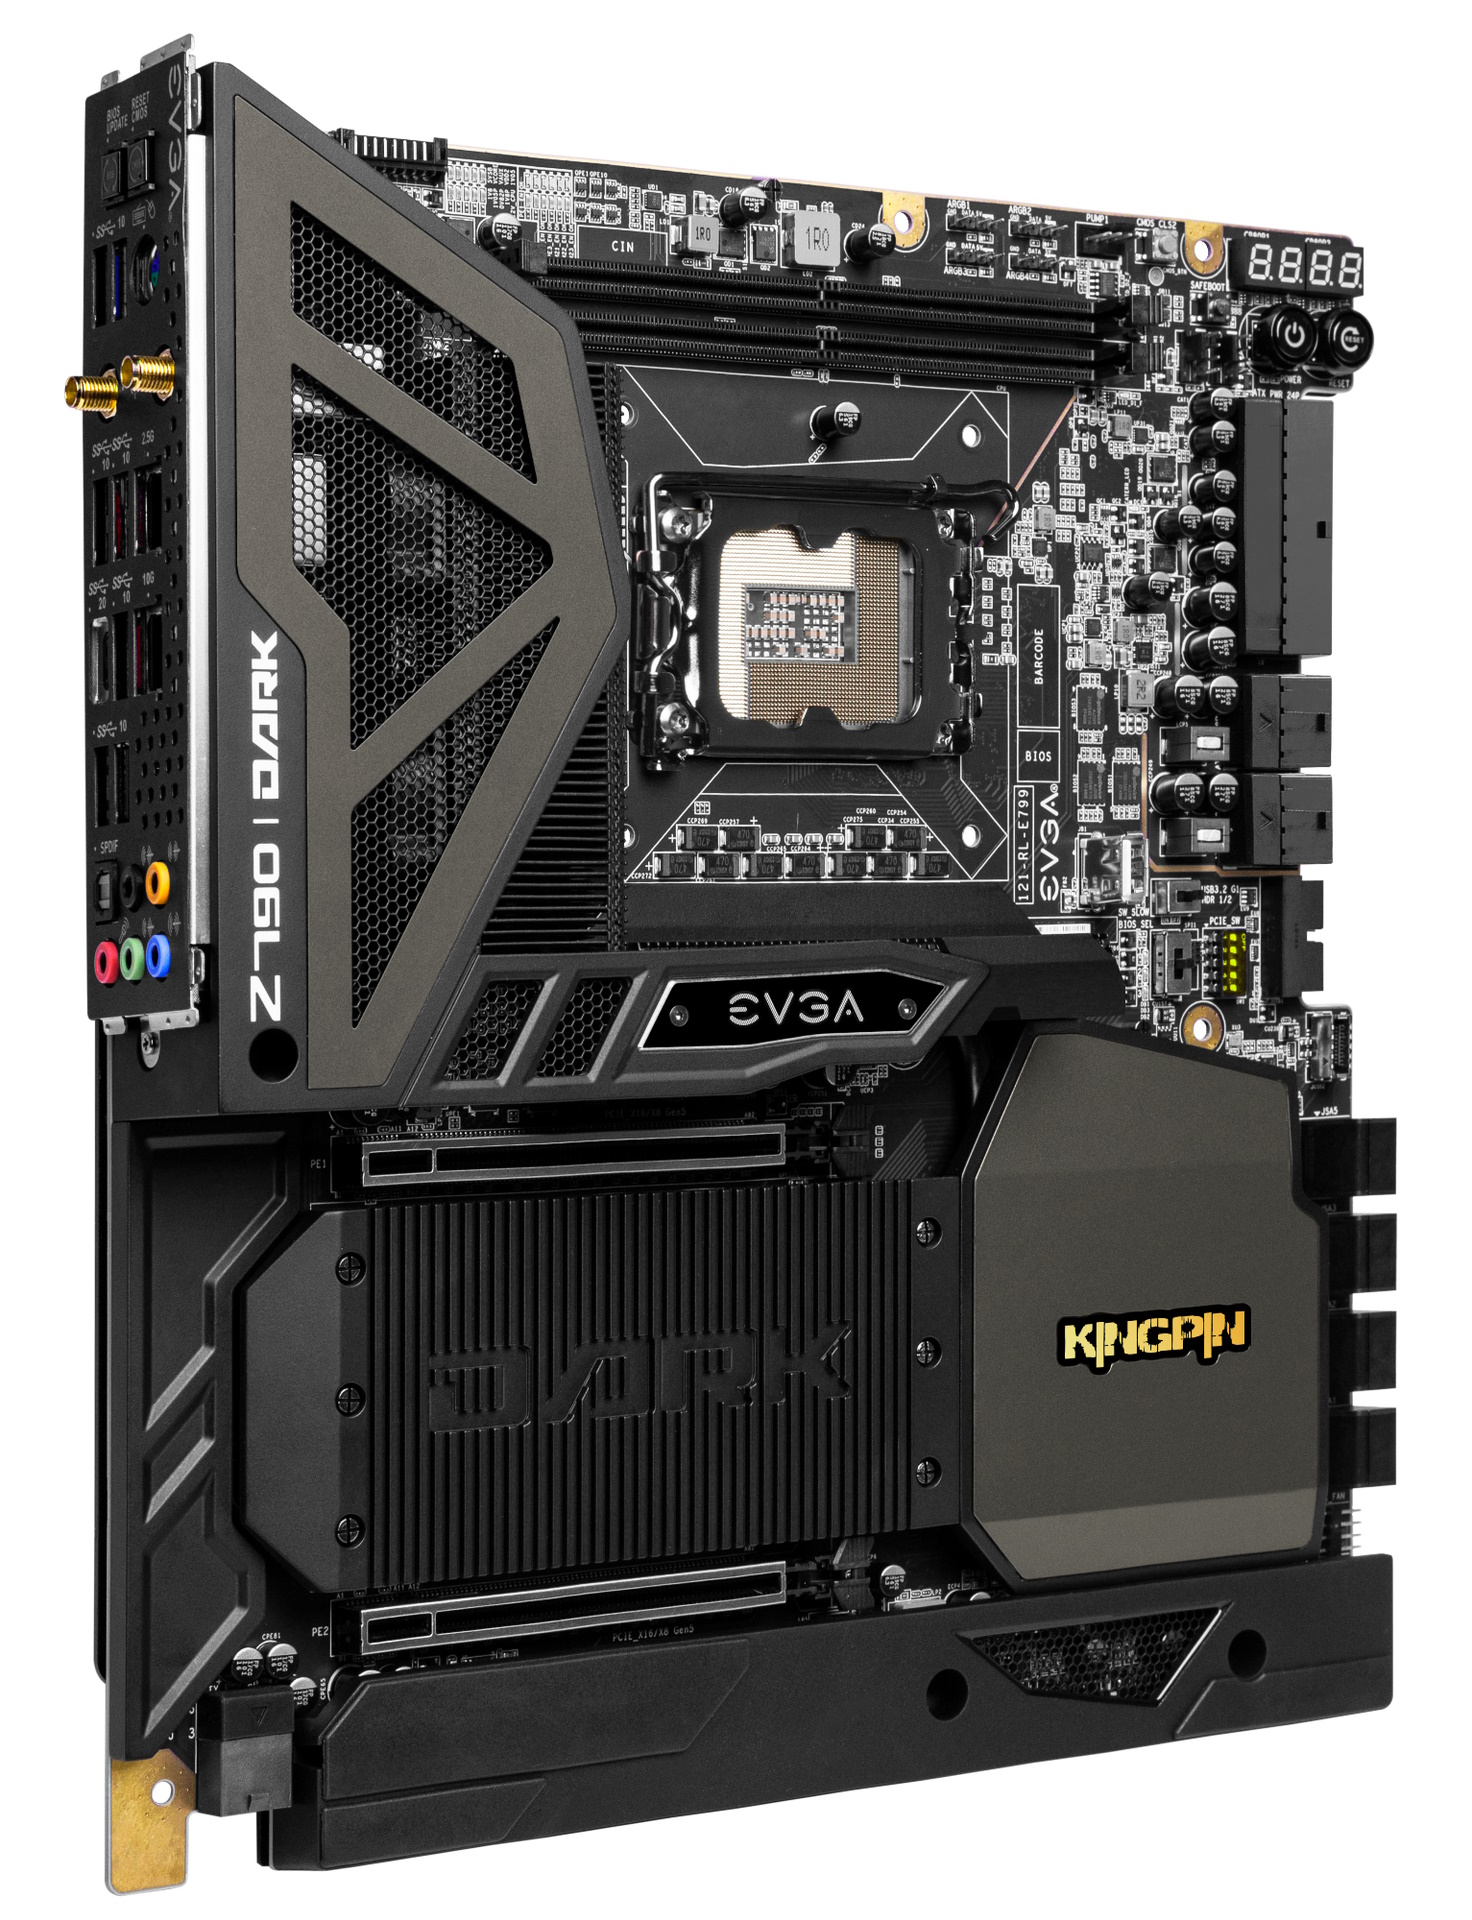
The Z790 Dark sits on a 14-layer (most are eight or less), low-loss PCB sporting an all-black look and gold highlights that also help with cooling. The socket area, turned 90 degrees, is a look you won’t find anywhere else but the EVGA Dark boards. The VRM heatsinks use a finned structure and are actively cooled by two small fans to remove heat from the power delivery bits. They also connect via heatpipe to the chipset heatsink on the bottom half of the board. There’s some EVGA branding on these shrouds and the Kingpin name in gold on the chipset heatsink.
While there aren’t any integrated RGB LEDs (there are plenty of LEDs but for status/troubleshooting purposes), there are four headers to connect your own. In the end, the Z790 Dark is unassuming rather than flashy and makes for a good centerpiece for your Z790 build.
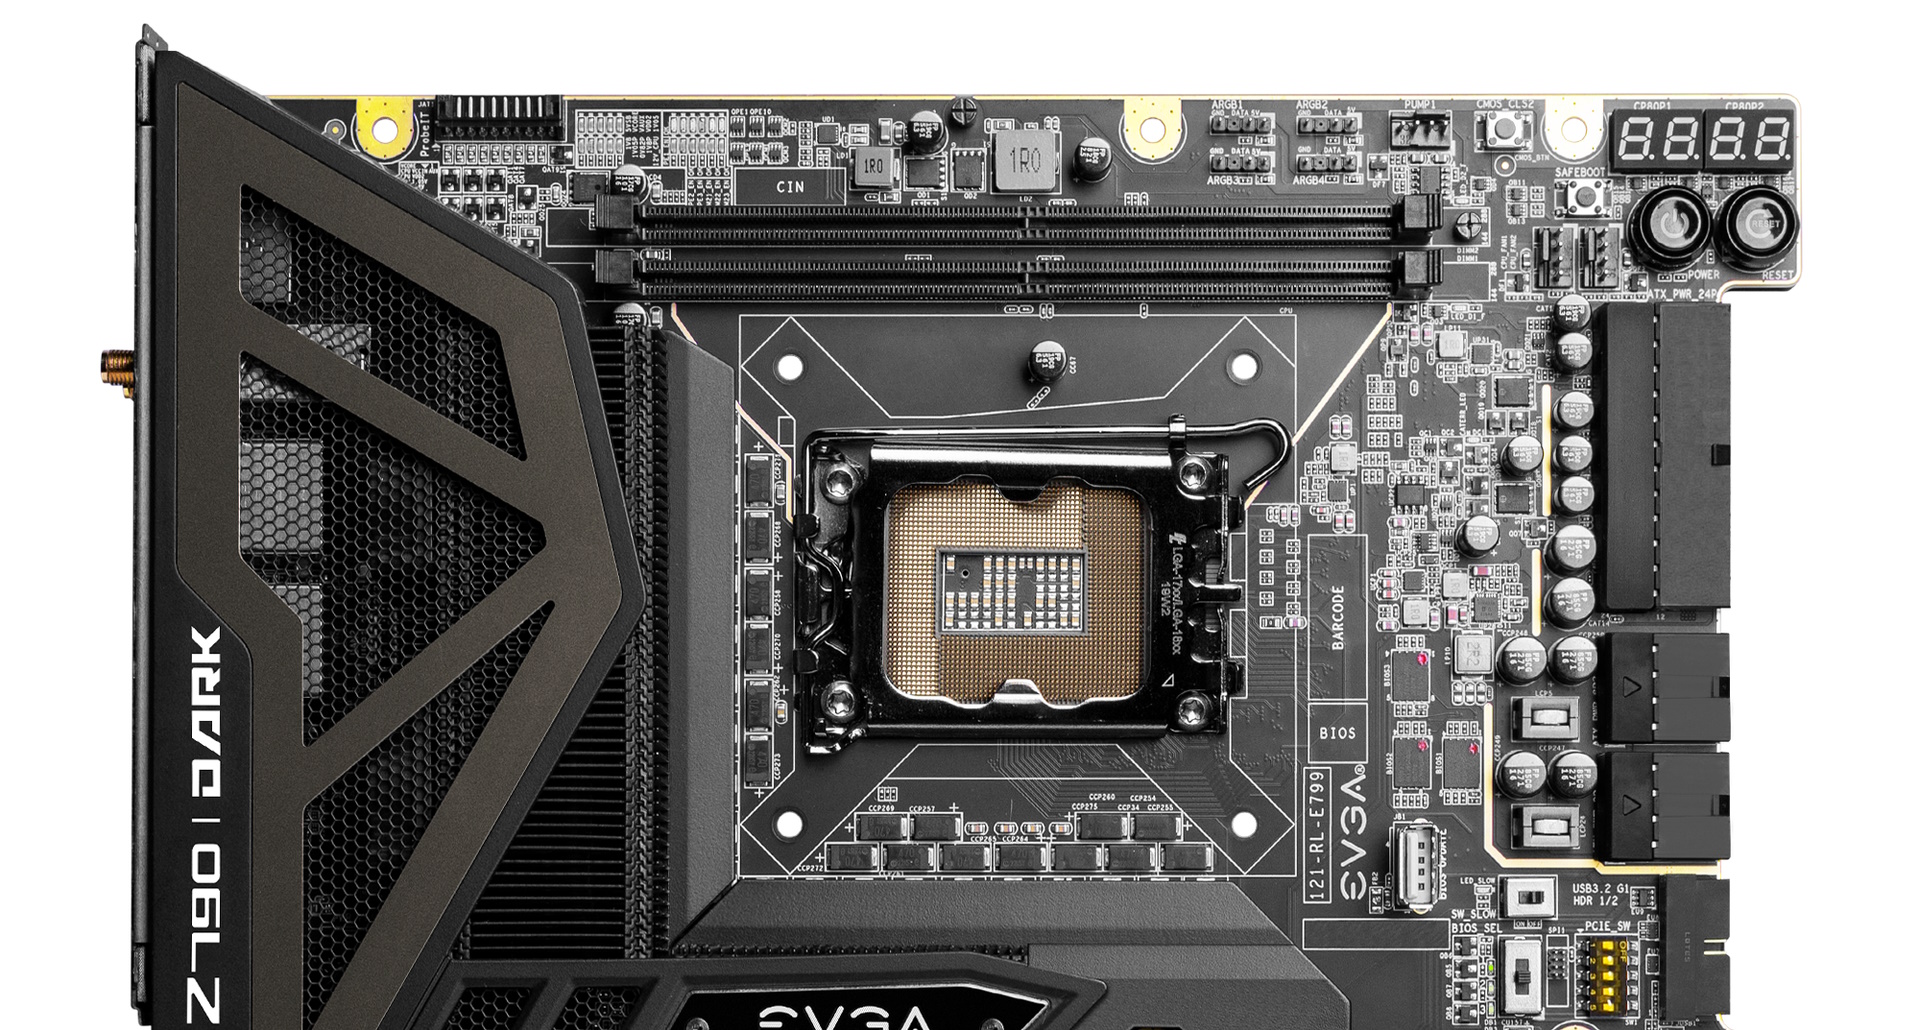
On the top half of the board, we start with the upper-left corner with the ProbeIt connector. This 10-pin plug allows users to easily read voltage directly (which is more accurate) from the board by connecting your probe to the tendrils, each reading a different voltage. You can measure CPU Vcore, CPU VCCIN, VDD, and other voltages critical to overclocking. Just to the right are a slew of informational LEDs that show the status of several onboard items, including PCIe slots, M.2 sockets, Vcore, and several other voltages. These can benefit the hardcore/extreme overclocker, but for most, this will just be bright white and green LEDs.
On top of the actively cooled VRM heatsinks is a plastic shroud with black grating to hide the unsightly bits below. We couldn’t hear the tiny VRM fans underneath during testing over the test system, only during POST when they quickly spin up. The two unreinforced DRAM slots sit just above the socket area with locking mechanisms on both sides. EVGA supports up to 64GB of DDR5 8000+(OC), one of the highest speeds listed on ATX or bigger boards. We had no issues running any of our three kits (the fastest is DDR5-7200) on this board. According to Hwbot, there’s plenty of headroom left as well.
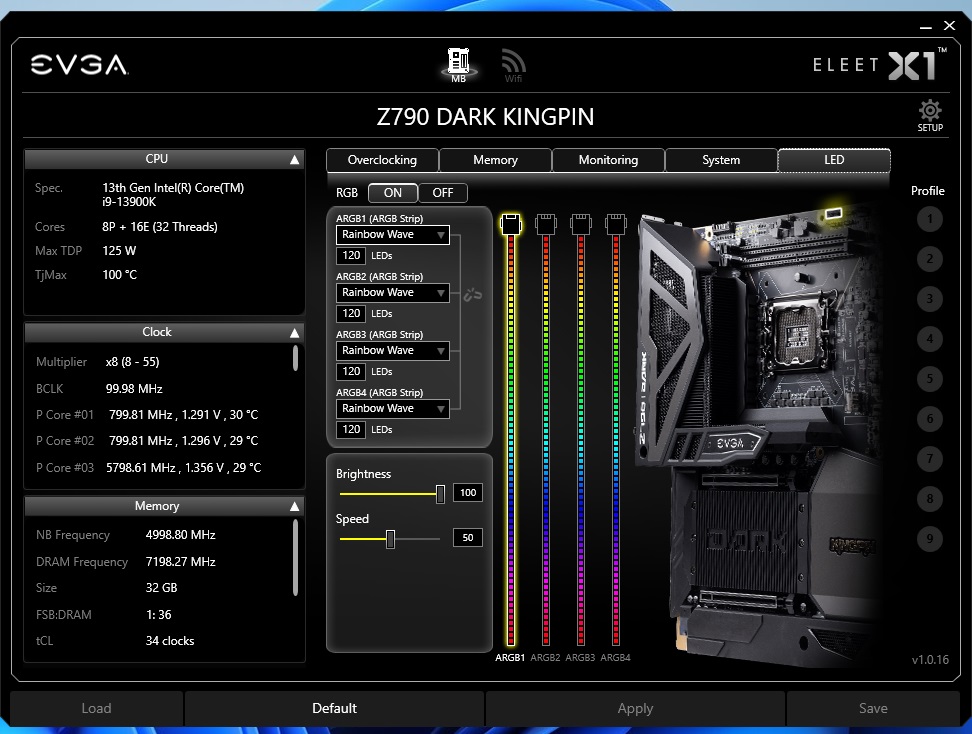
Continuing right, past the ready-for-insulation socket area, above the DRAM slots, are all four RGB headers. Each header is of the 3-pin ARGB variety. To adjust the RGB lighting, you can do so through the Eleet software.
Next, we bump into the first (of eight) 4-pin fan/pump headers, all supporting PWM and DC-controlled devices. Any labeled DC/PWM will output up to 2A/24W, while any labeled PUMP will output more, up to 3A/36W. There are plenty of headers and plenty of output on each for daily use.
In the corner of the board, we run into a couple of buttons (CMOS reset and Safeboot) and the multi-function 4-character LED. The latter displays codes during the POST process. And after booting, the same LEDs display voltages or temperatures. Below that are the power and reset buttons.
Continuing down the right edge, there’s a portion of the board for better cable management. All headers/connectors down this edge mount horizontally, also assisting with cable management. Here we spy the 24-pin ATX connector for board power and the two 8-pin EPS connectors to power the CPU (one required). These are a long way away from their usual location in the upper-left corner. Below these is a front panel USB 3.2 Gen 1 (5 Gbps) connector.
Behind this are a couple of features for the overclocker. In yellow are simple switches to enable/disable PCIe slots. Behind that, a three-position BIOS selector switch (yes, there are three BIOSes available), a slow mode switch, and finally, a vertical USB port to update the BIOS (or to use when extreme overclocking and capturing screenshots!).
Moving on to the VRMs, power comes from the 8-pin EPS connector(s) onto a Renesas RAA229131 PWM controller. For Vcore, power then heads on to 18x 105A Renesas RAA22010540 SPS MOSFETs. The total of 1,890 Amps available is one of the higher values we’ve seen and handles the flagship Intel Core i9-13900K at stock and overclocked with aplomb, even using sub-ambient cooling methods. There are no shortcomings with the power delivery.
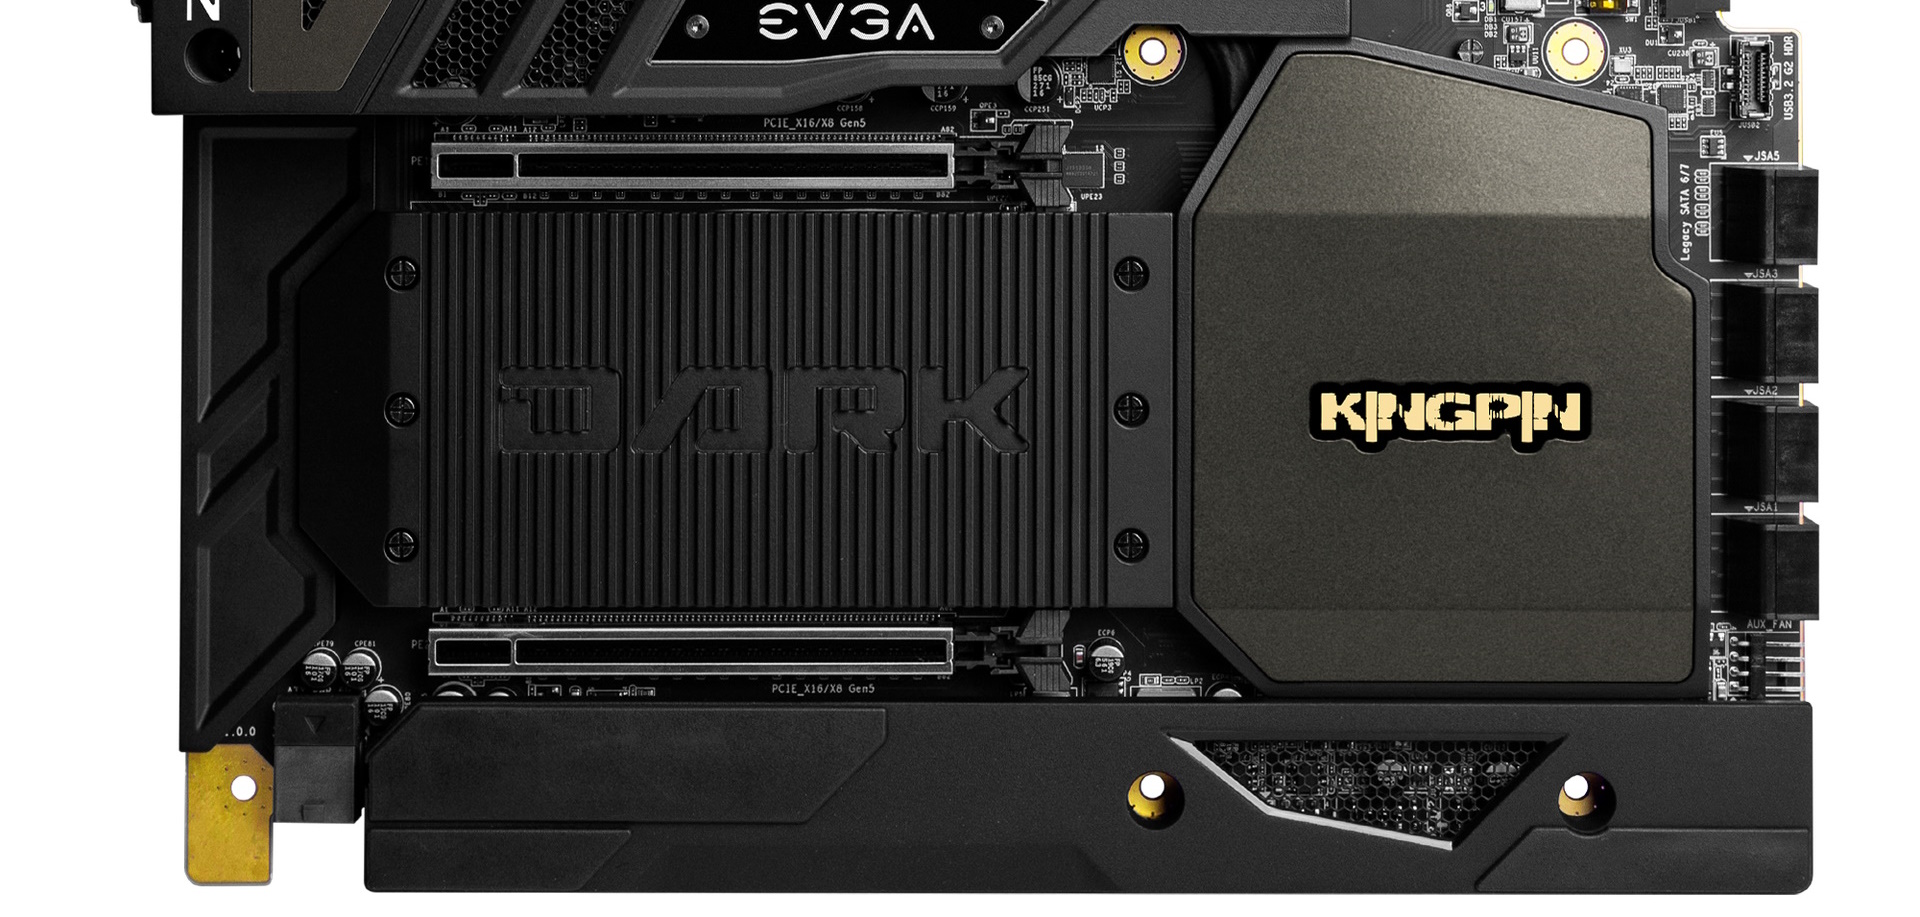
On the bottom half of the board, we get a better look at the large heatsink for the three M.2 sockets hidden below, and the PCIe slots (most of them, one is hidden under a shroud). On the left, hiding under a cover, is the Realtek ALC1220 audio codec. The last-generation flagship codec will do just fine for most users. Some may want the latest and greatest codec, but this is an overclocking board at heart, so I can’t hold a good audio solution against it, even if it is from the previous generation.
Starting with the PCIe slots in the middle of the board, the two full-length slots (visible) connect through the CPU. One is capable of running PCIe 5.0 x16 when the other slot isn’t populated. Otherwise, they break down to x8/x8 and support AMD multi-GPU. Hidden under a rubber cover is a third slot that connects through the chipset and runs at PCIe 4.0 x4 speeds.
Sitting between the full-length slots and under the heatsink are three M.2 sockets capable of supporting up to 110mm PCIe devices. Each runs up to PCIe 4.0 x4 (64 Gbps) speeds. Even though this board was built with overclocking in mind, I’d still like to see one PCIe 5.0 x4 (128 Gbps) M.2 socket, especially at this price. To the right of the chipset are eight horizontal SATA3 6 Gbps ports. Six come from the chipset, while two come from a third-party (ASMedia) chip. Both support RAID0/1/5/10 modes, for those looking for additional speed or redundancy.
Above the SATA ports is a front panel USB 3.2 Gen 2 (10 Gbps) port. Below that are a couple of horizontal 4-pin fan/pump headers. Across the bottom of the board are several headers underneath the shroud. You’ll find the usual, including additional USB ports, front panel audio, and more. Below is a complete list from left to right.
- 6-pin PCIe connector
- Front panel audio
- BIOS Safeboot button
- (2) 4-pin fan headers
- (2) USB 2.0 headers
- 2-pin Temperature sensor header
- Front panel header
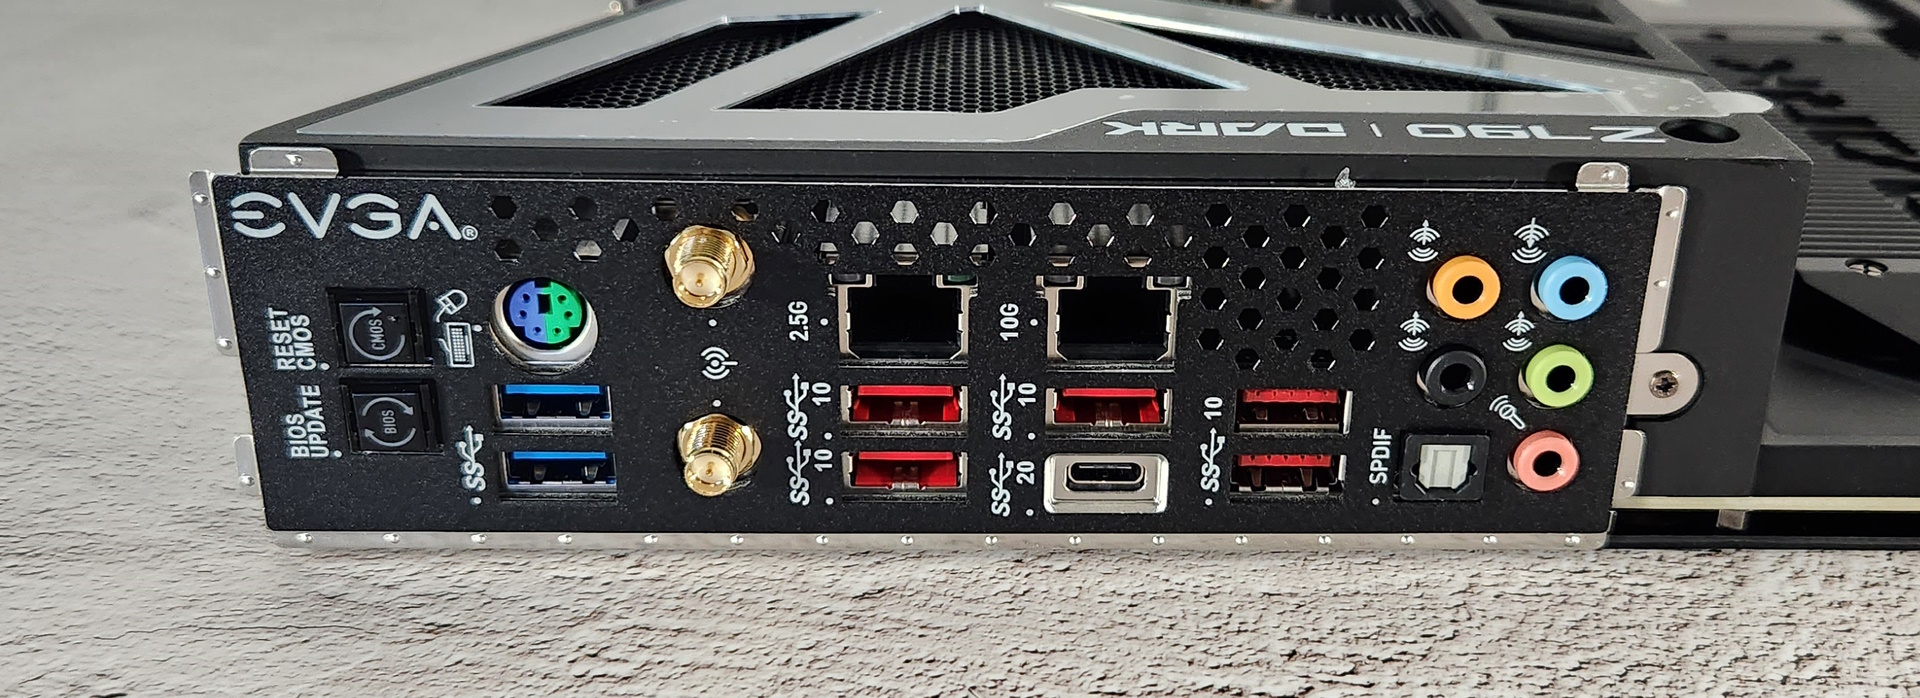
The Z790 Dark has a preinstalled rear IO, as expected. It’s relatively busy back here with many ports, plugs, and even some holes cut out to help feed the actively cooled power delivery. On the left are the BIOS Update and Reset CMOS buttons. In the middle are eight total USB ports, including a 20 Gbps Type-C port. You’ll find five 10 Gbps ports (red) and two 5 Gbps ports (blue). For networking, the Intel i226V port is on the left, and the Marvell 10 GbE is on the right above the 10 Gbps USB ports. Also on the back are the Wi-Fi antenna connections, and on the right a 5-plug plus SPDIF audio stack.
MORE: Best Motherboards
MORE: How To Choose A Motherboard
MORE: All Motherboard Content
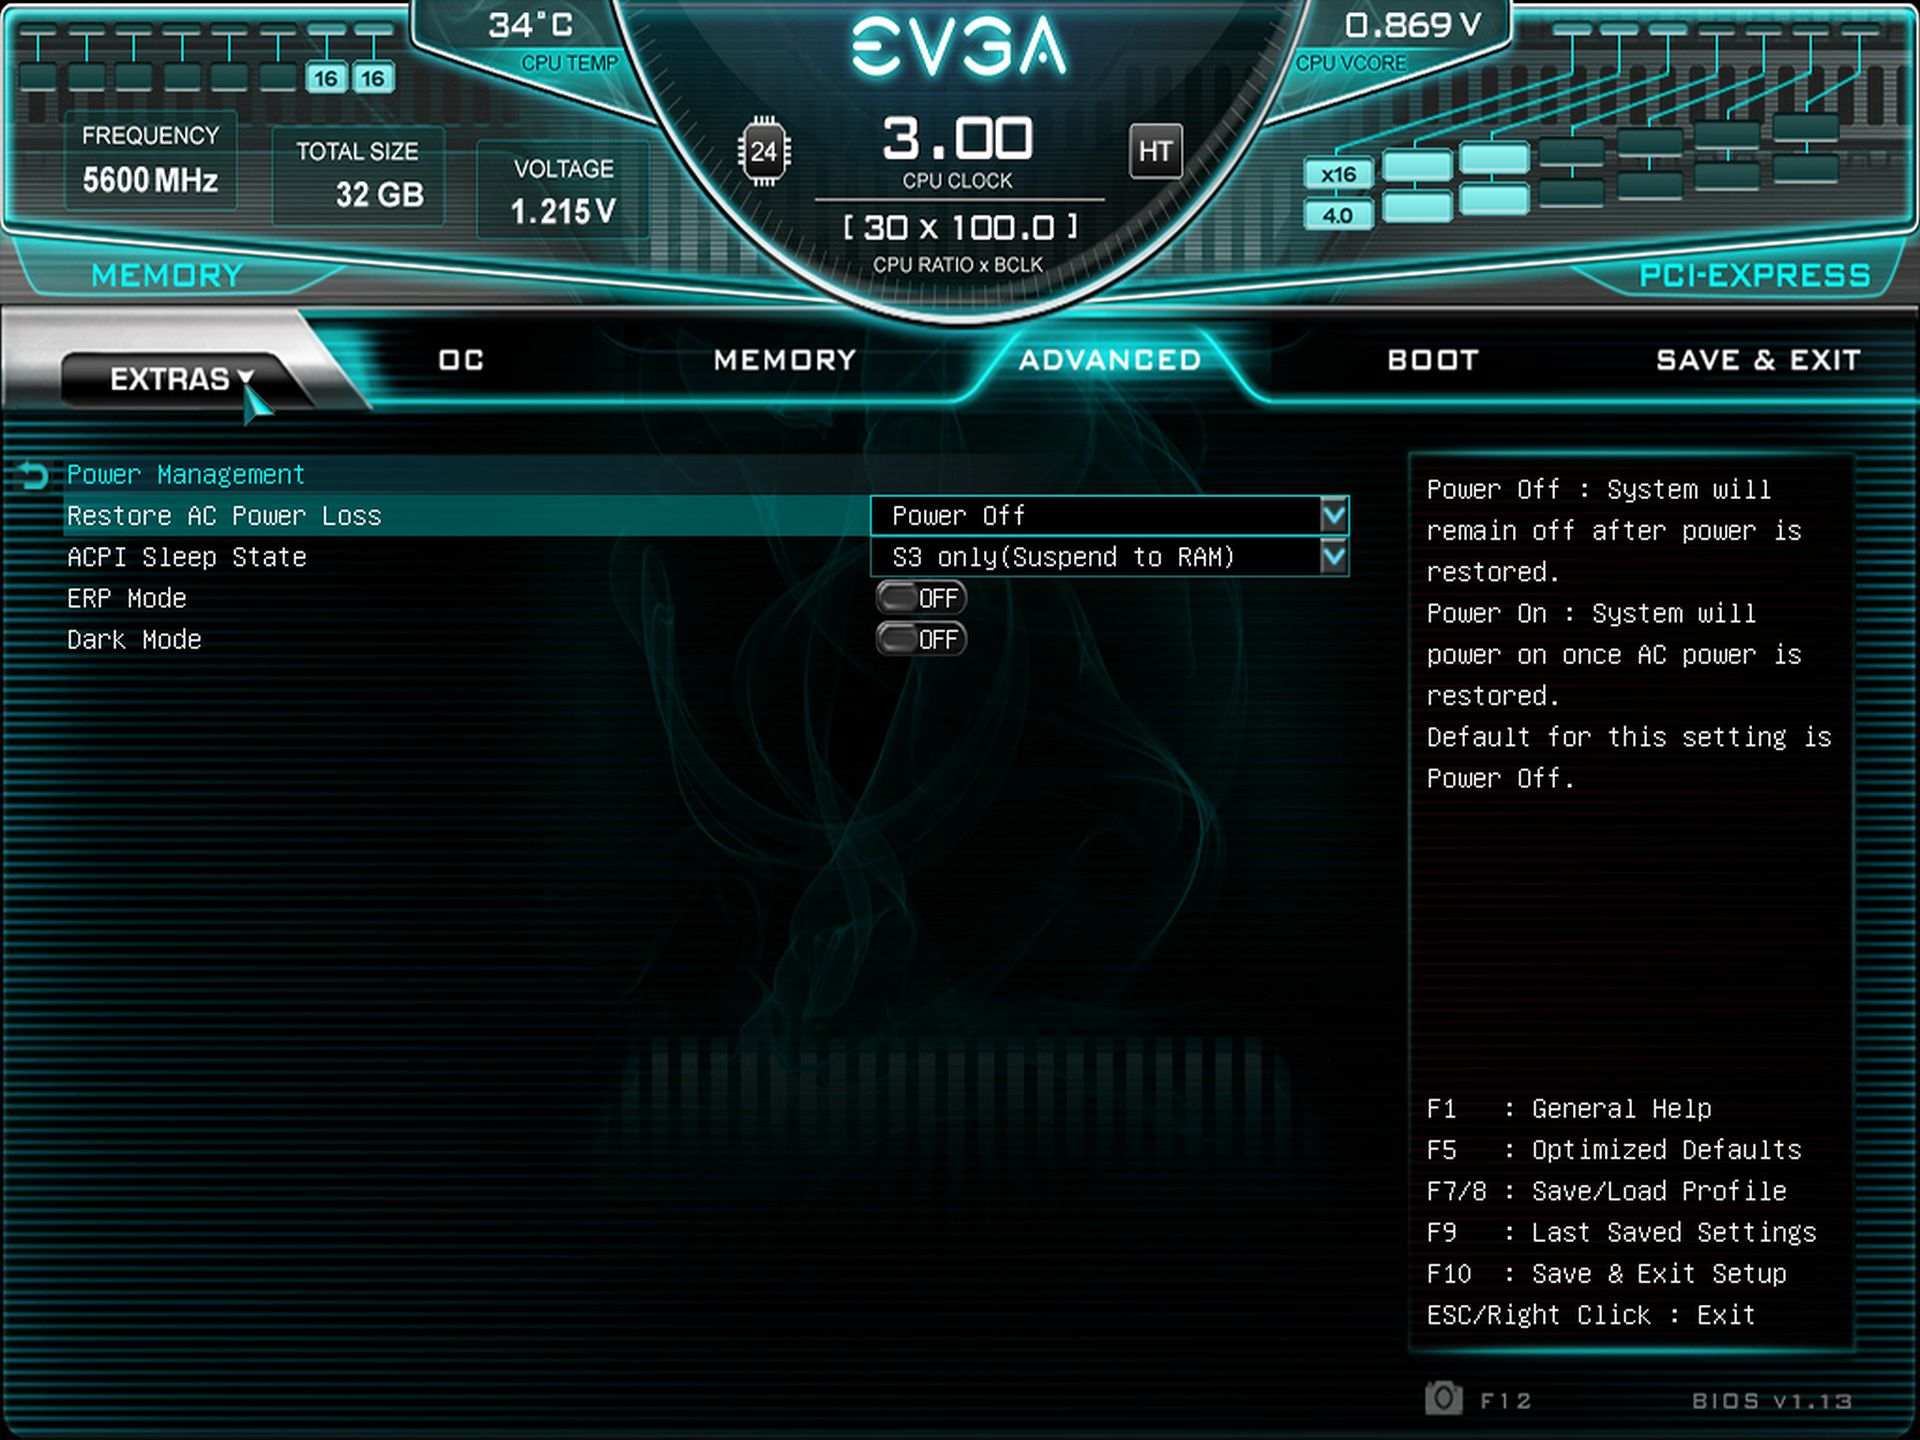
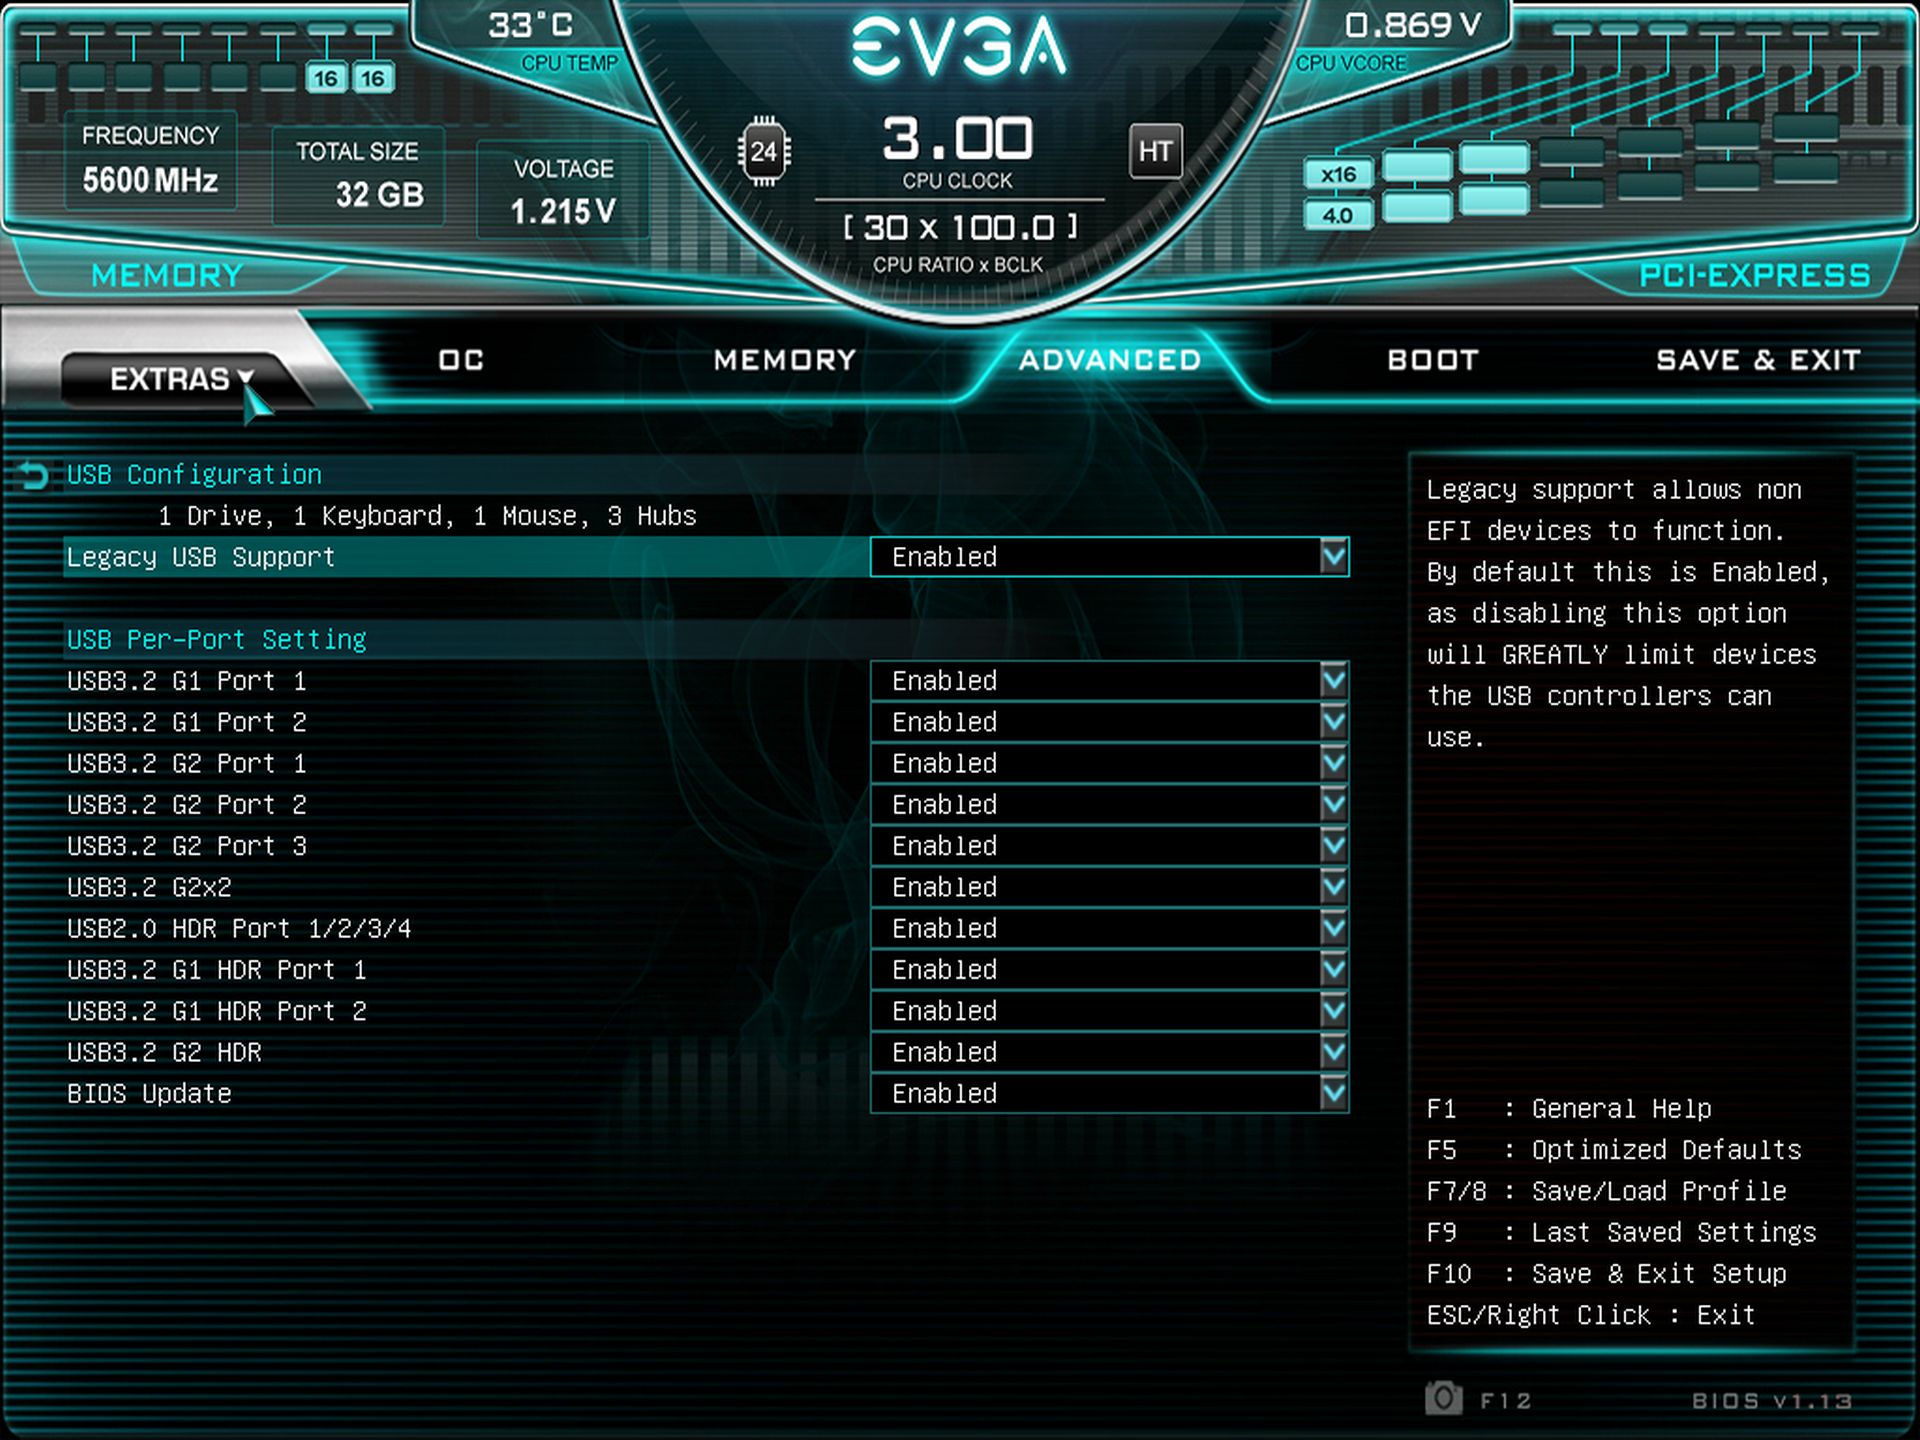
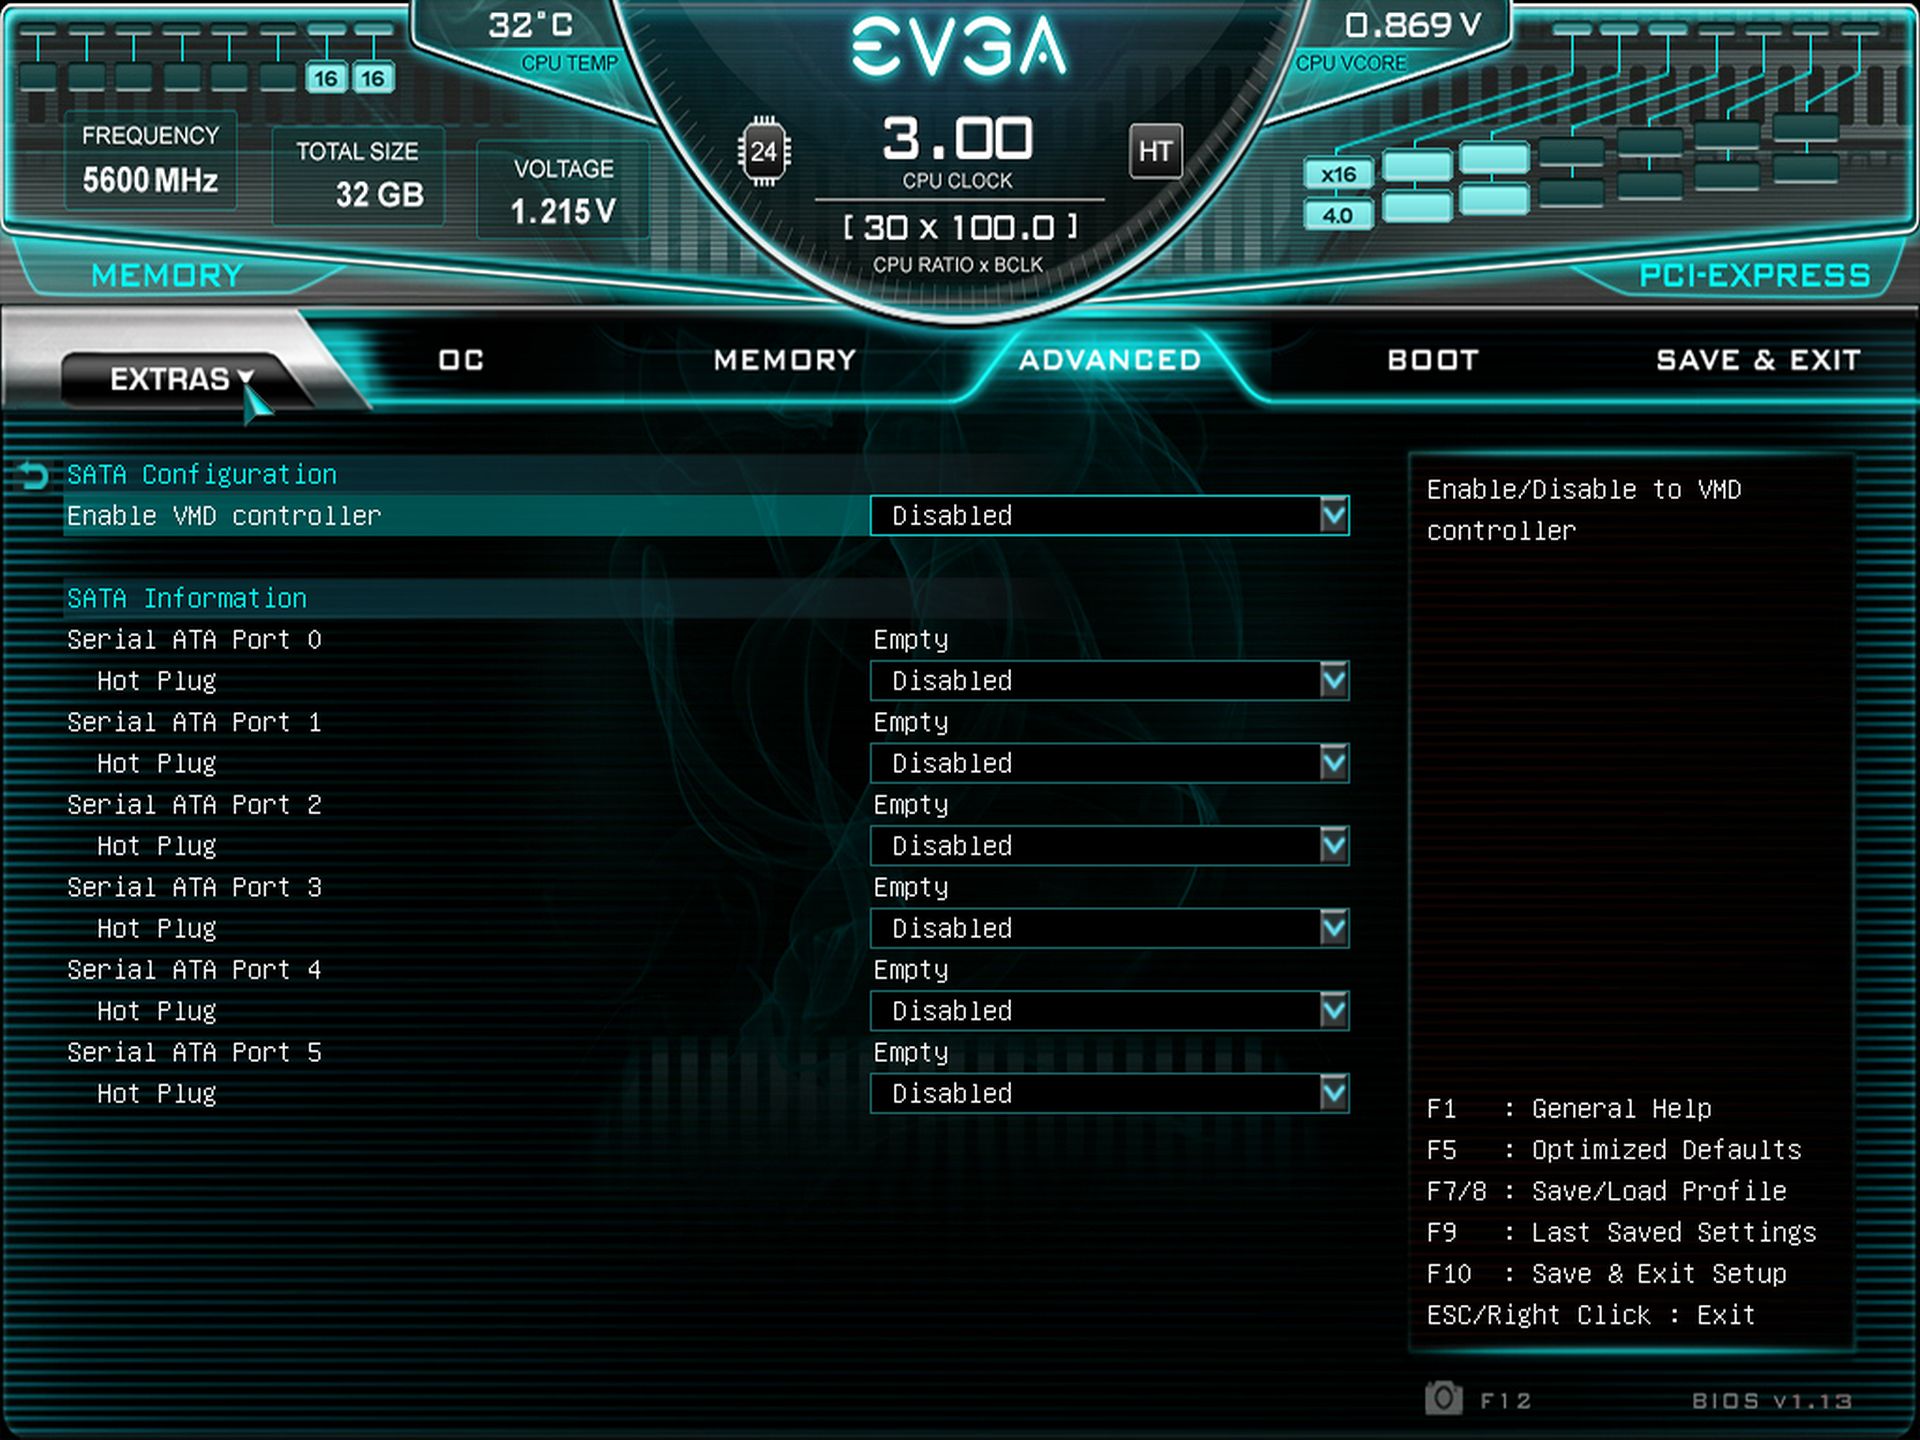
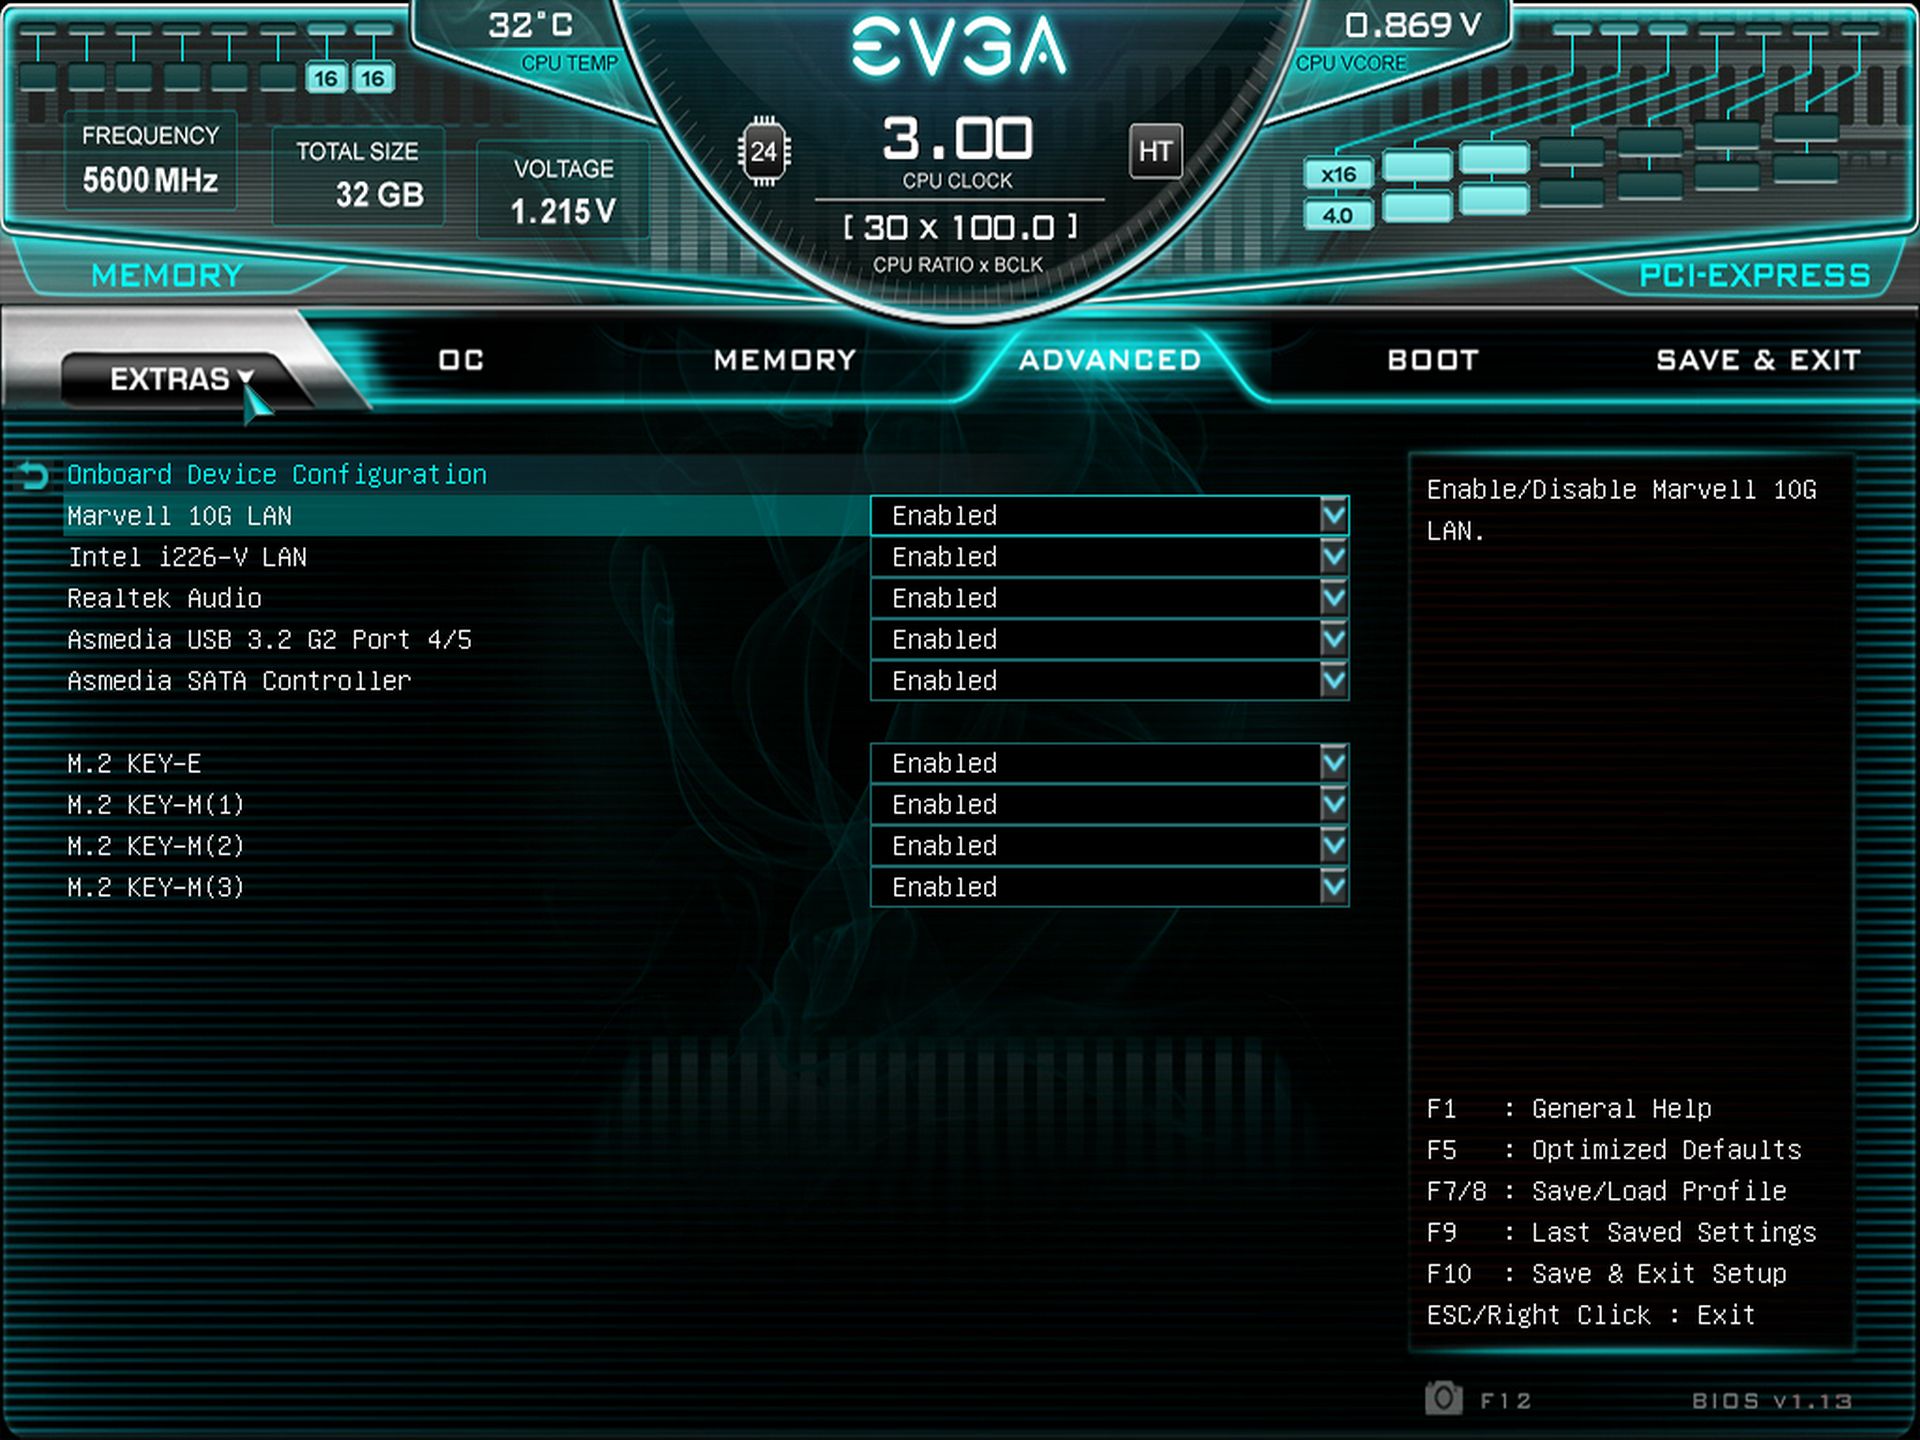
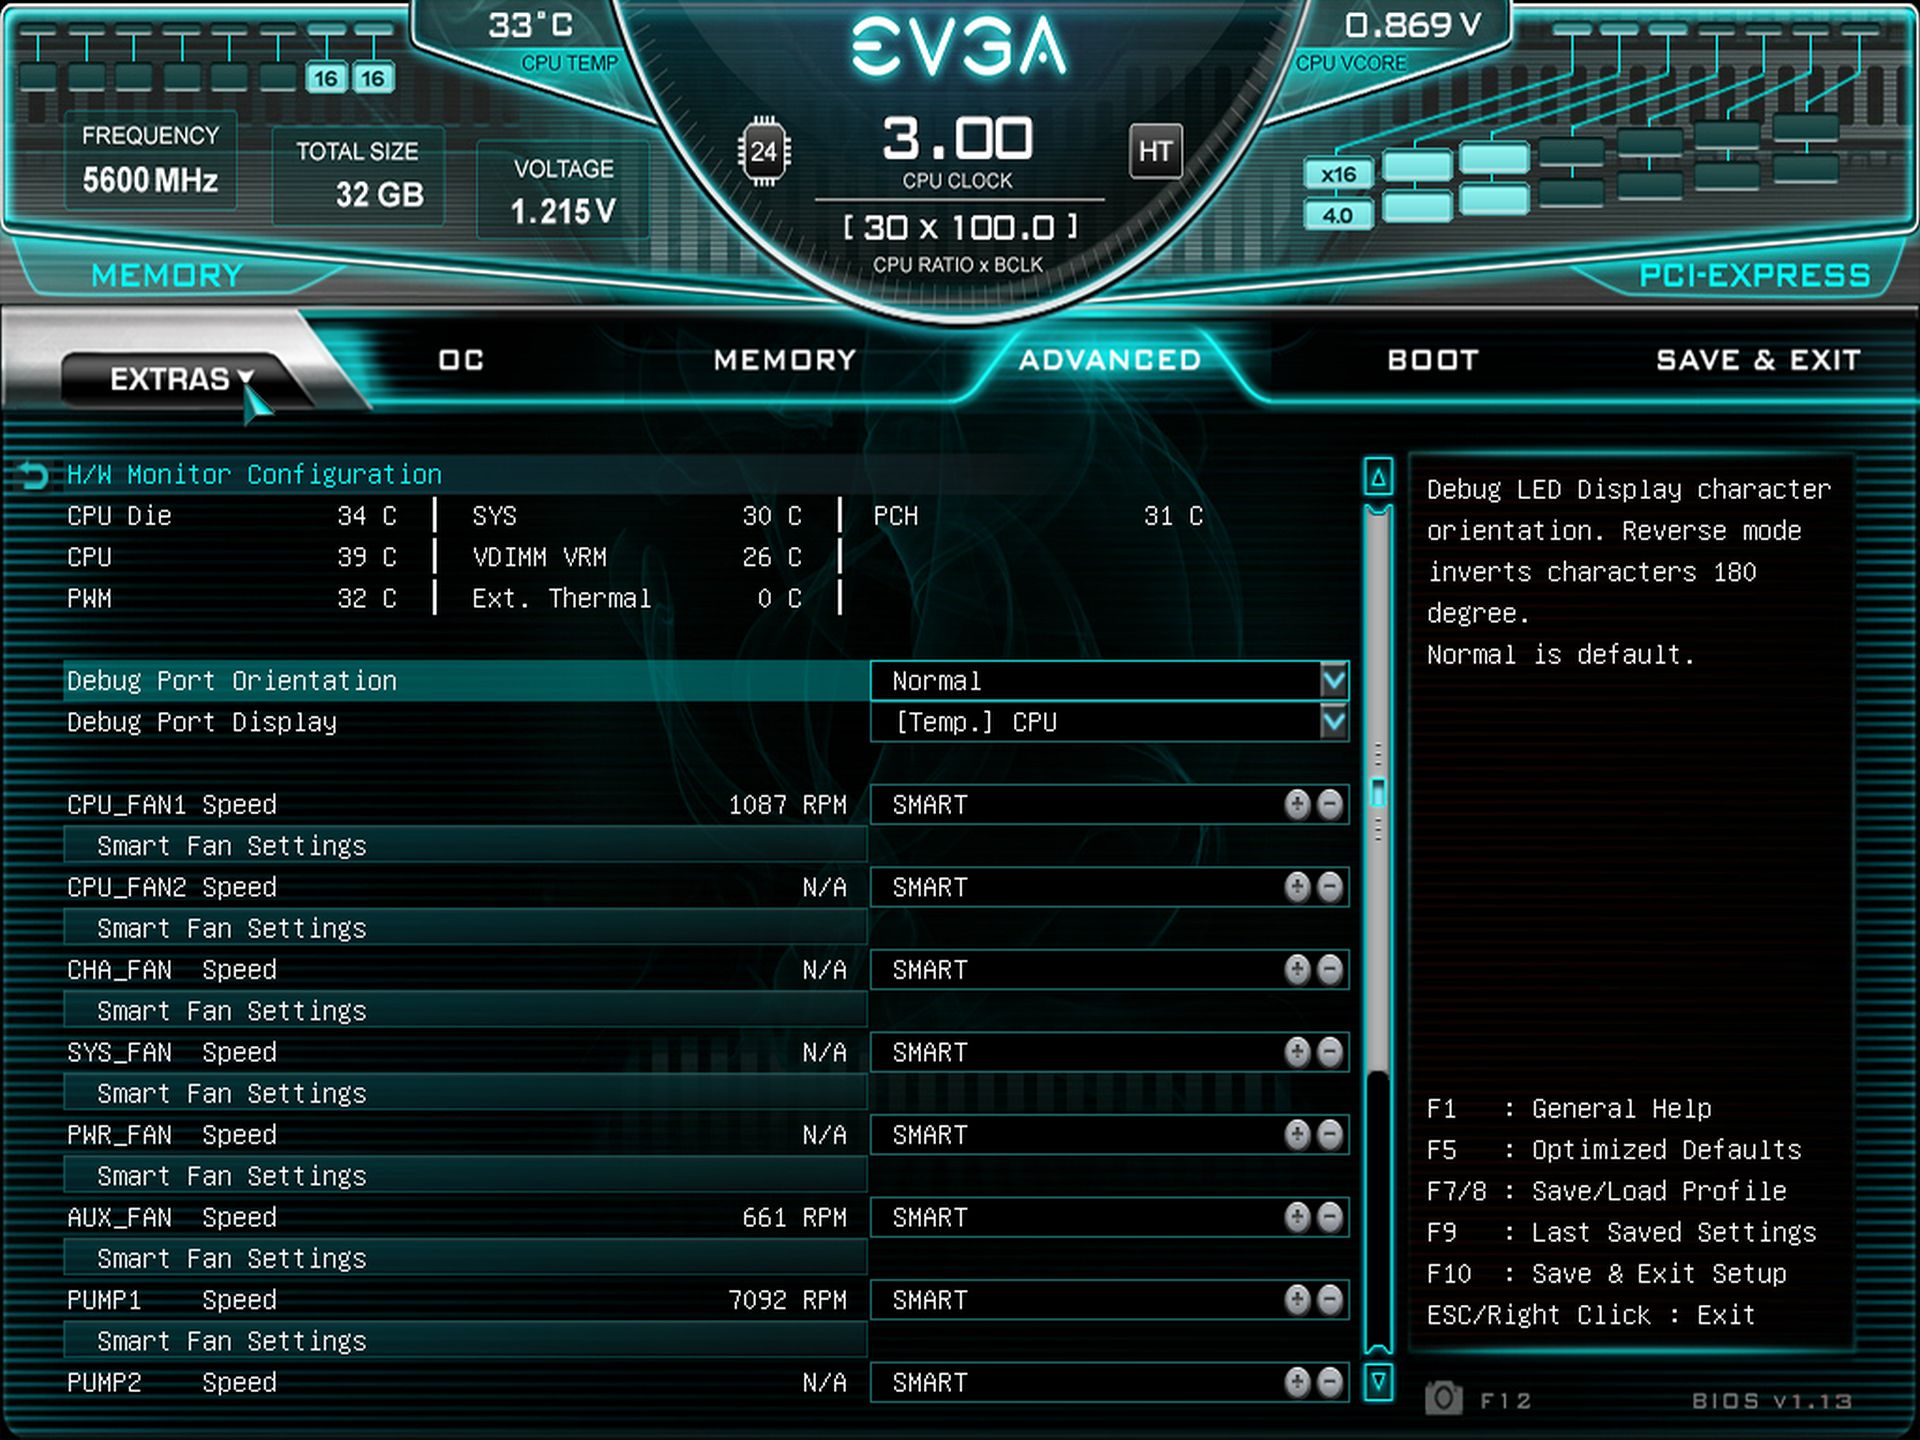
Firmware
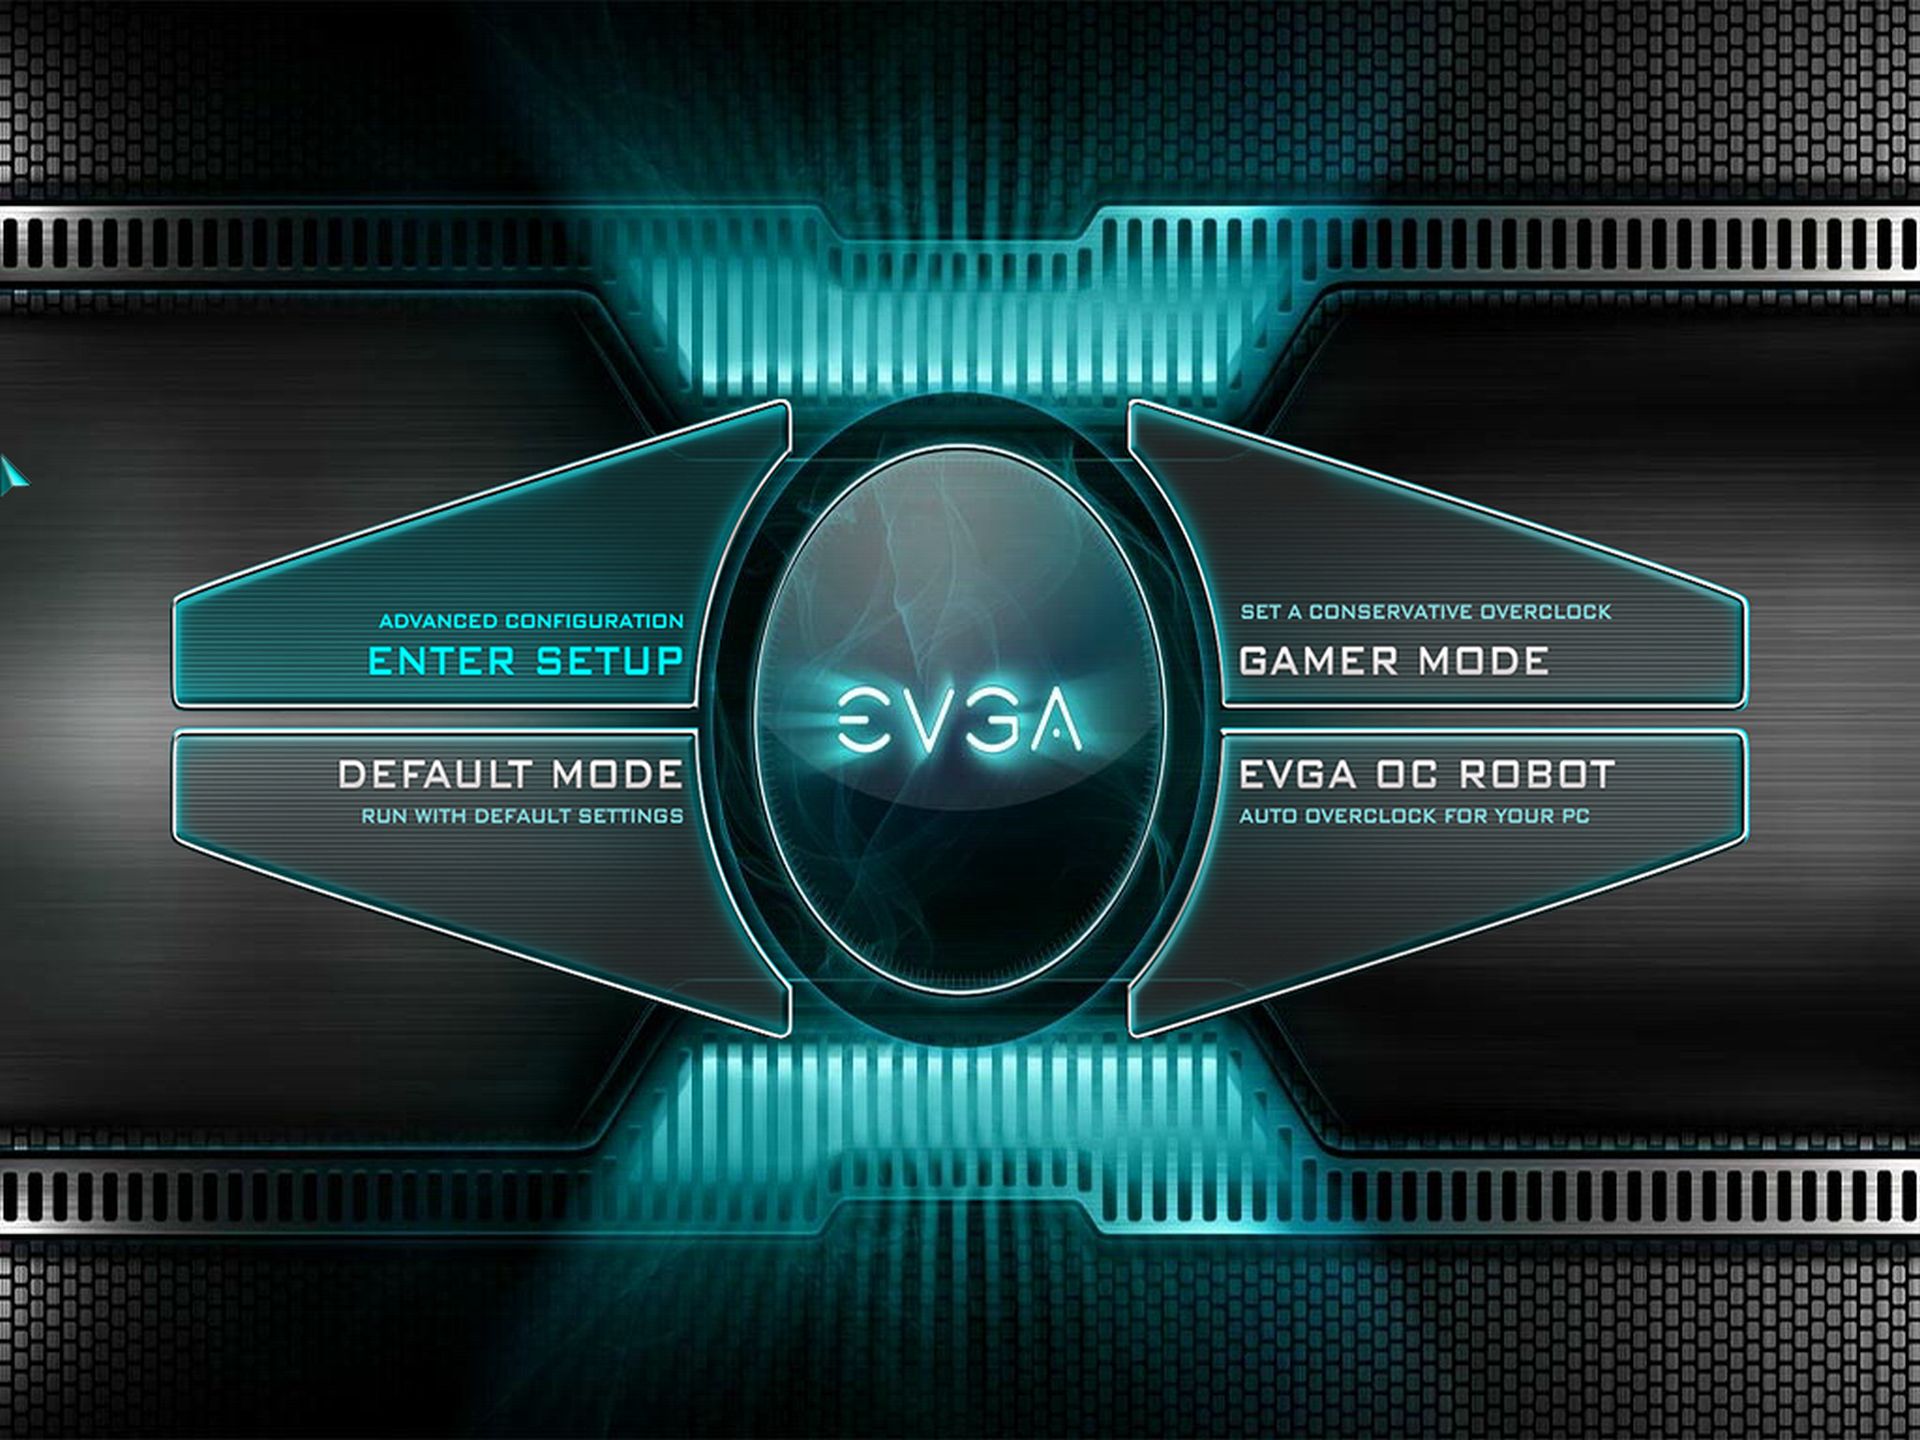
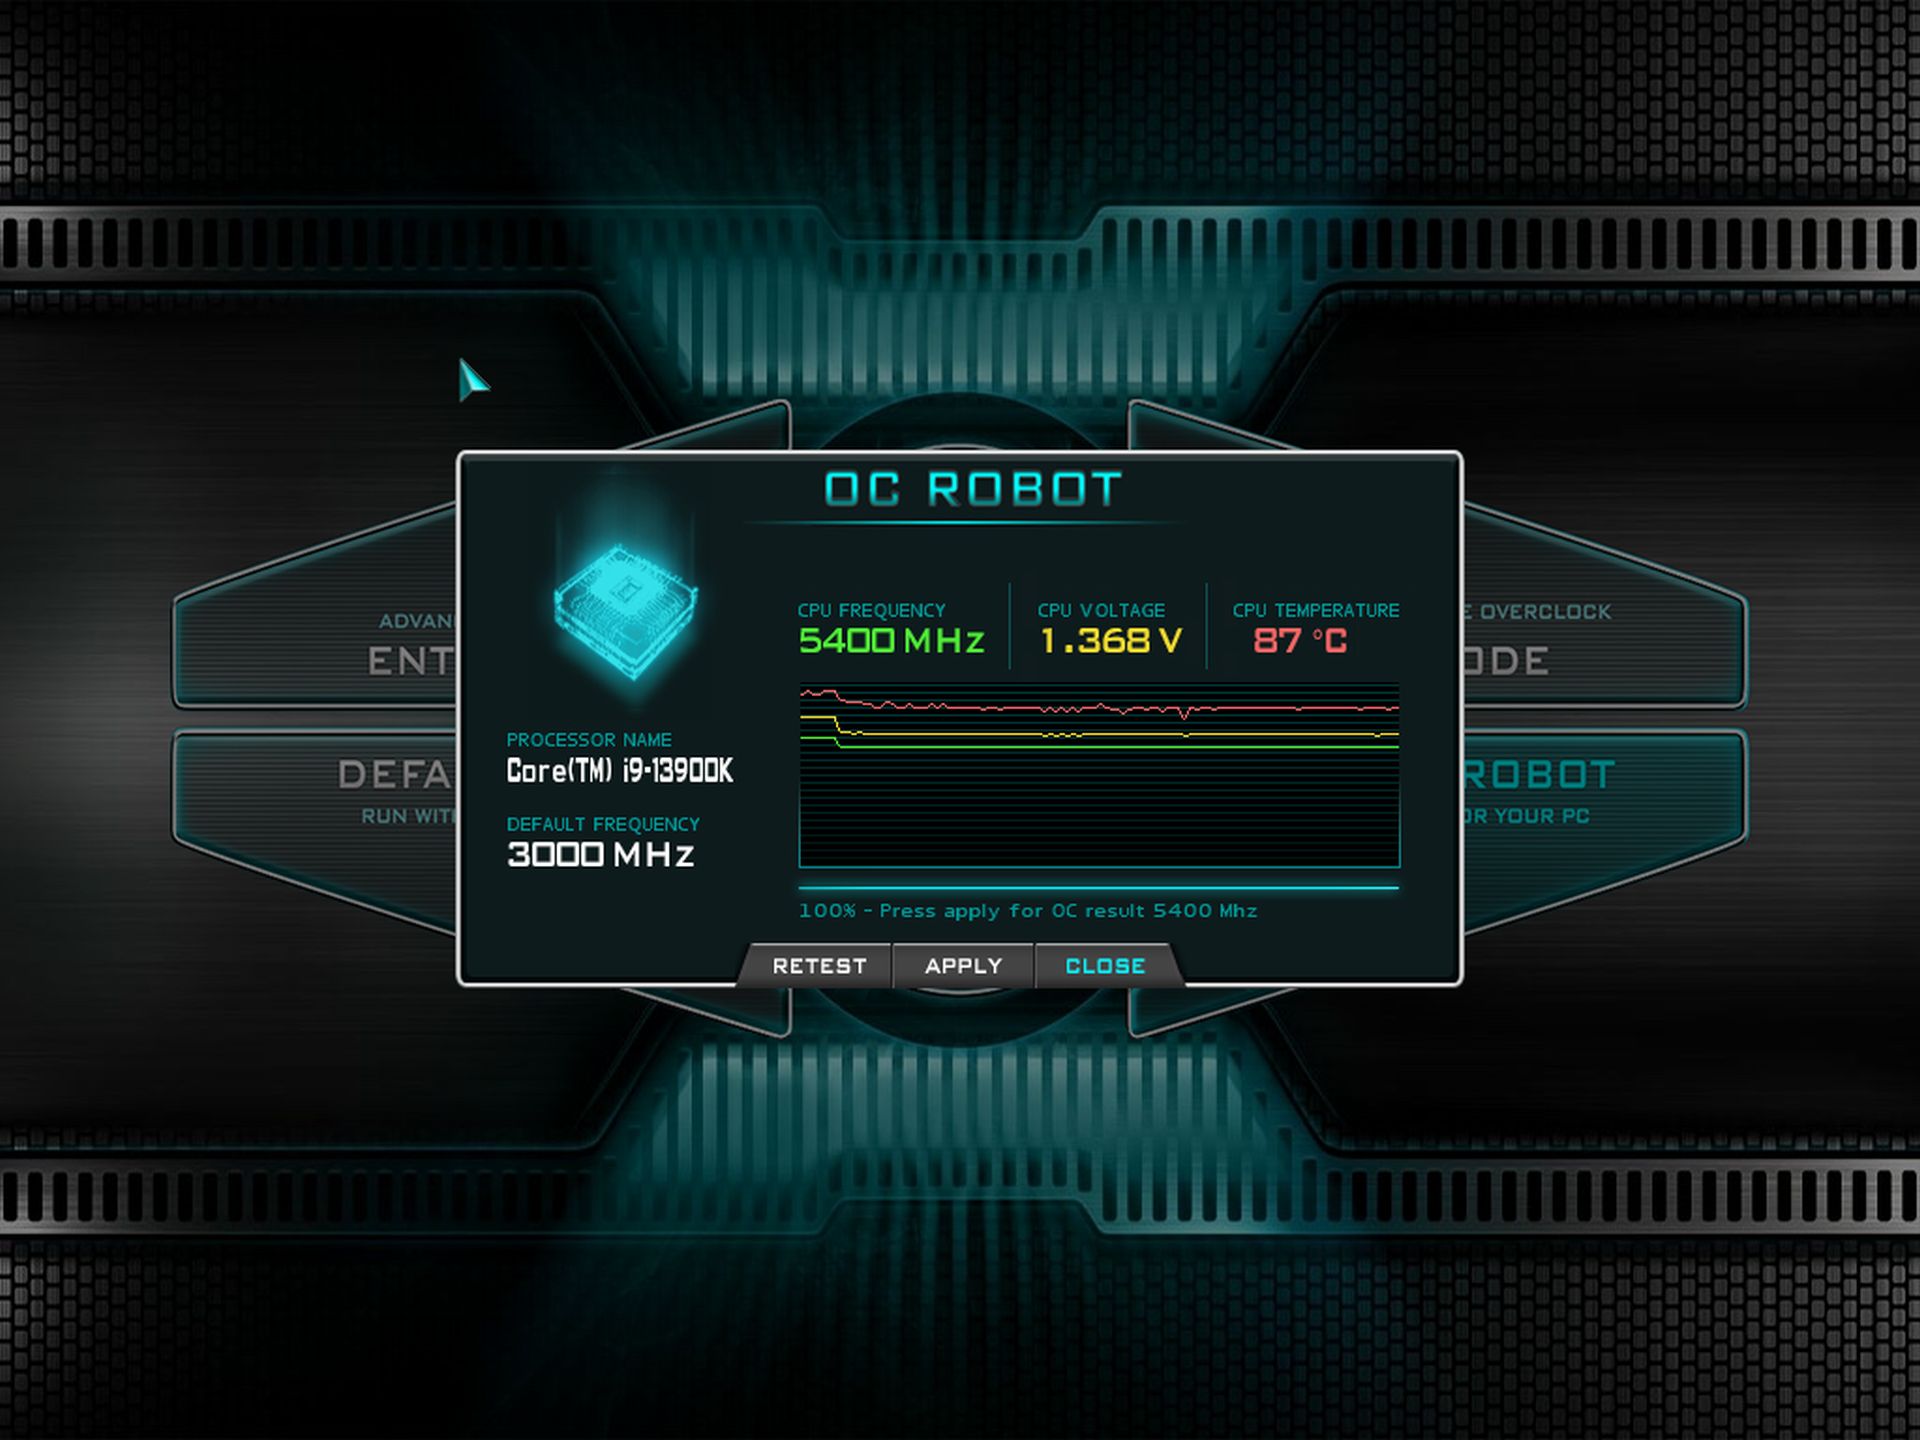
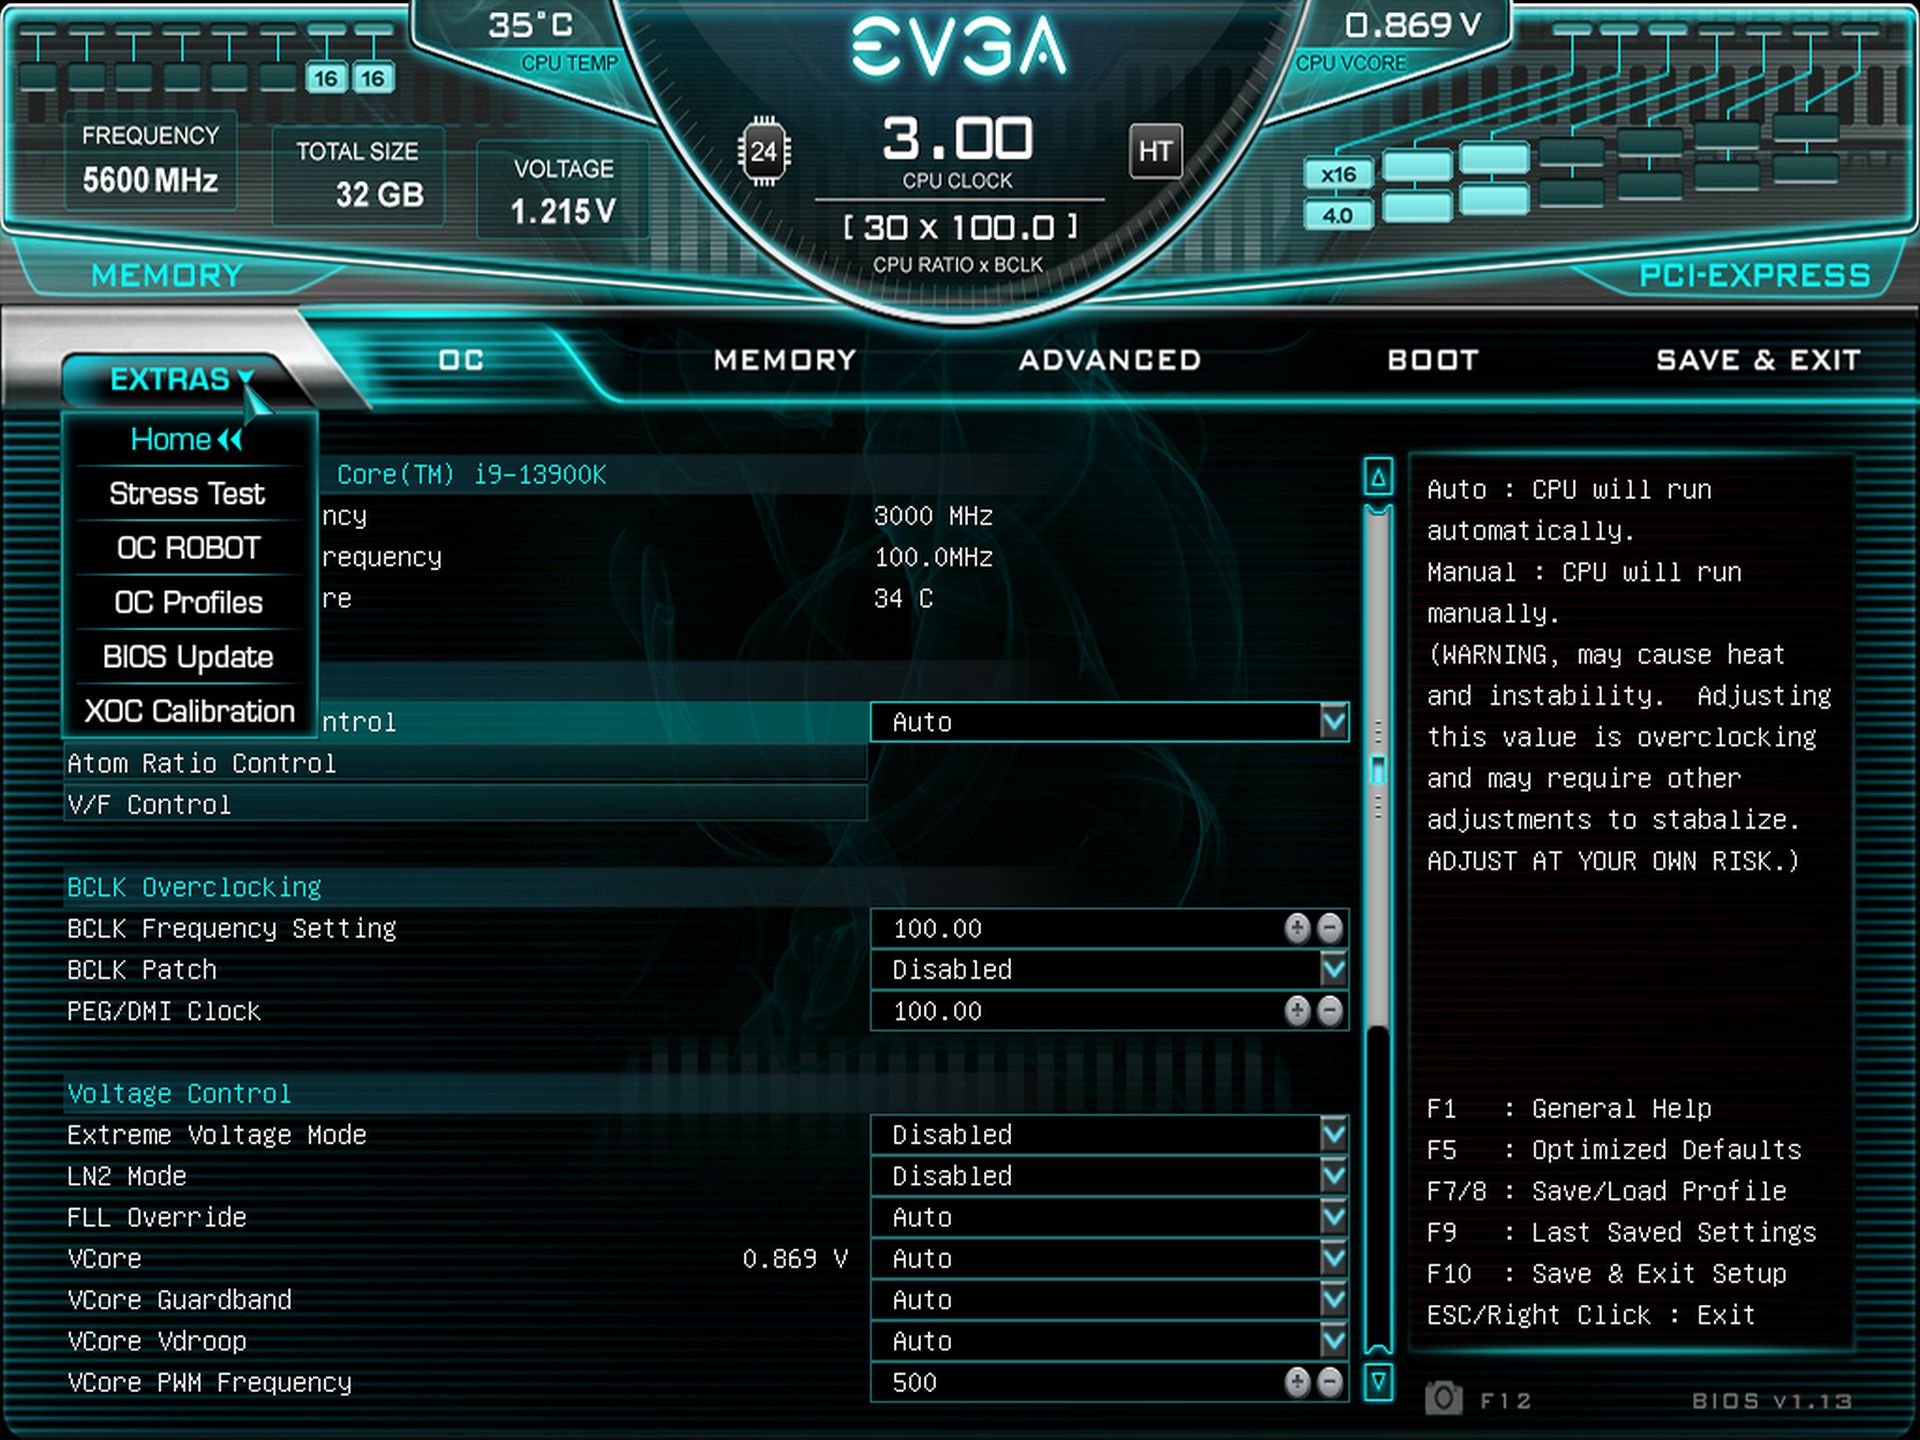
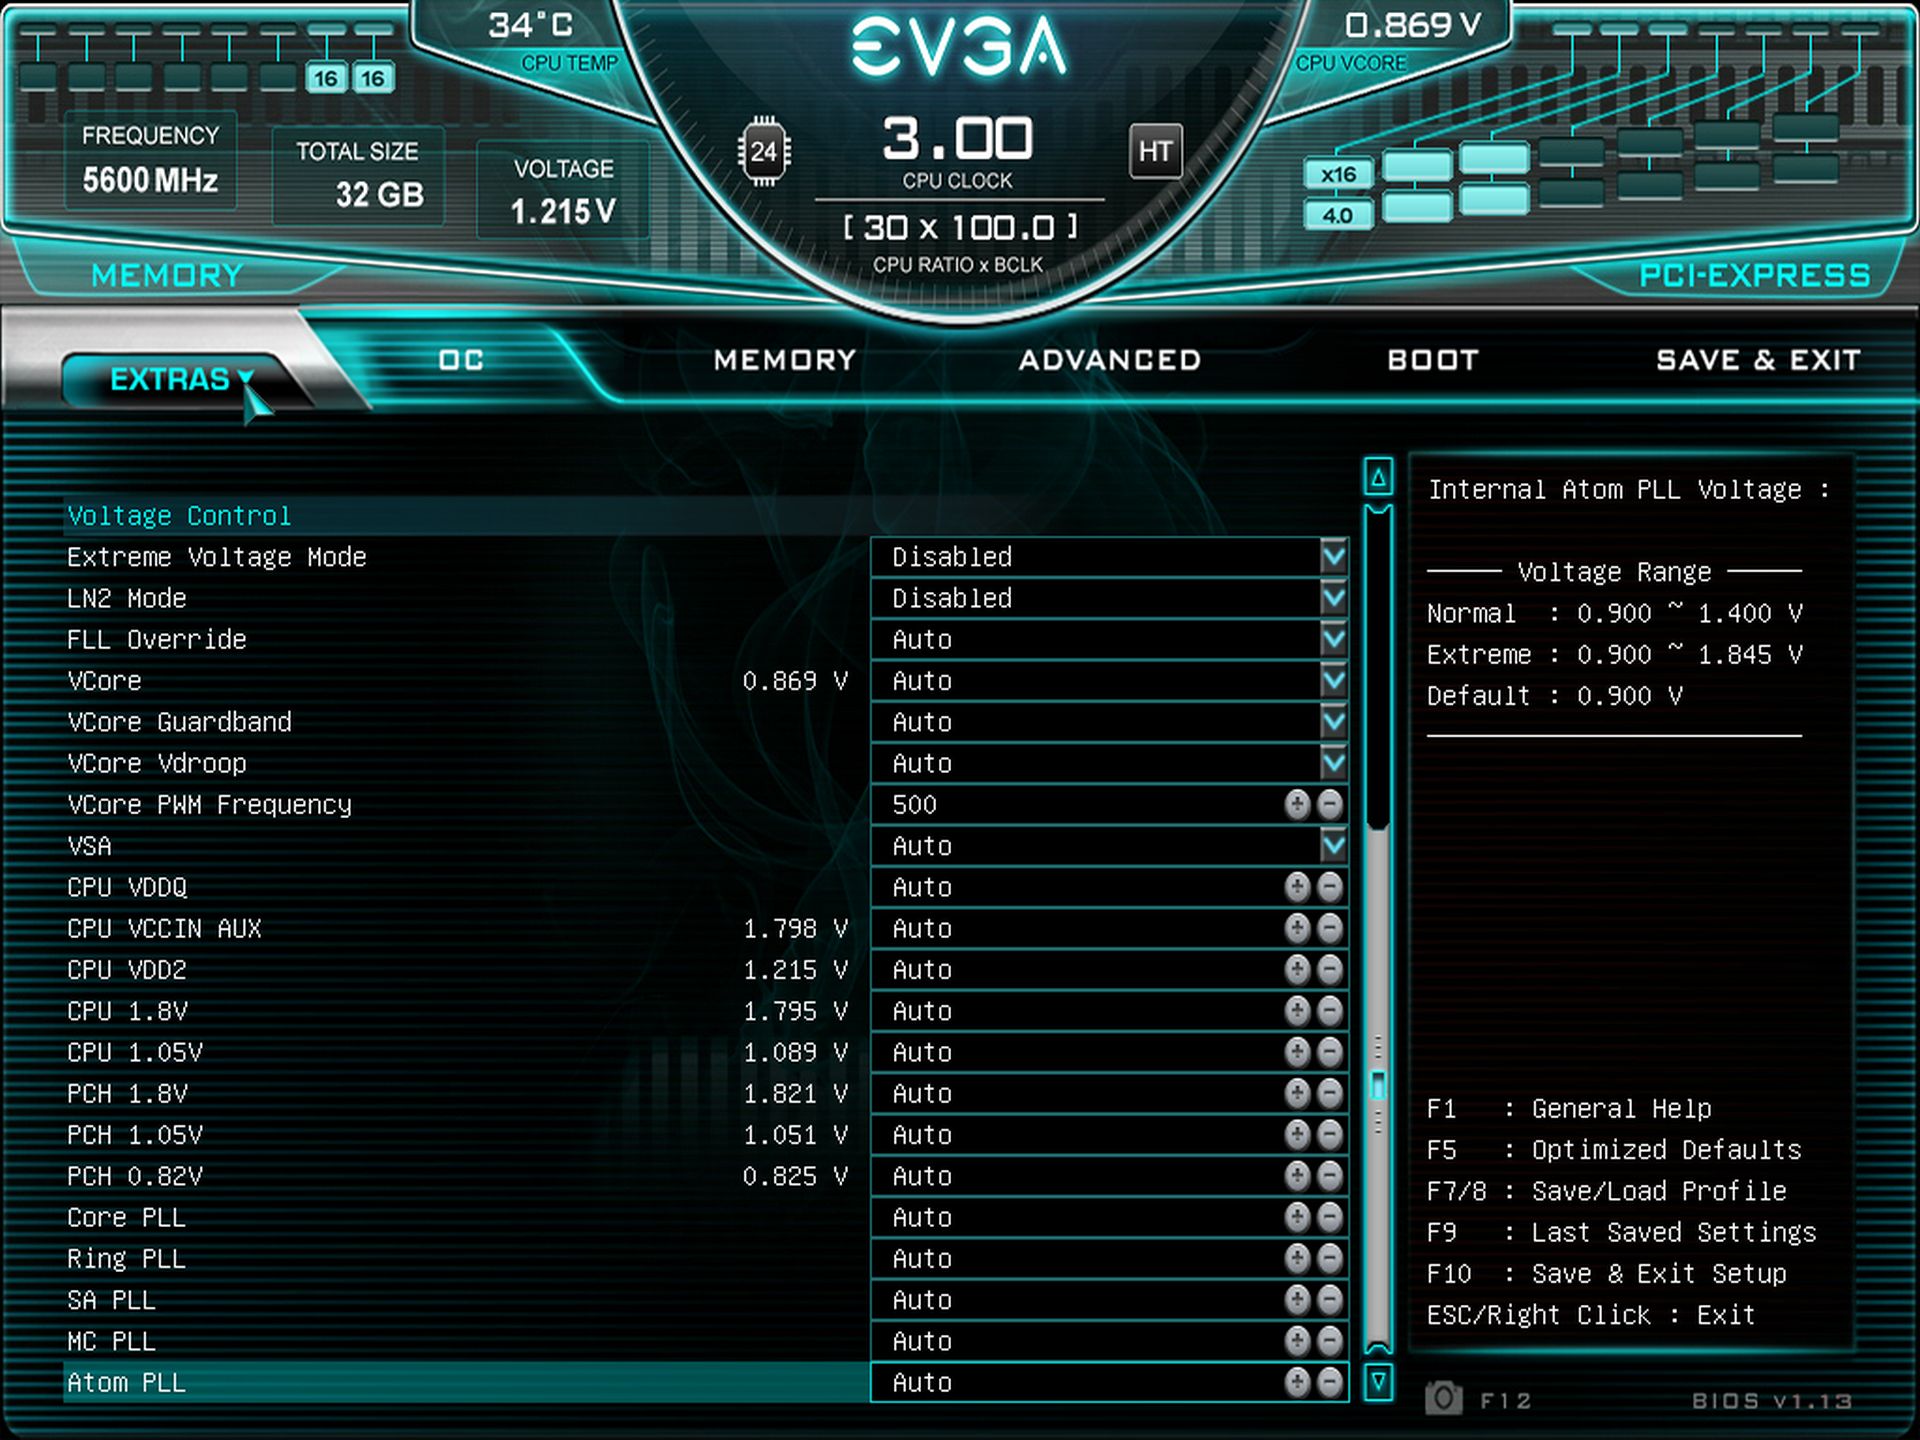
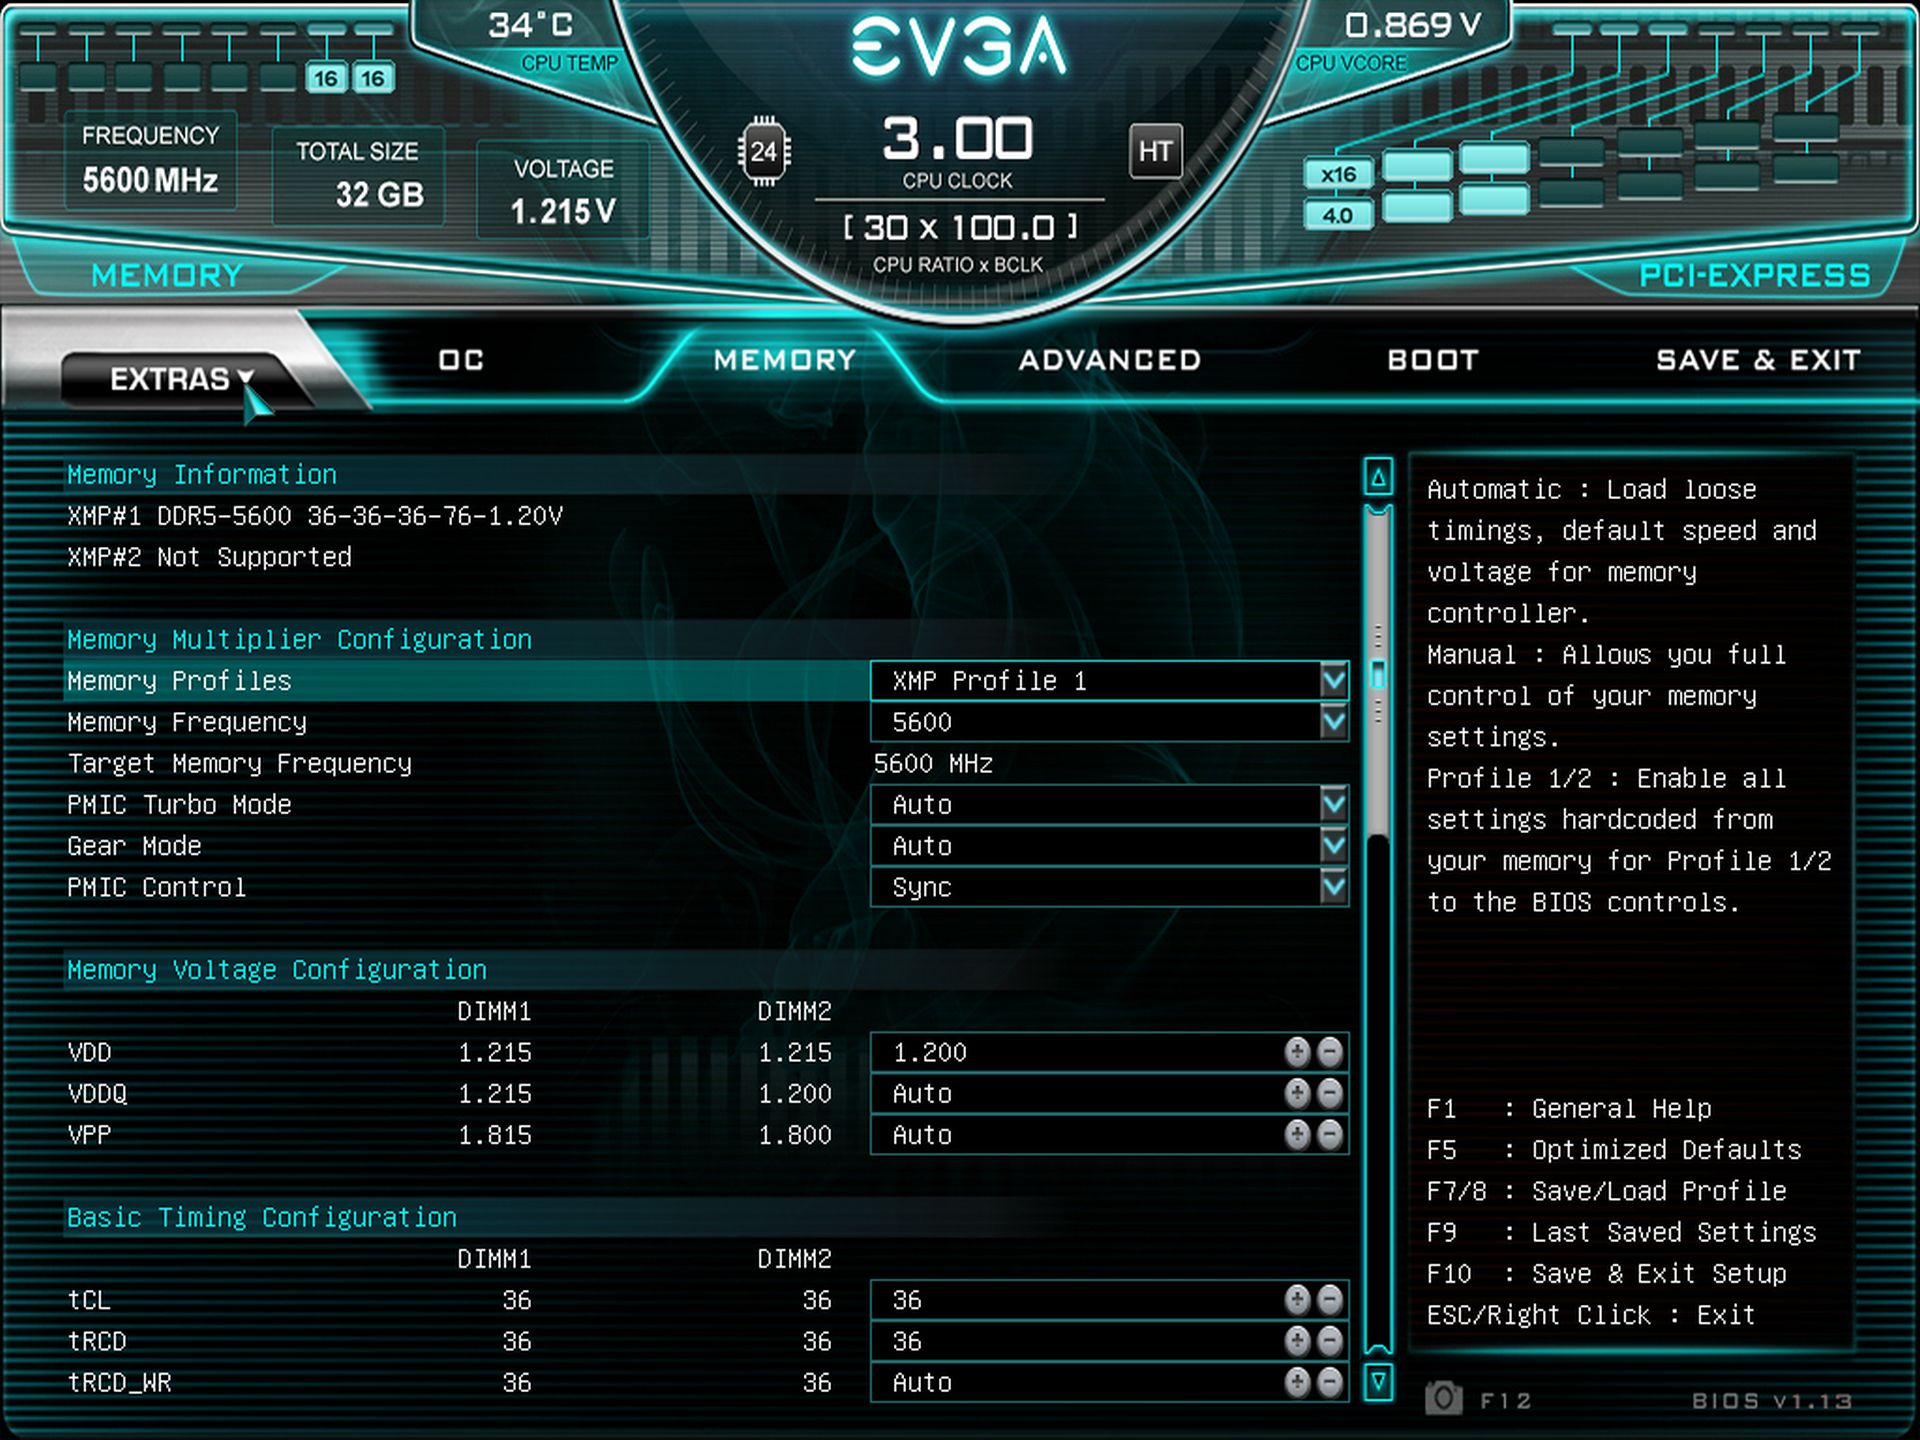
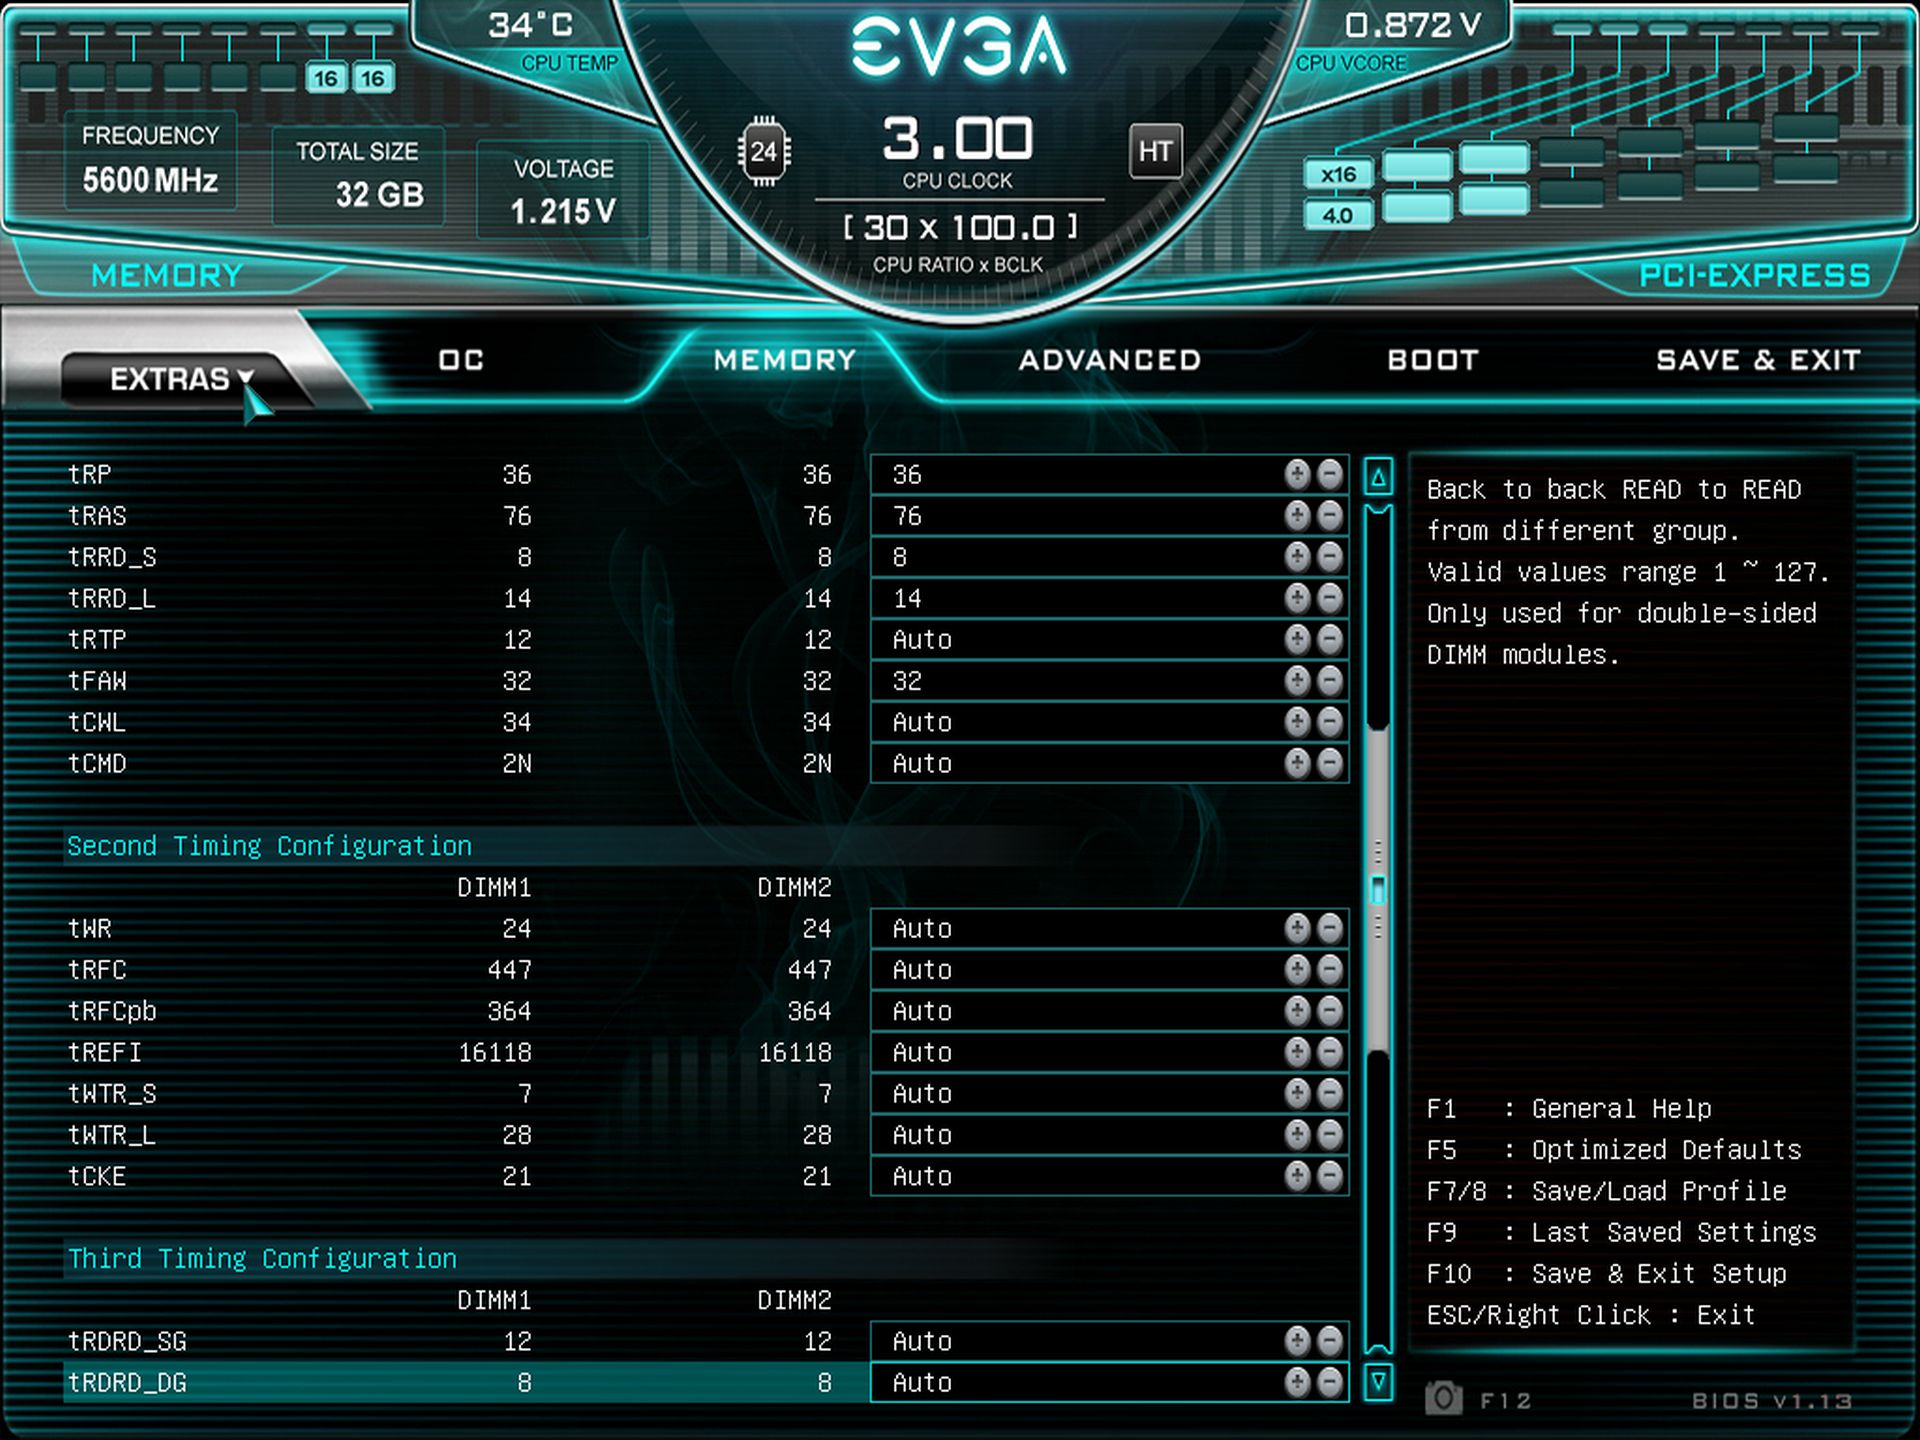
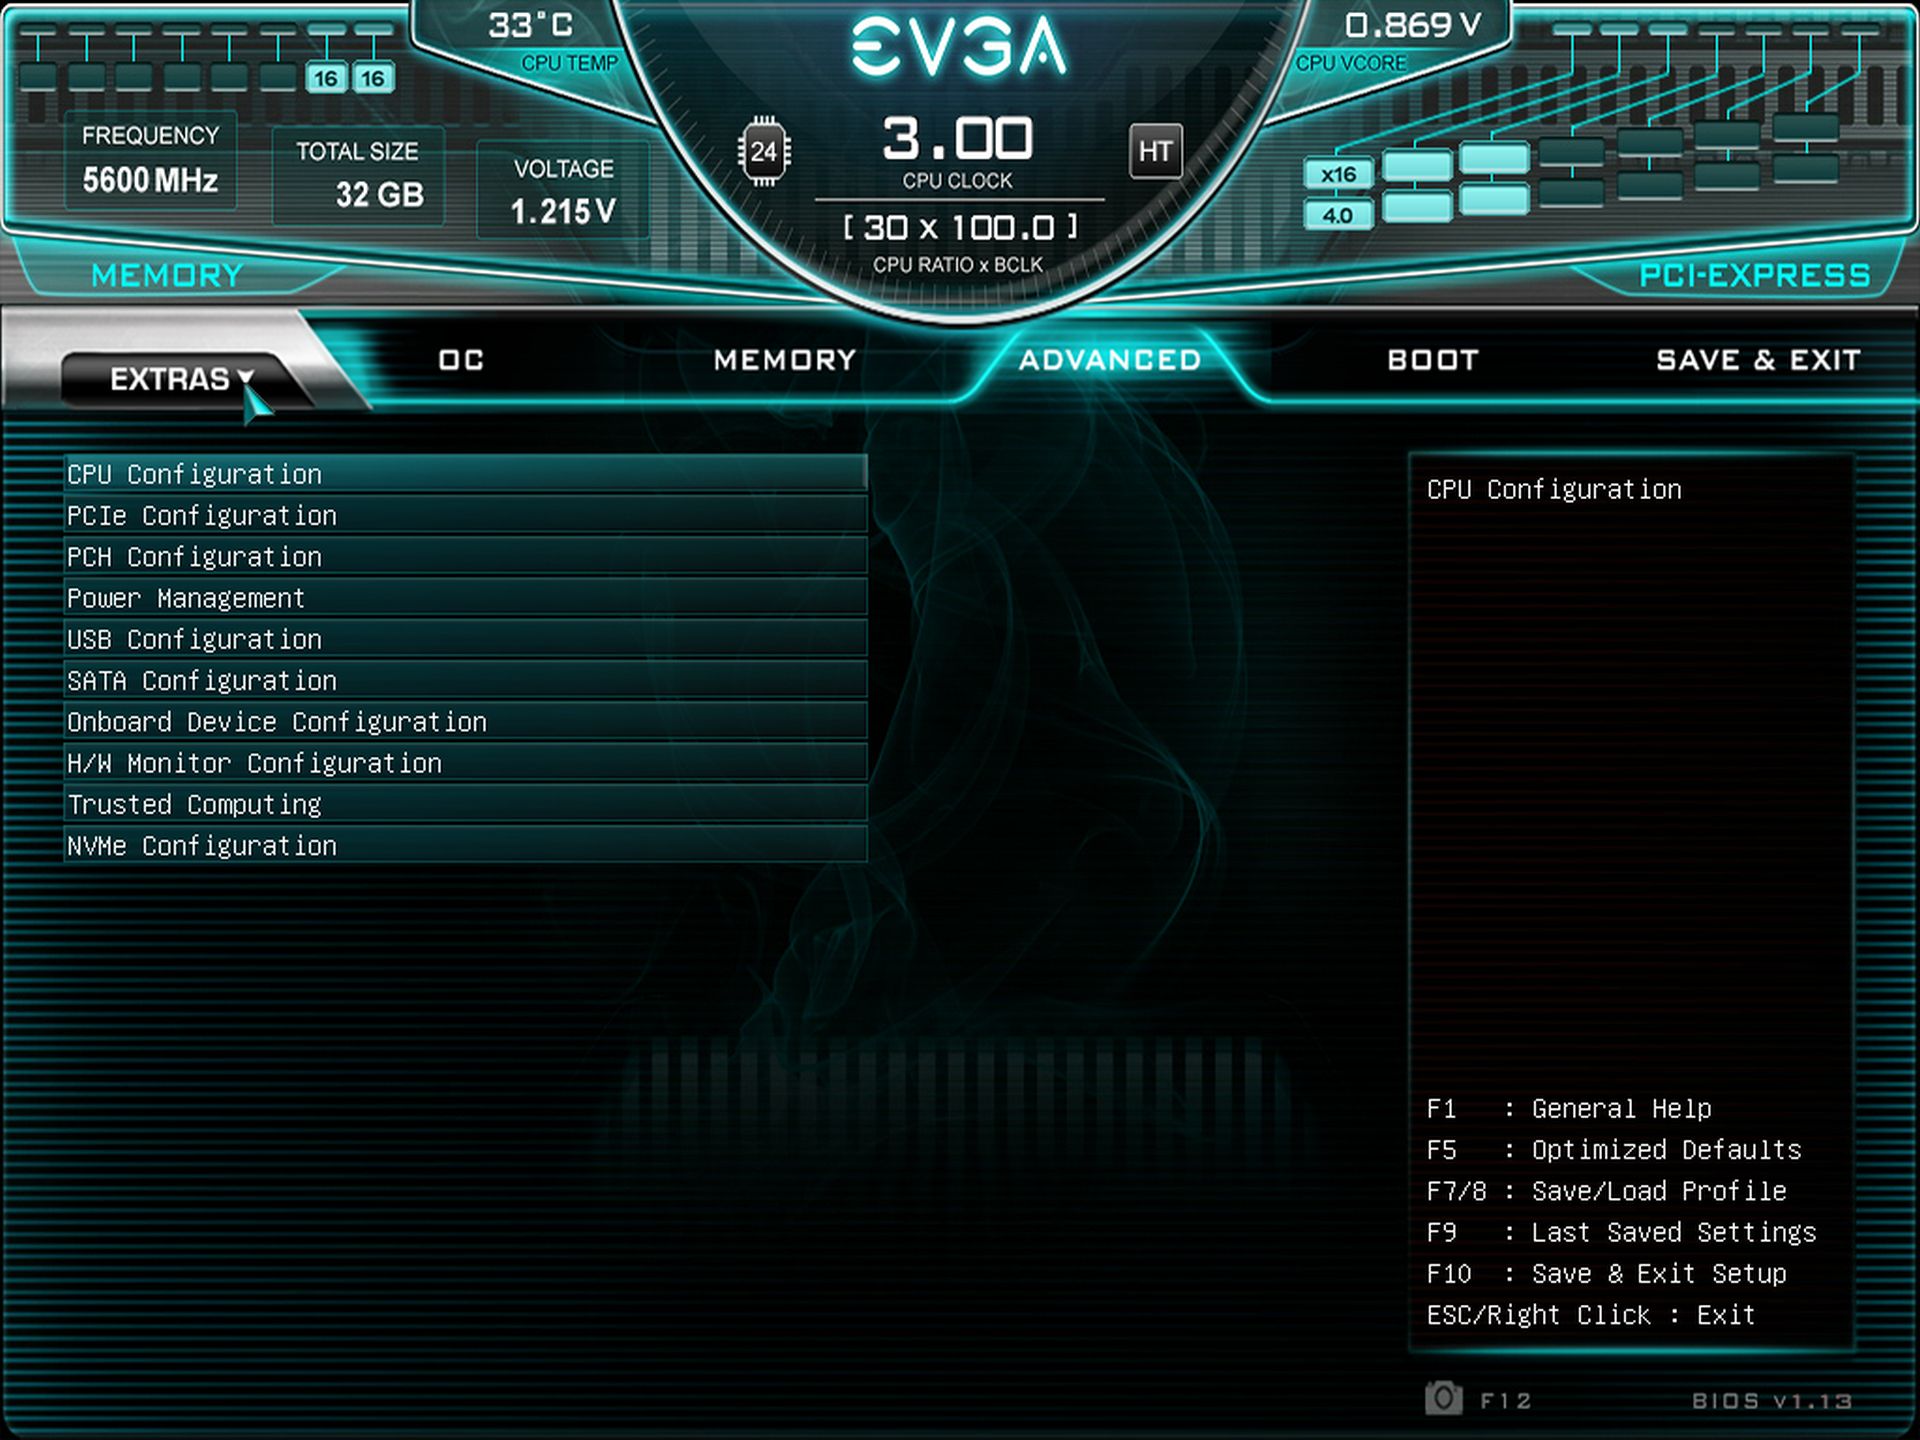
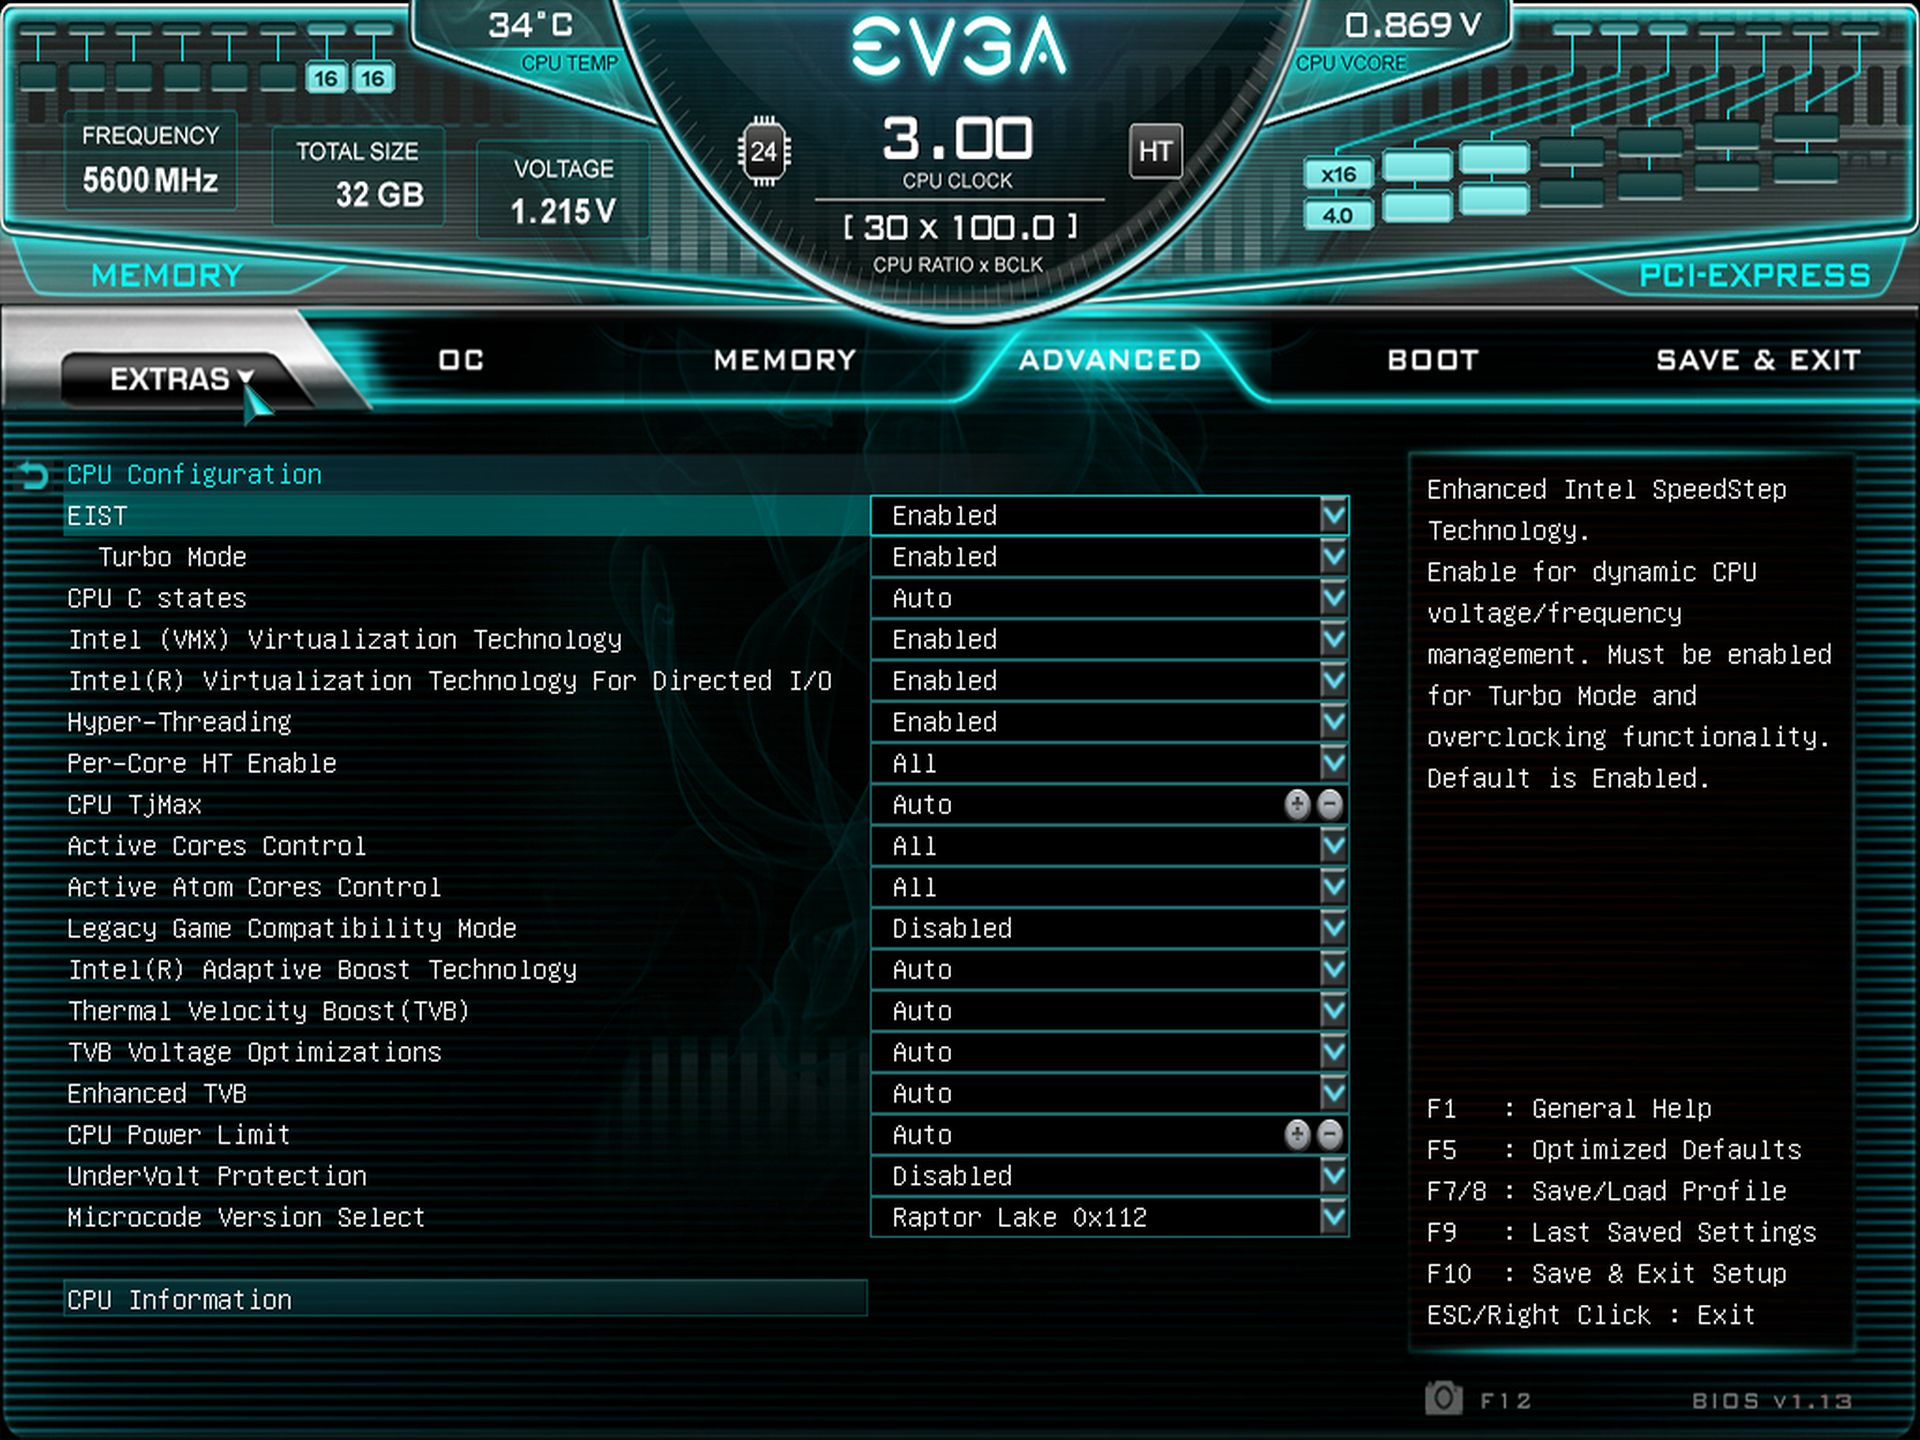
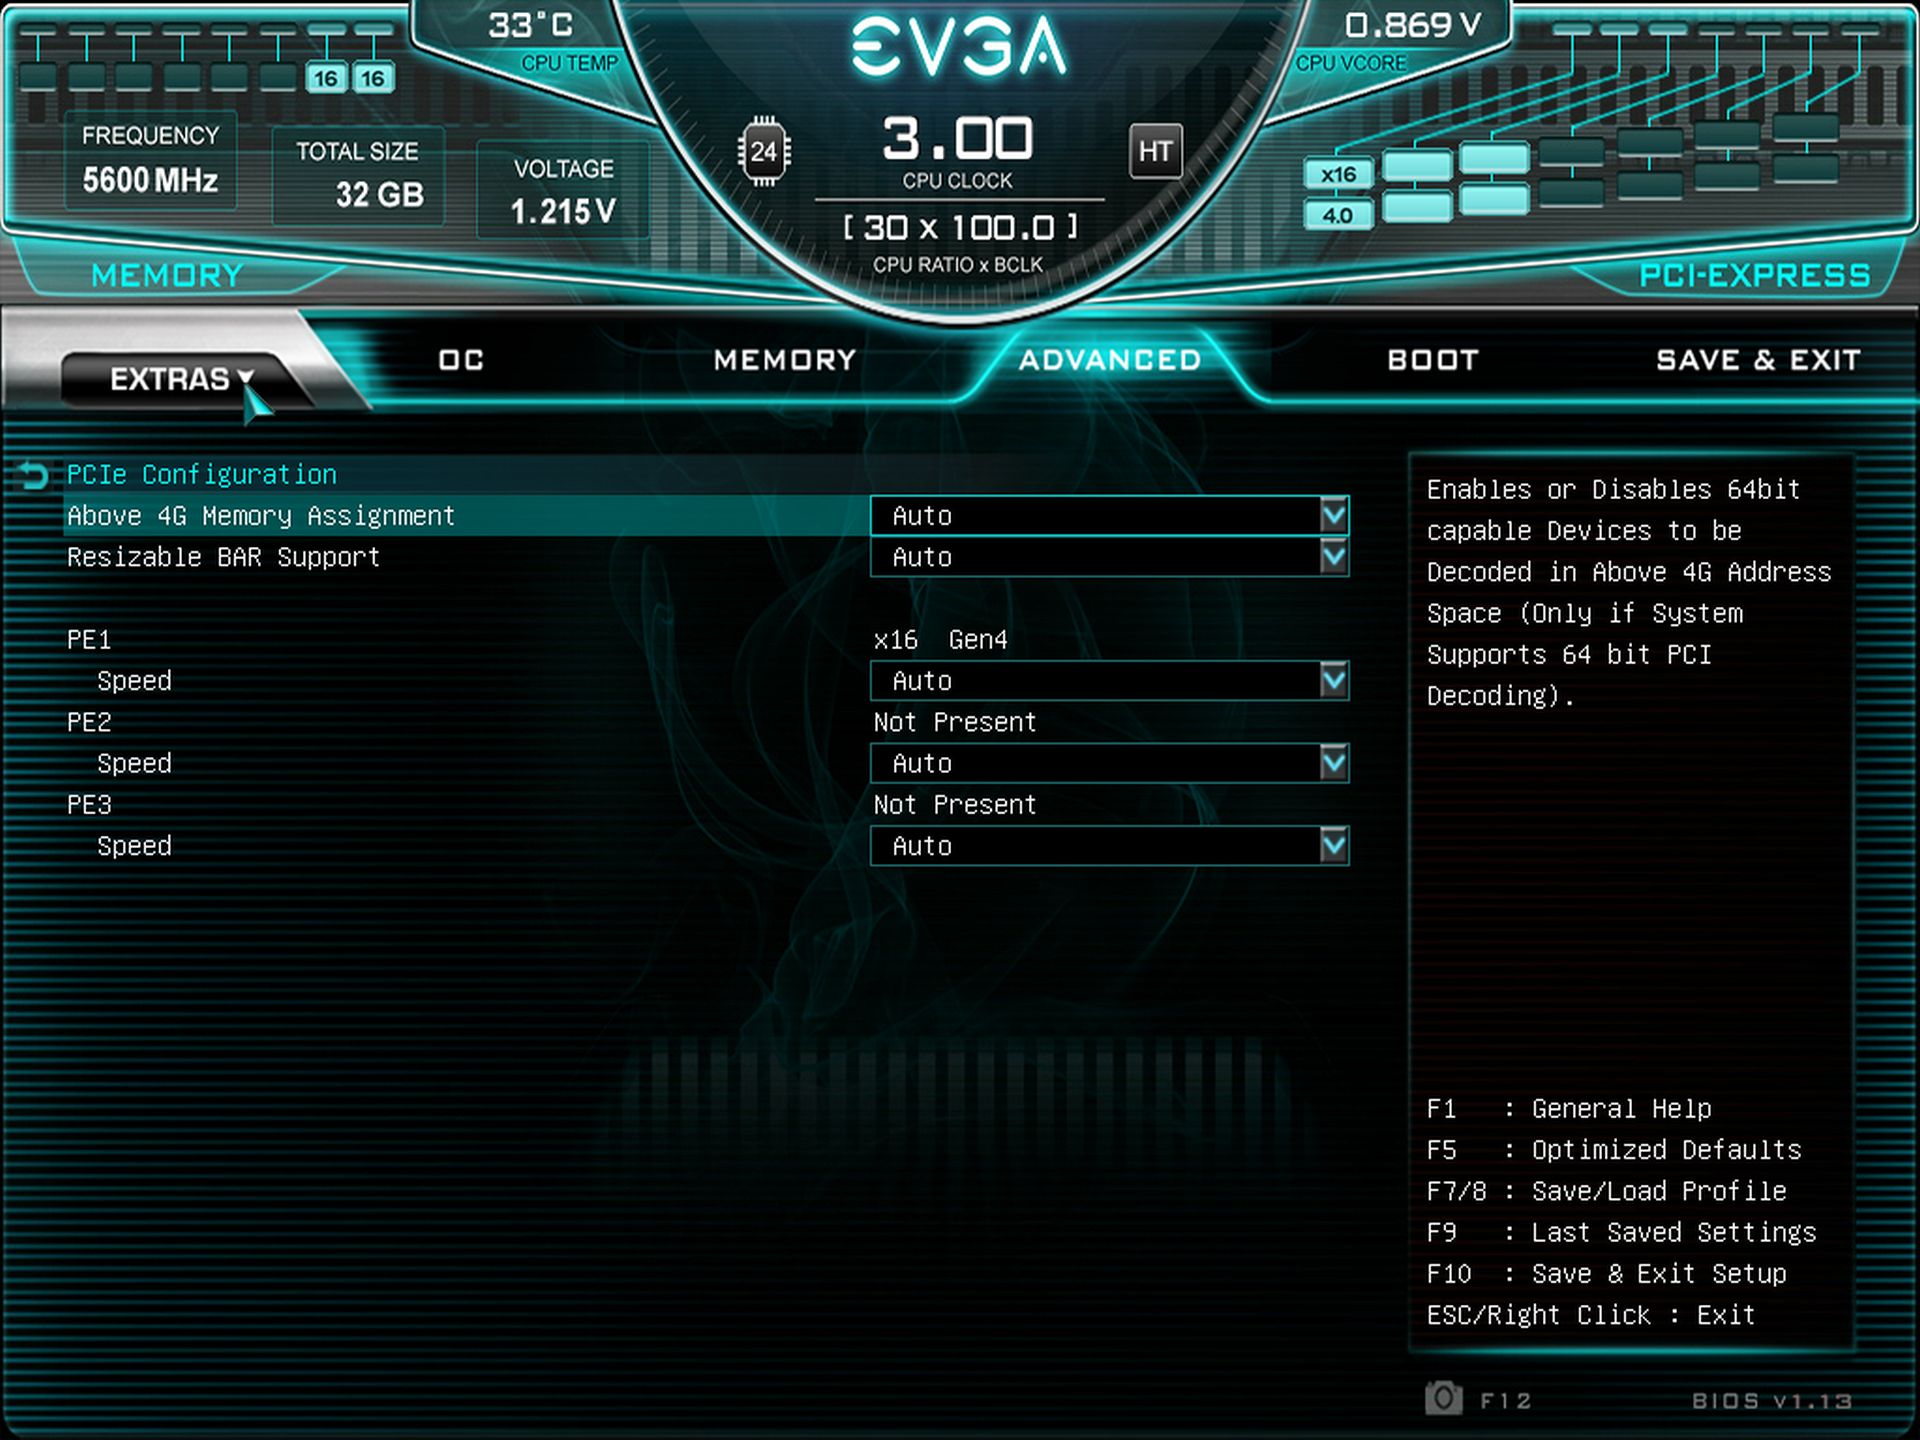
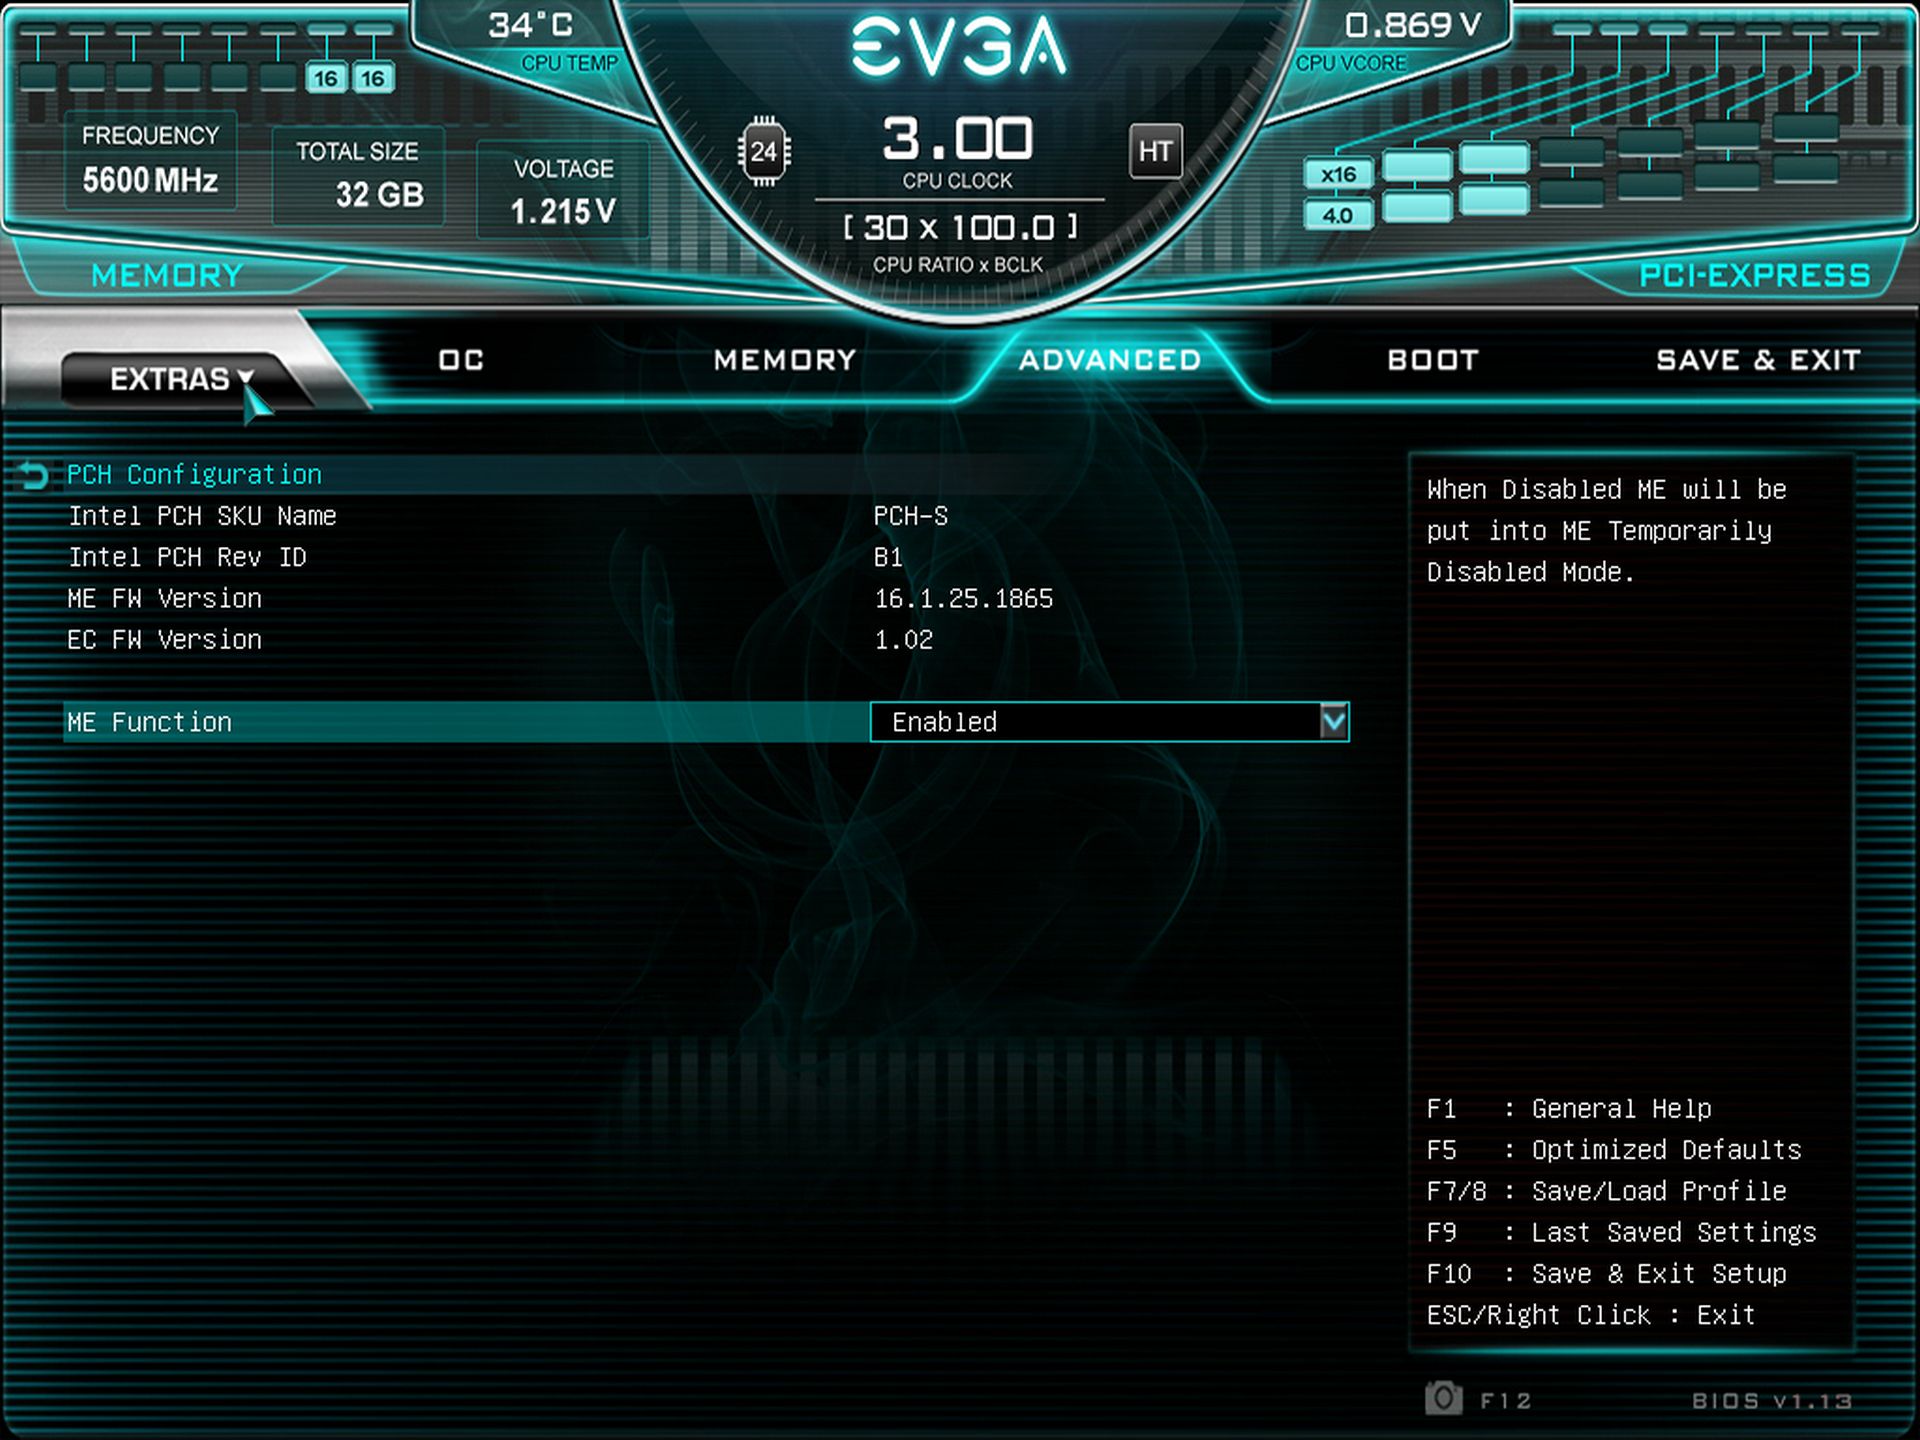
Like other board makers, EVGA's BIOS hasn’t changed much compared to the last one we looked at (Z690 generation). Once the system POSTs, you’re presented with four options (Setup, Default, Gamer Mode, and EVGA OC Robot) to access different functionality. After entering the Setup portion of the BIOS, where you can tweak settings, you see informative system information on top. There are headings for different sections below, with the rest of the screen taken up by options for each.
For the most part, there isn’t much digging around in the sub-menus to find the most frequently accessed items, but CPU and memory overclocking are in different sections. Gamer Mode slightly boosts the CPU, while the EVGA OC Robot finds a faster clock speed by raising clocks and playing with voltage during stress testing. Overall, thighs here are easy to read and navigate, with more options than most will ever use.

Software
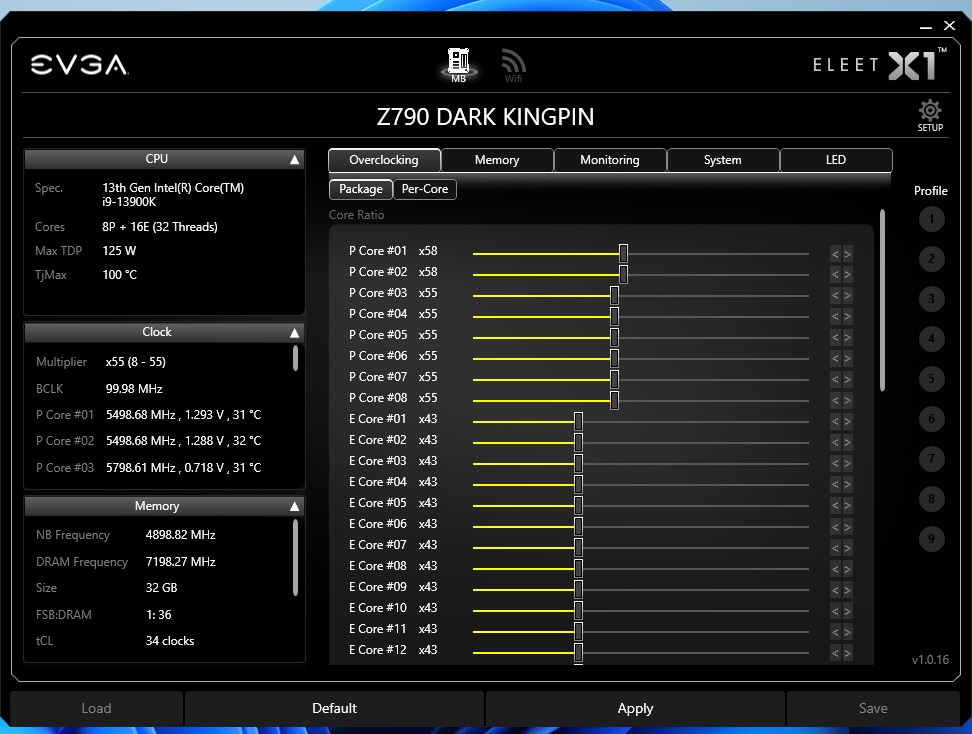
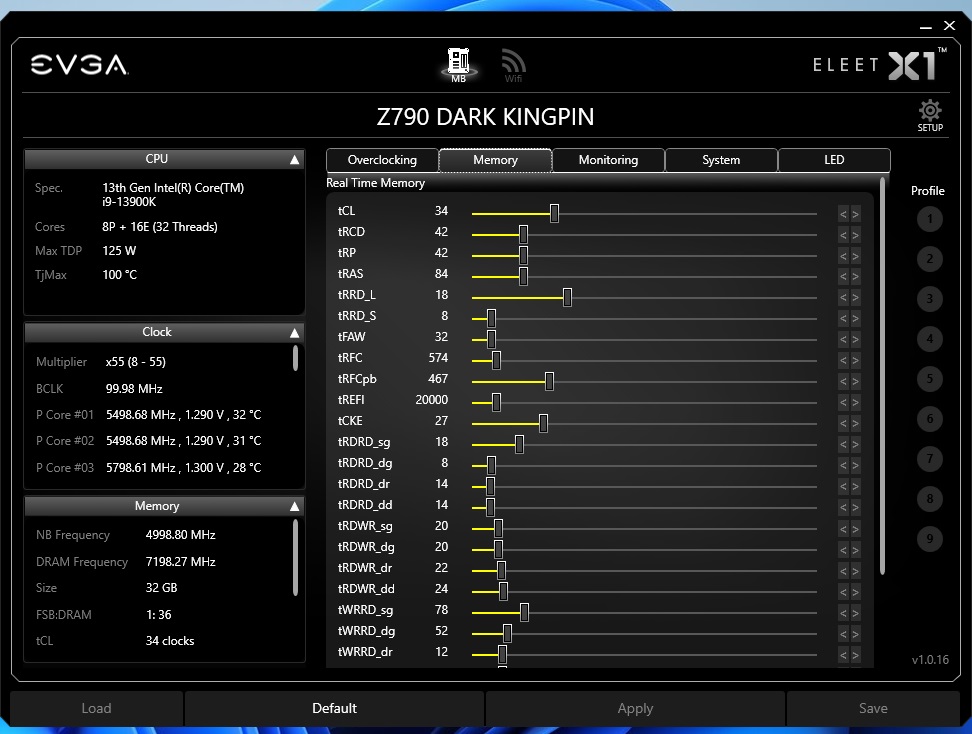
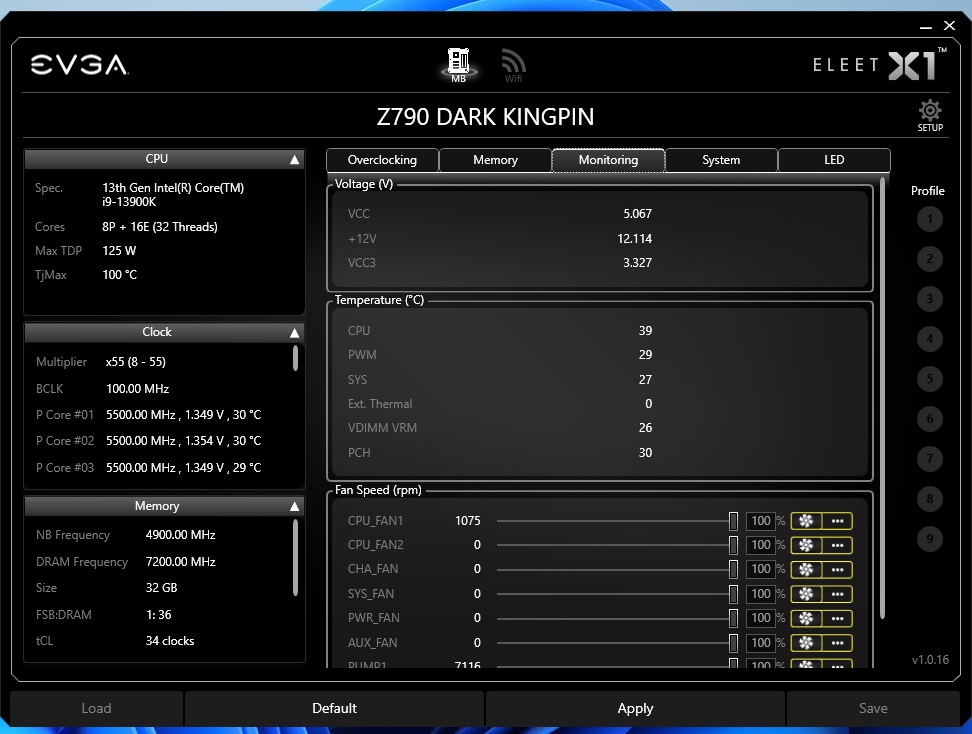
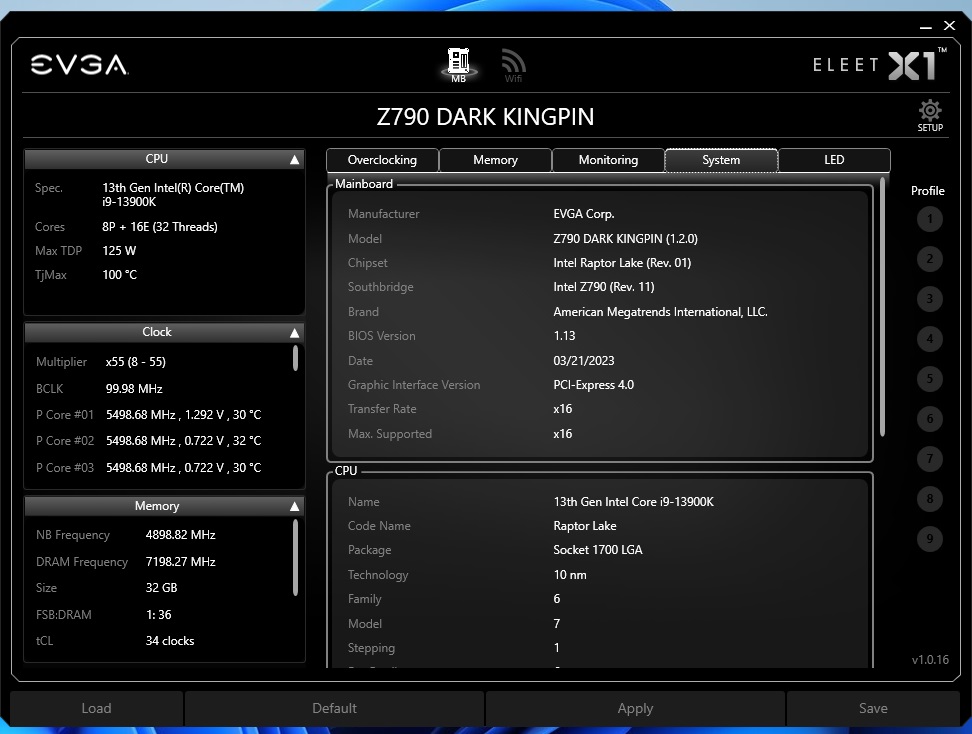
On the software side, EVGA’s Eleet X1 is a multi-functional monitoring and tweaking tool. For example, Eleet can overclock the CPU and Memory and monitor the system voltages, temperatures and fan speeds. Additionally, it offers RGB lighting control and several preset lighting modes, plus the ability to adjust each strip attached to the motherboard headers. The latest version of Eleet X1 (1.0.13.0) is easy to read and helpful. The only thing I feel is missing from the software is fan control.
Test System / Comparison Products
We’ve updated our test system to Windows 11 64-bit OS with all updates applied. We kept the same Asus TUF RTX 3070 video card from our previous testing platforms but updated the driver. We also updated to F1 22 for our games and kept Far Cry 6. We use the latest non-beta motherboard BIOS available to the public unless otherwise noted. The hardware we used is as follows:
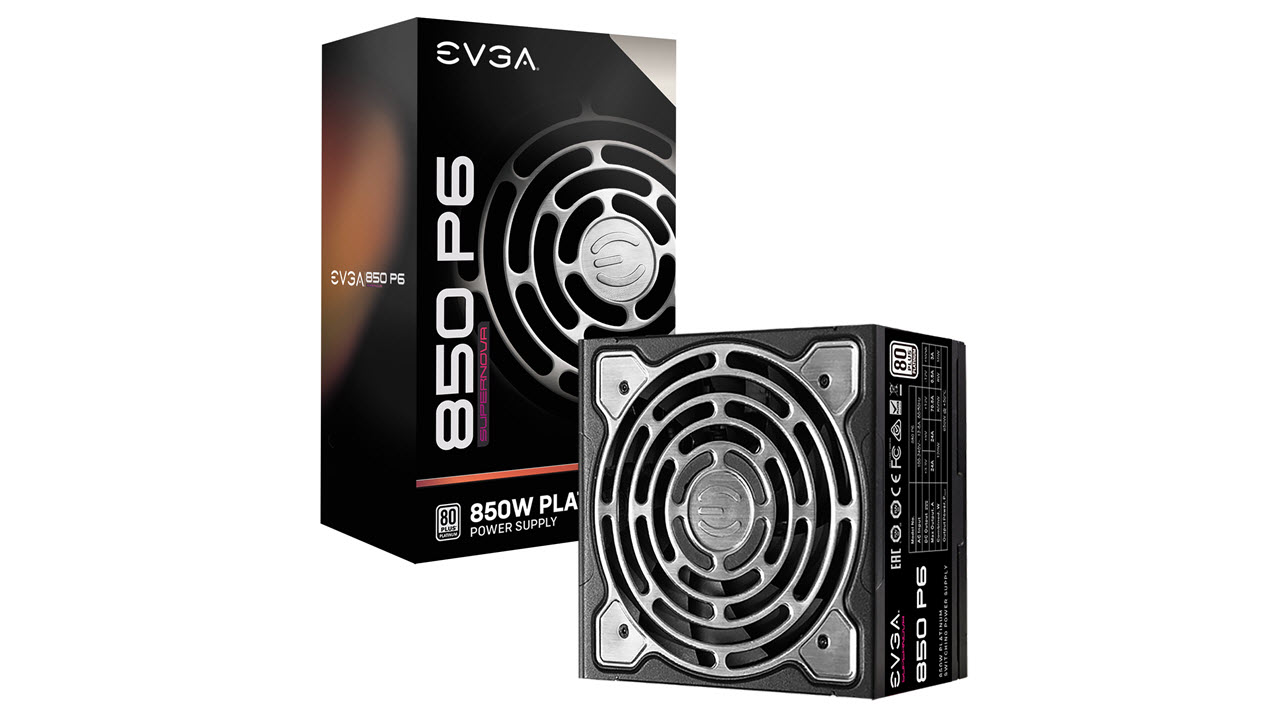
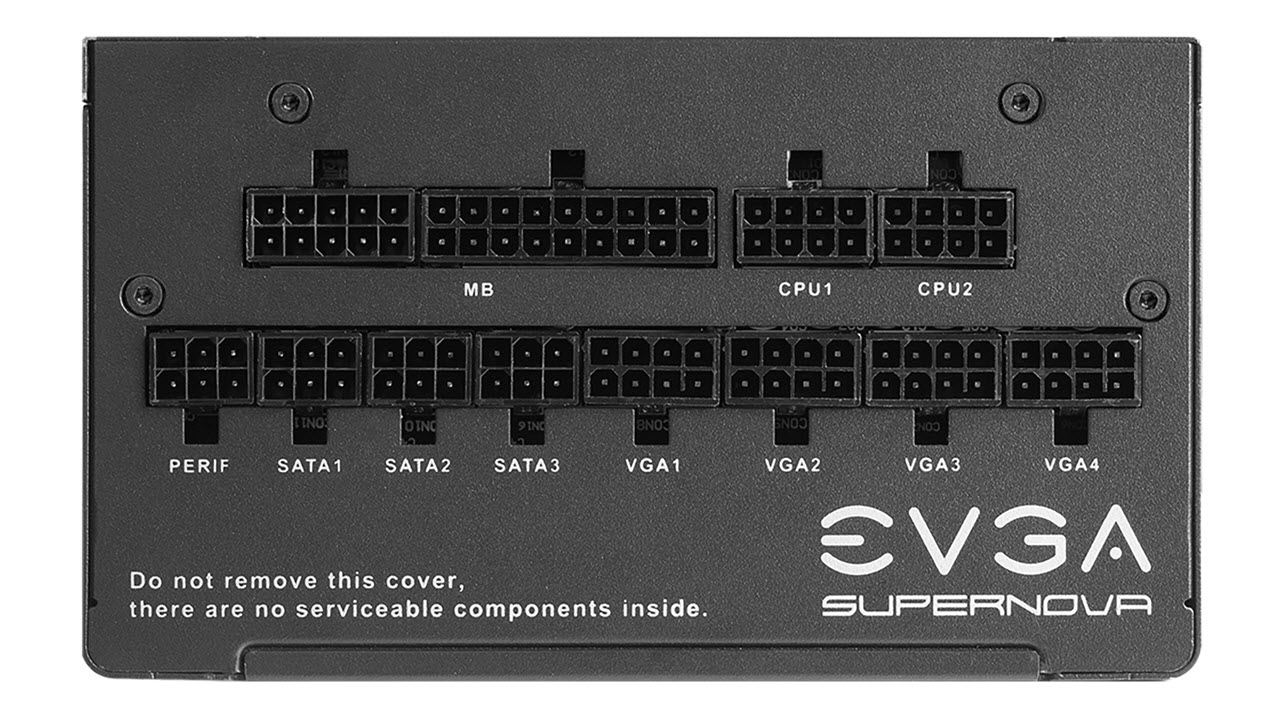
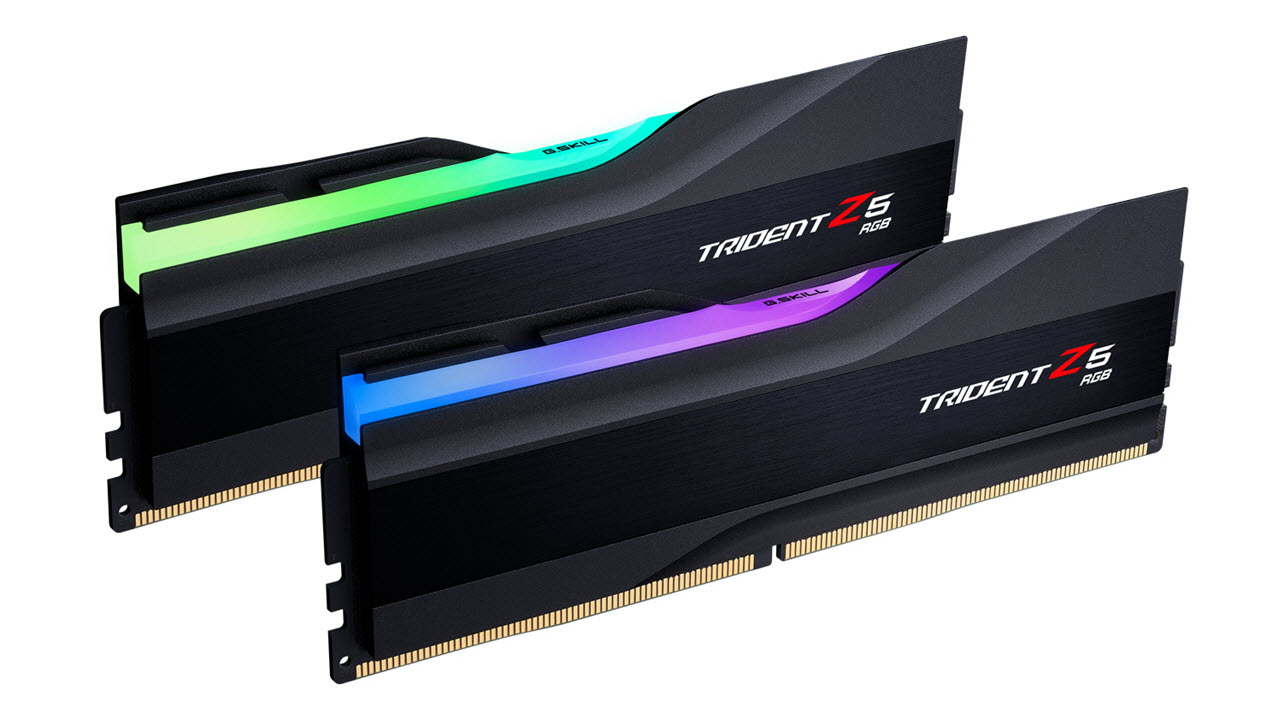
EVGA supplied our Supernova 850W P6 power supply (appropriately sized and more efficient than the 1.2KW monster we used previously) for our test systems, and G.Skill sent us a DDR5-5600 (F5-5600U3636C16GX2-TZ5RK) memory kit for testing.
Benchmark Settings
MORE: Best Motherboards
MORE: How To Choose A Motherboard
MORE: All Motherboard Content
Benchmark Results
Our standard benchmarks and power tests are performed using the CPU’s stock frequencies (including any default boost/turbo), with all power-saving features enabled. We set optimized defaults in the BIOS and the memory by enabling the XMP profile. For this baseline testing, the Windows power scheme is set to Balanced (default) so the PC idles appropriately.
Synthetic Benchmarks
Synthetics provide a great way to determine how a board runs, as identical settings should produce similar performance results. Turbo boost wattage and advanced memory timings are places where motherboard makers can still optimize for either stability or performance, though, and those settings can impact some testing.
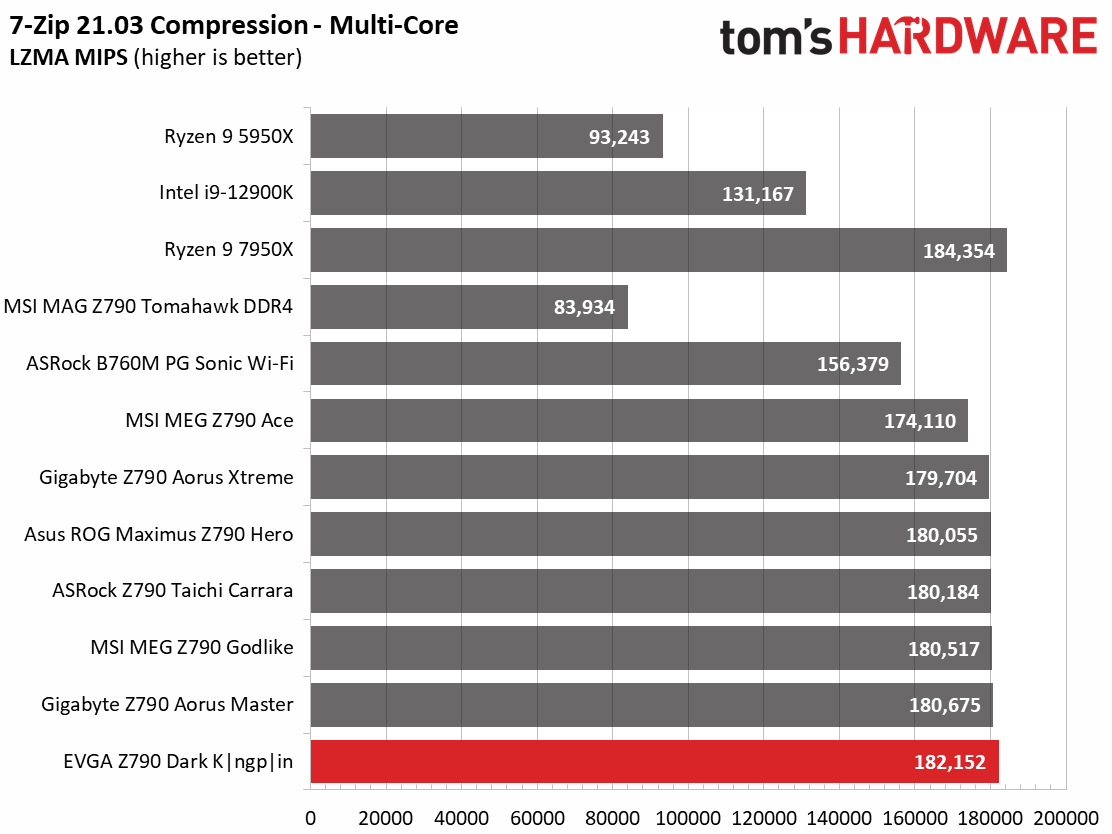
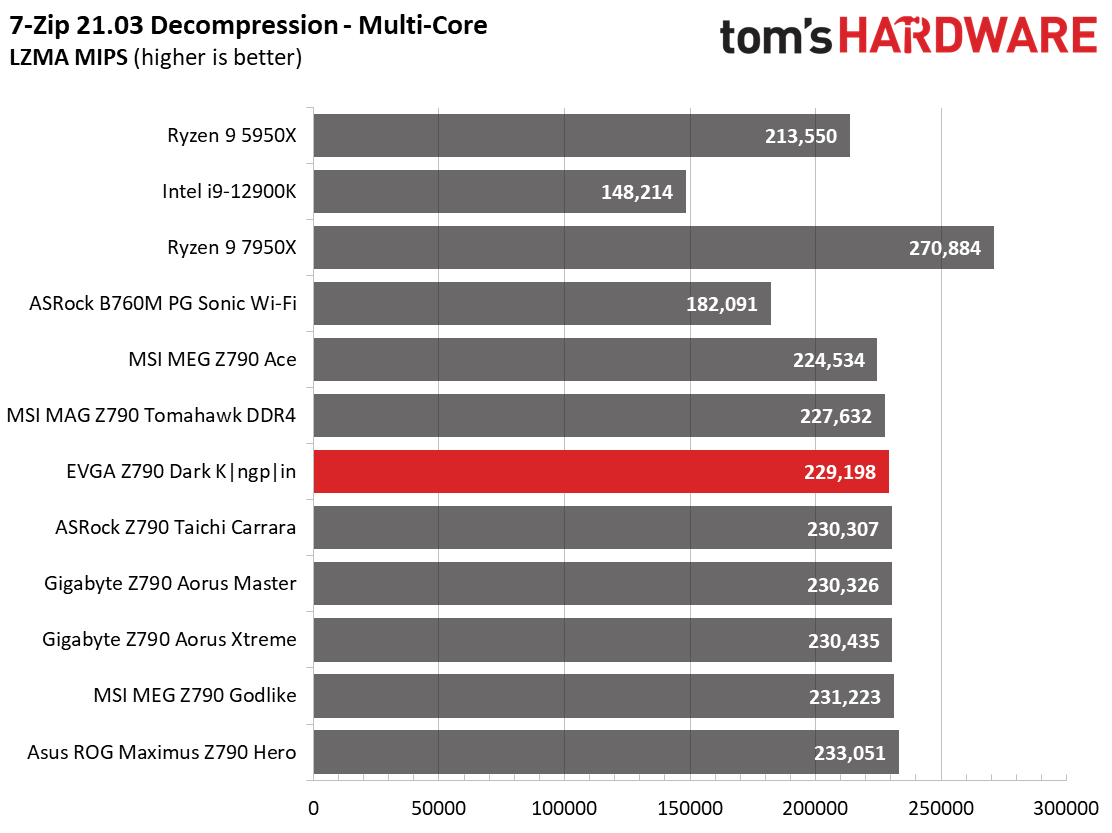
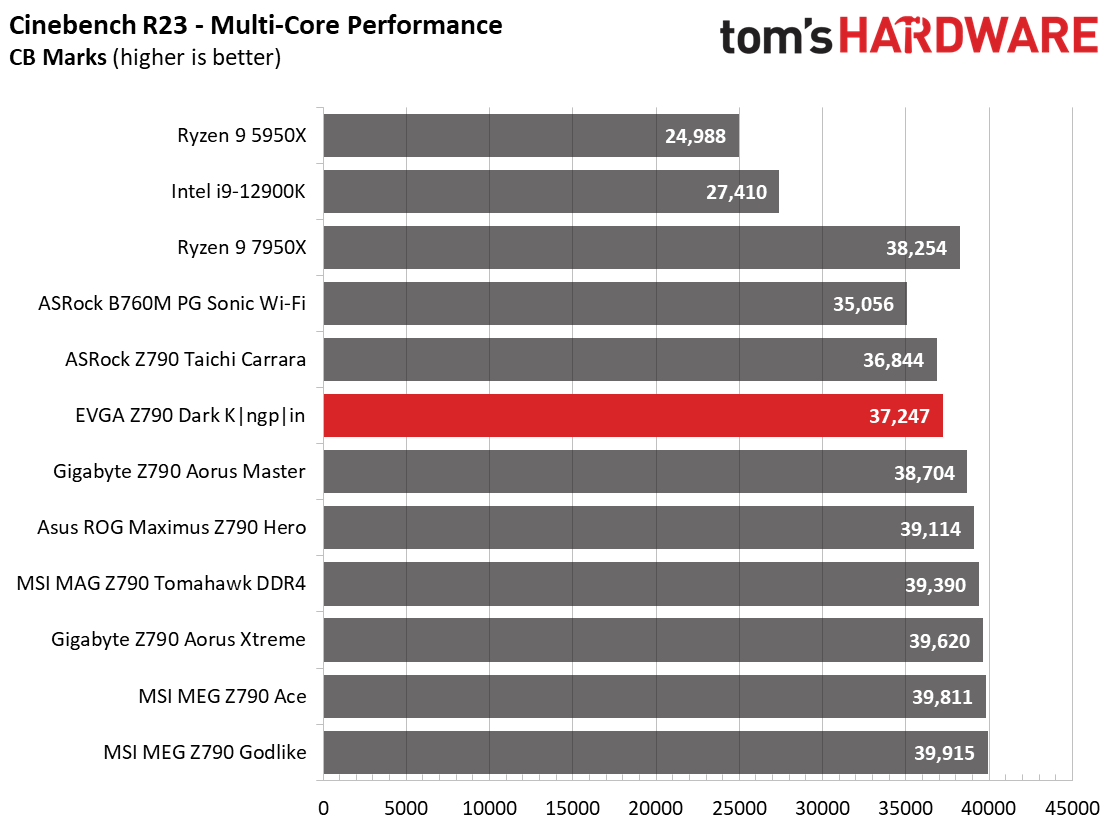
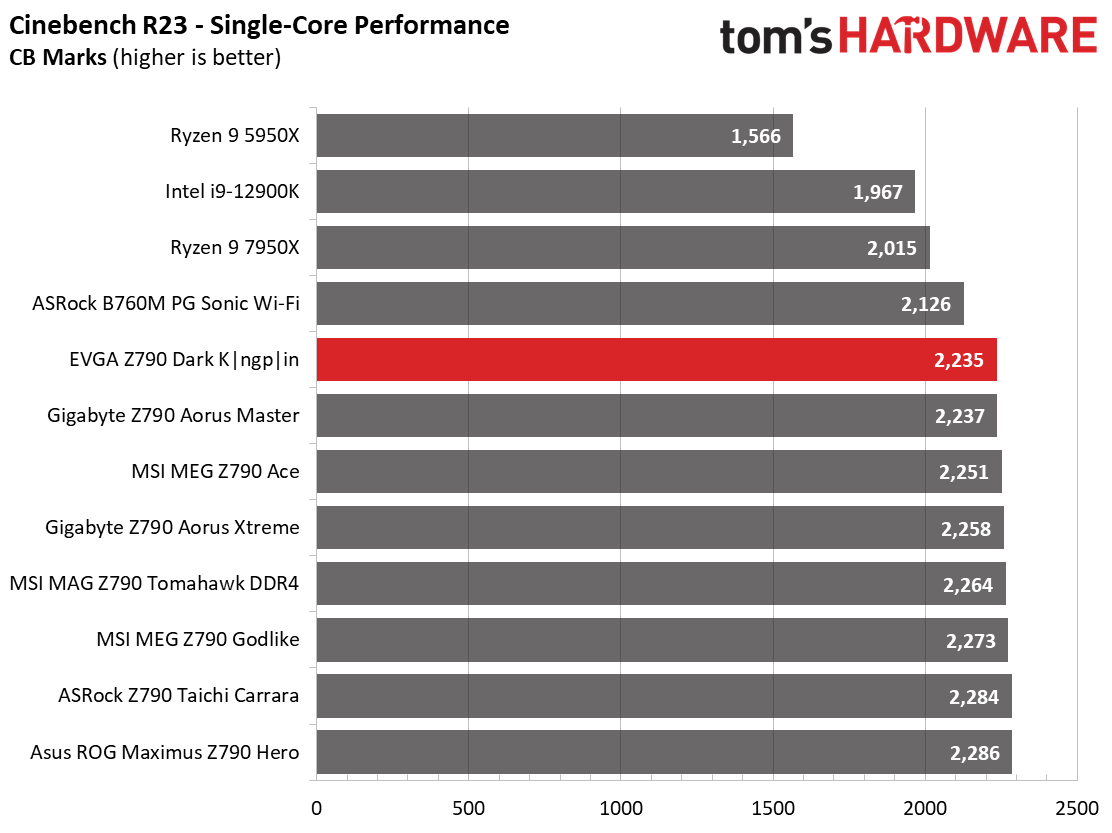
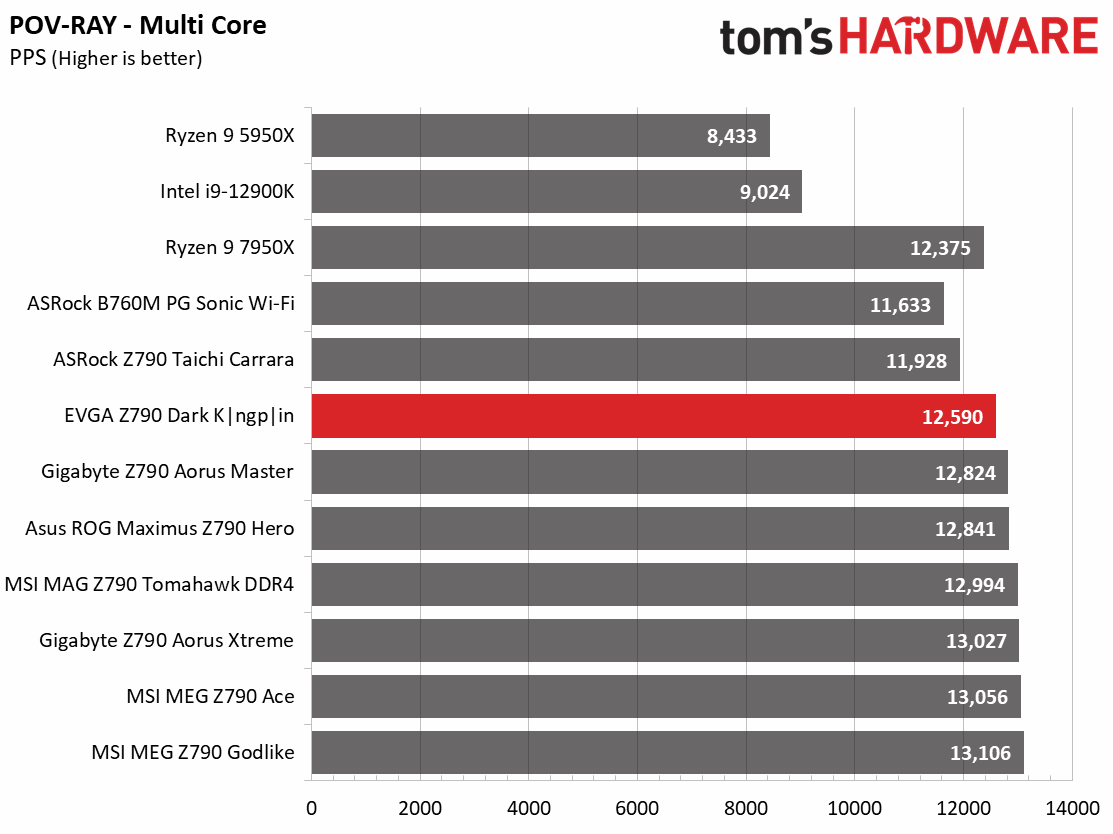
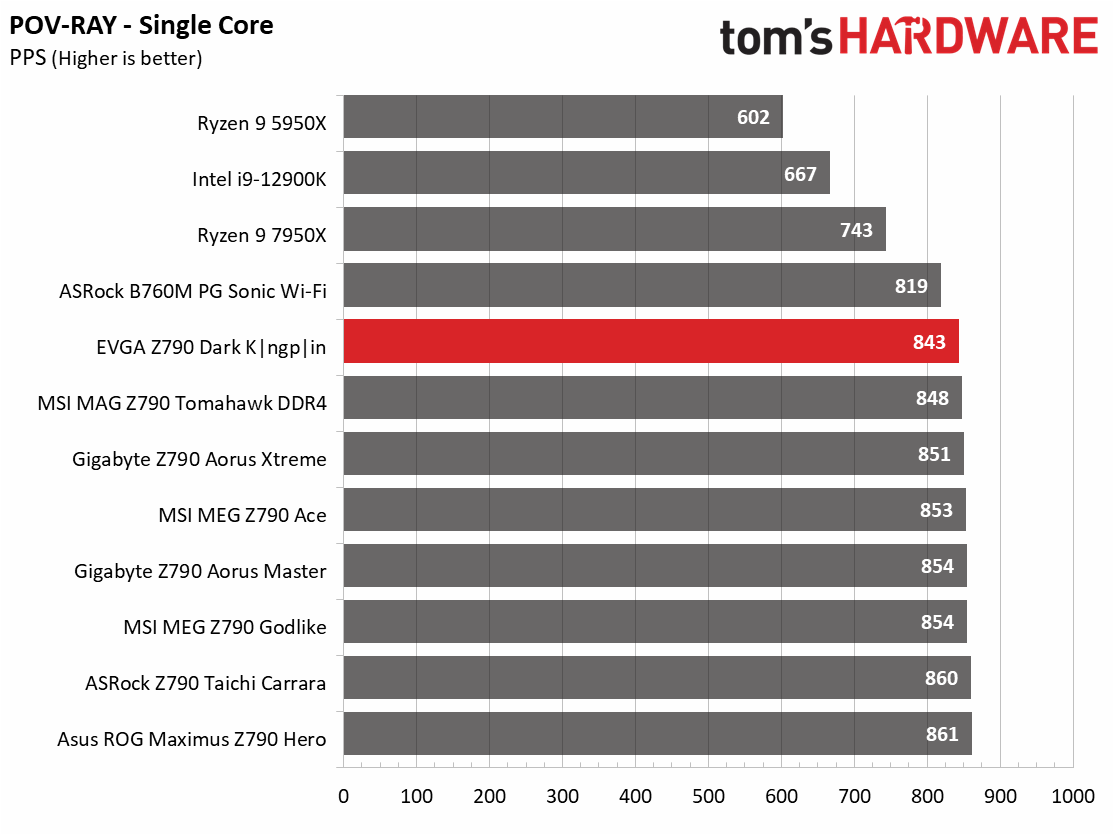
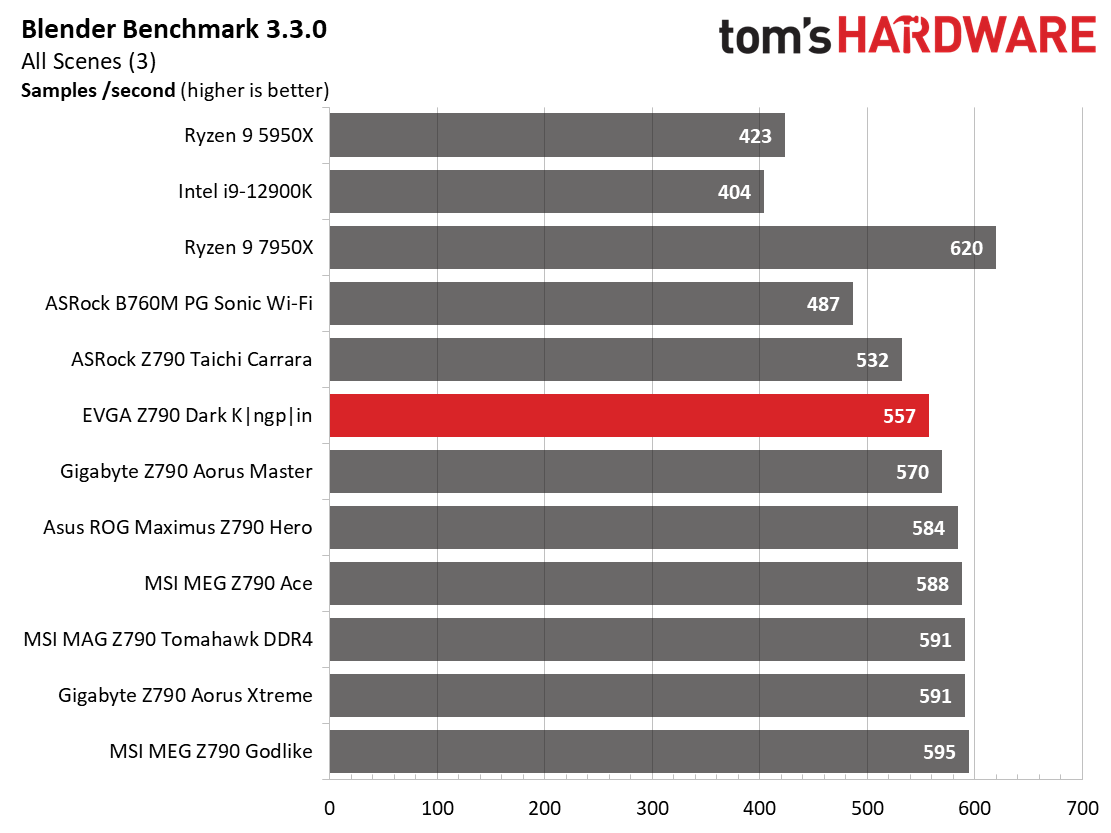
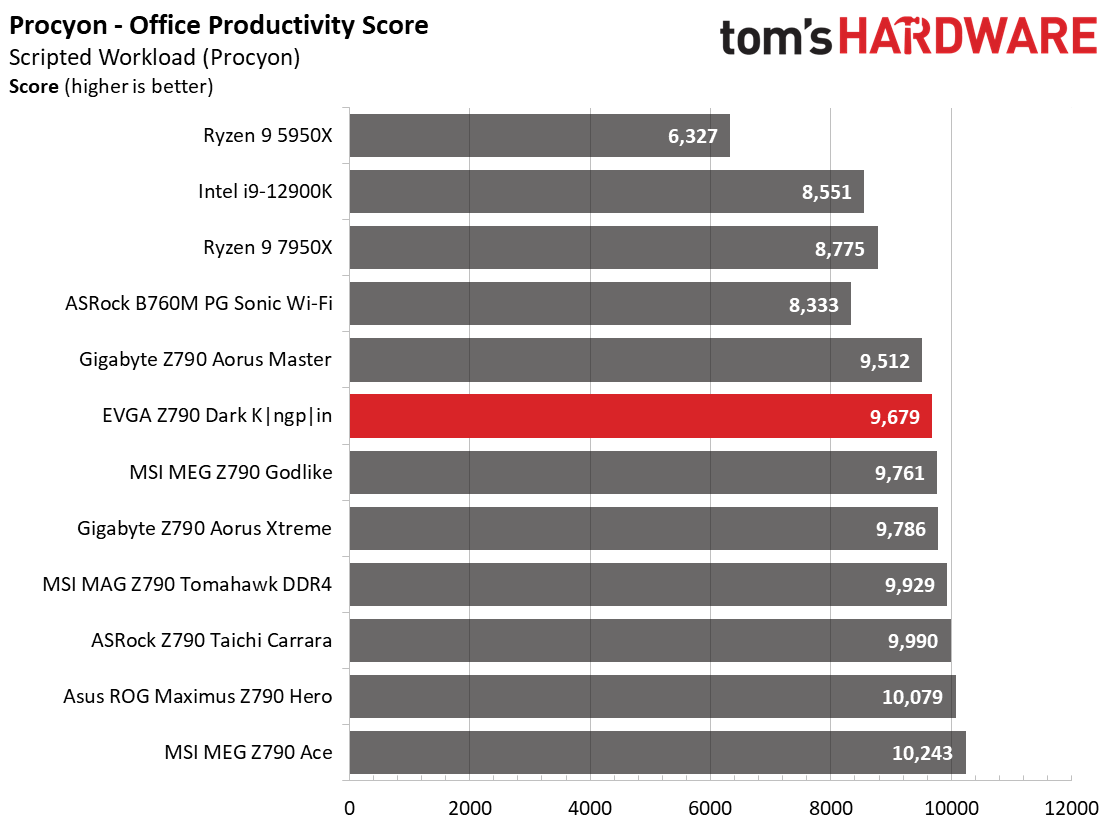
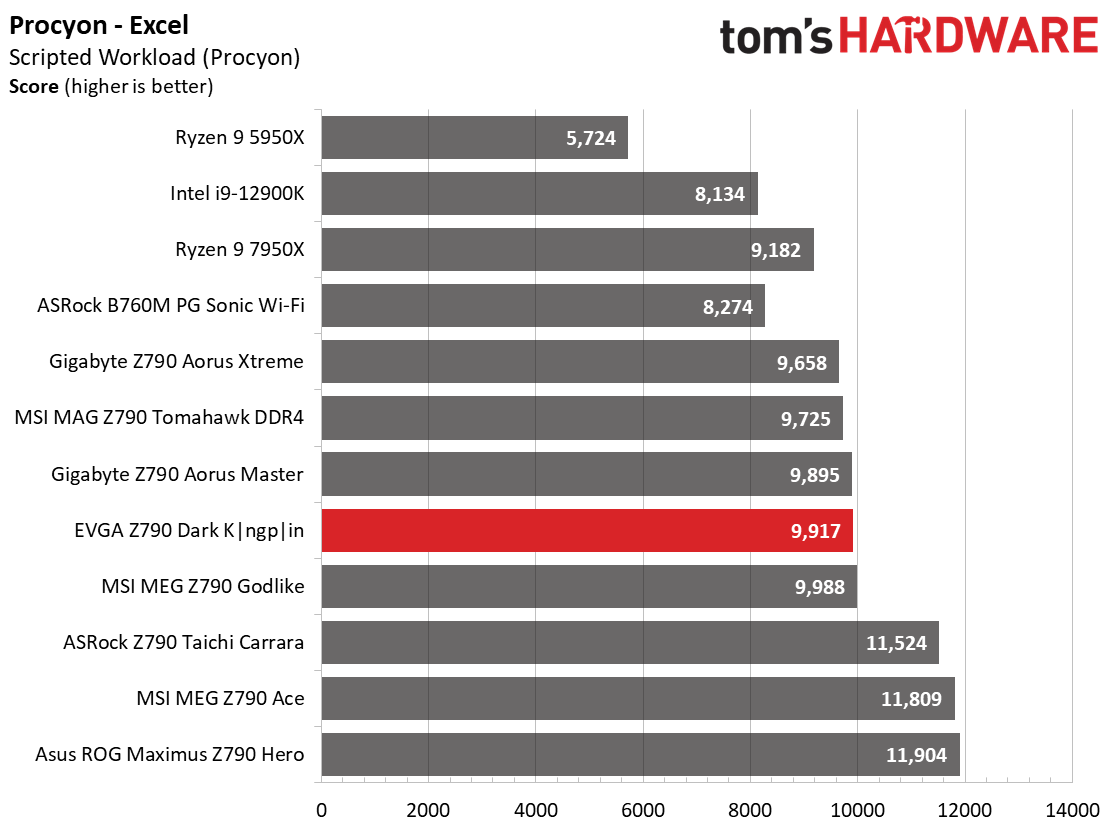
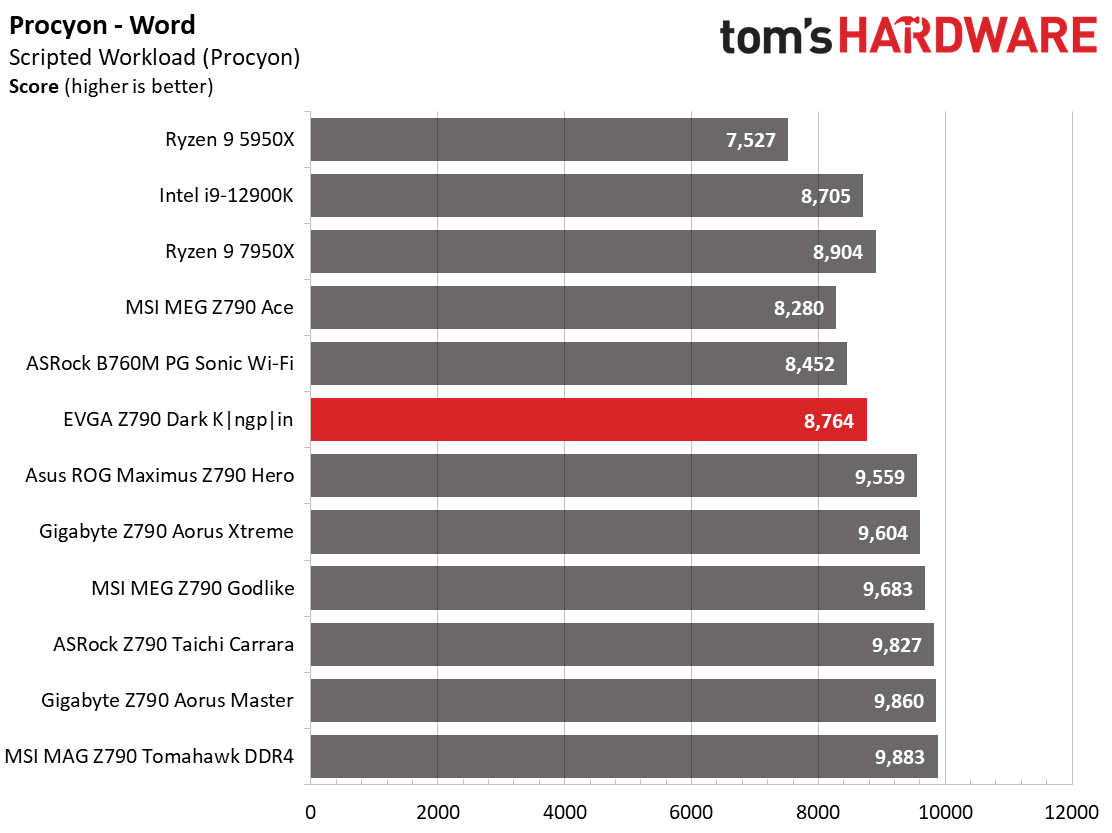
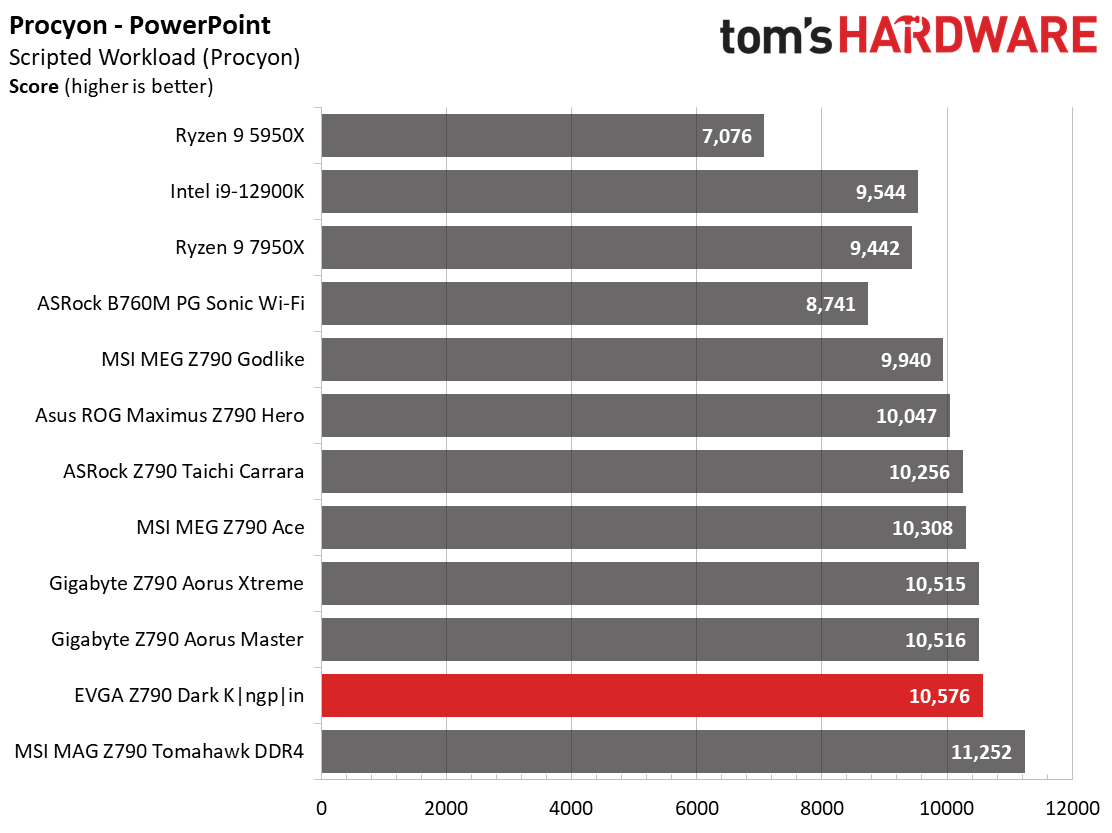
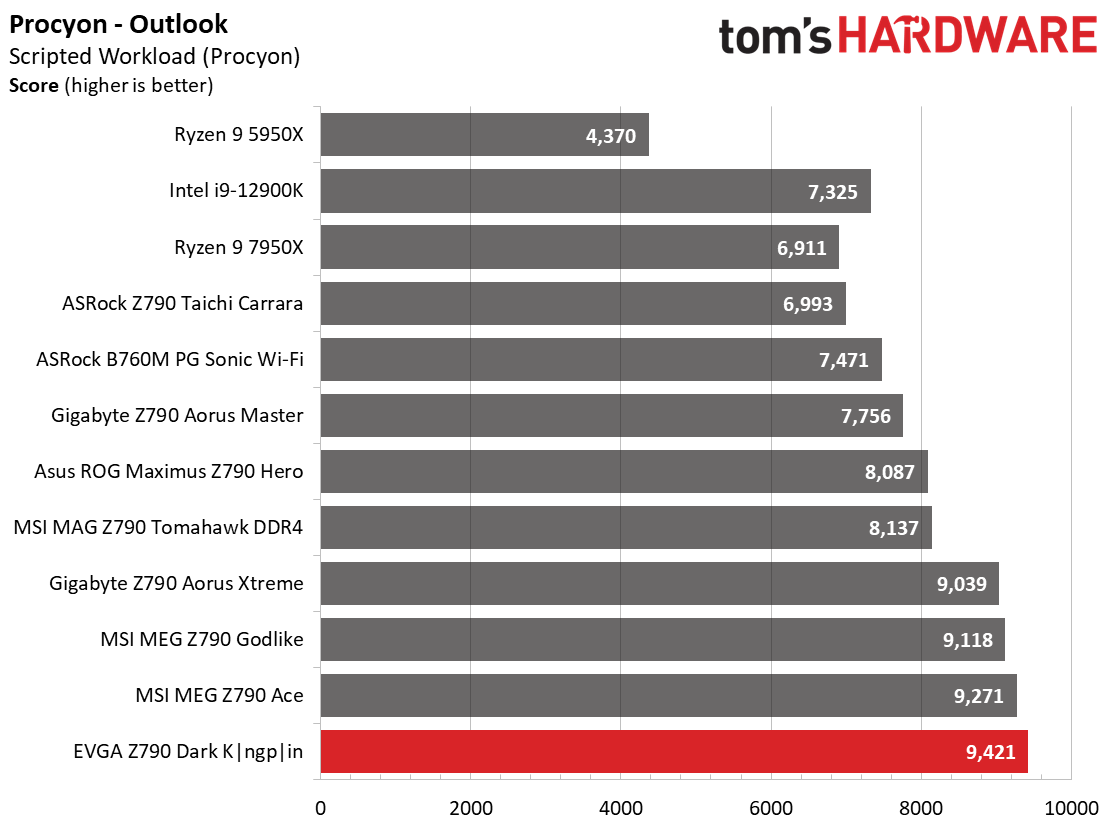
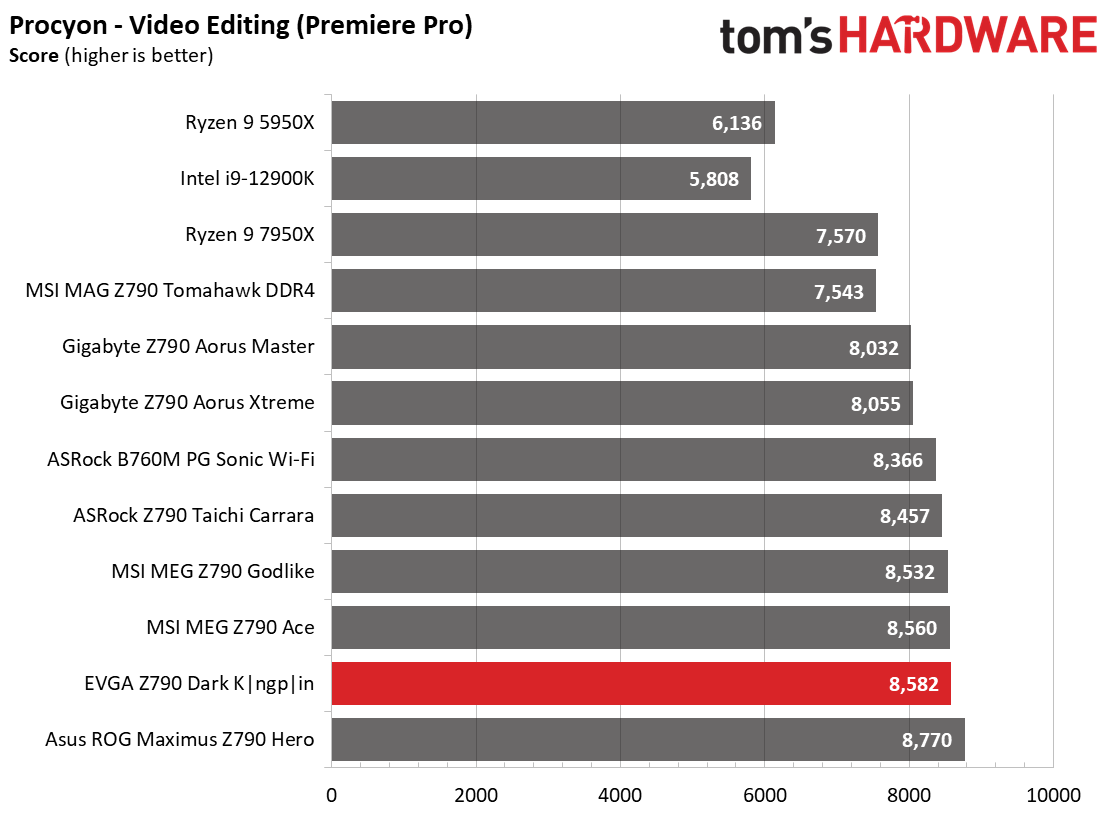
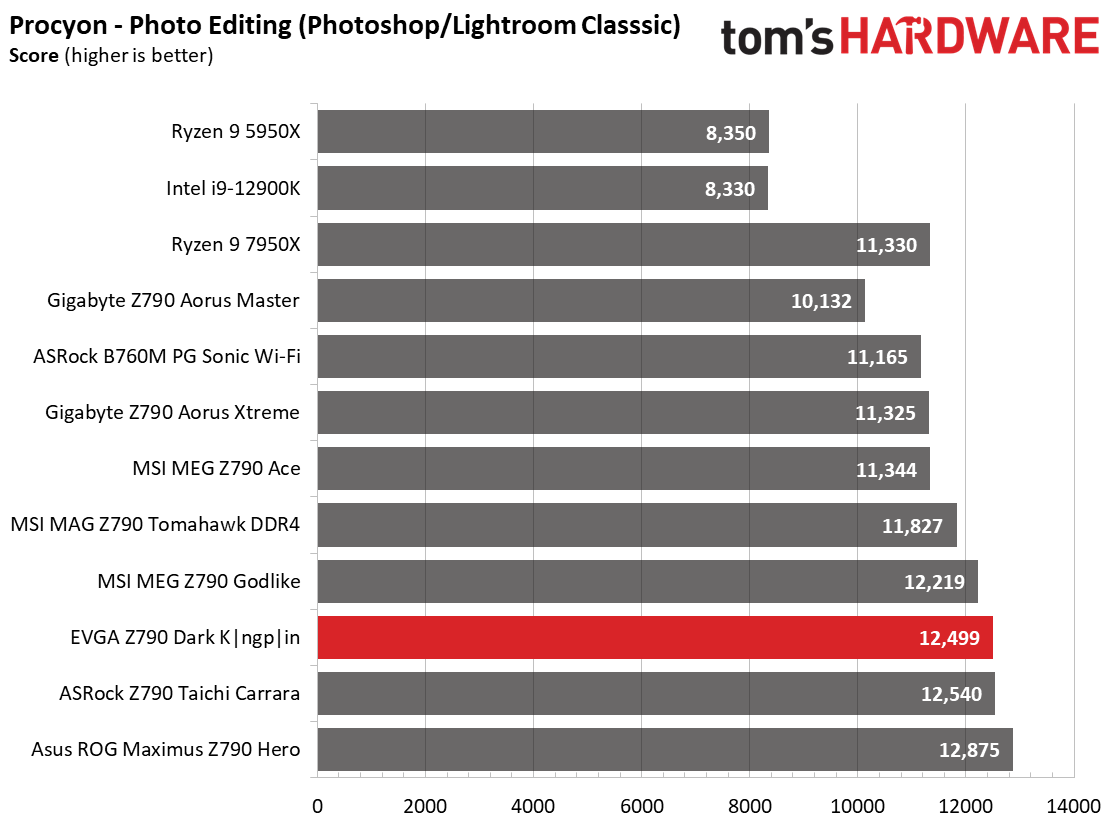
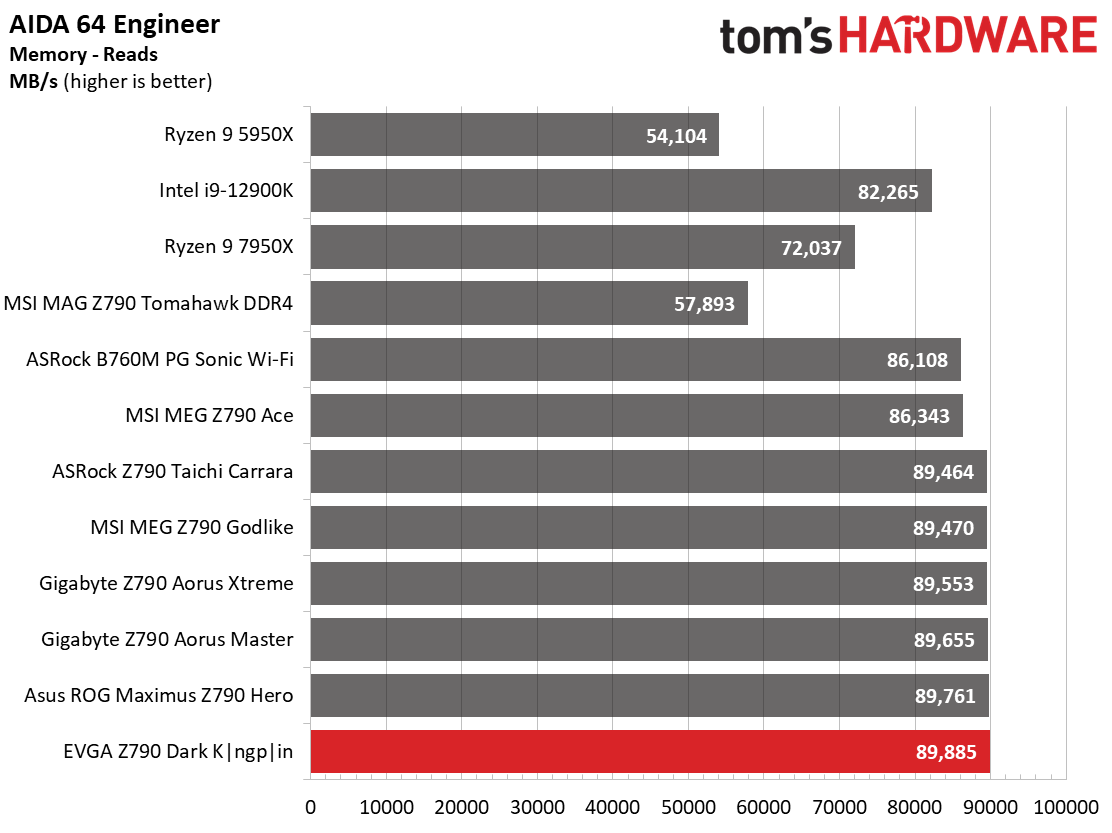
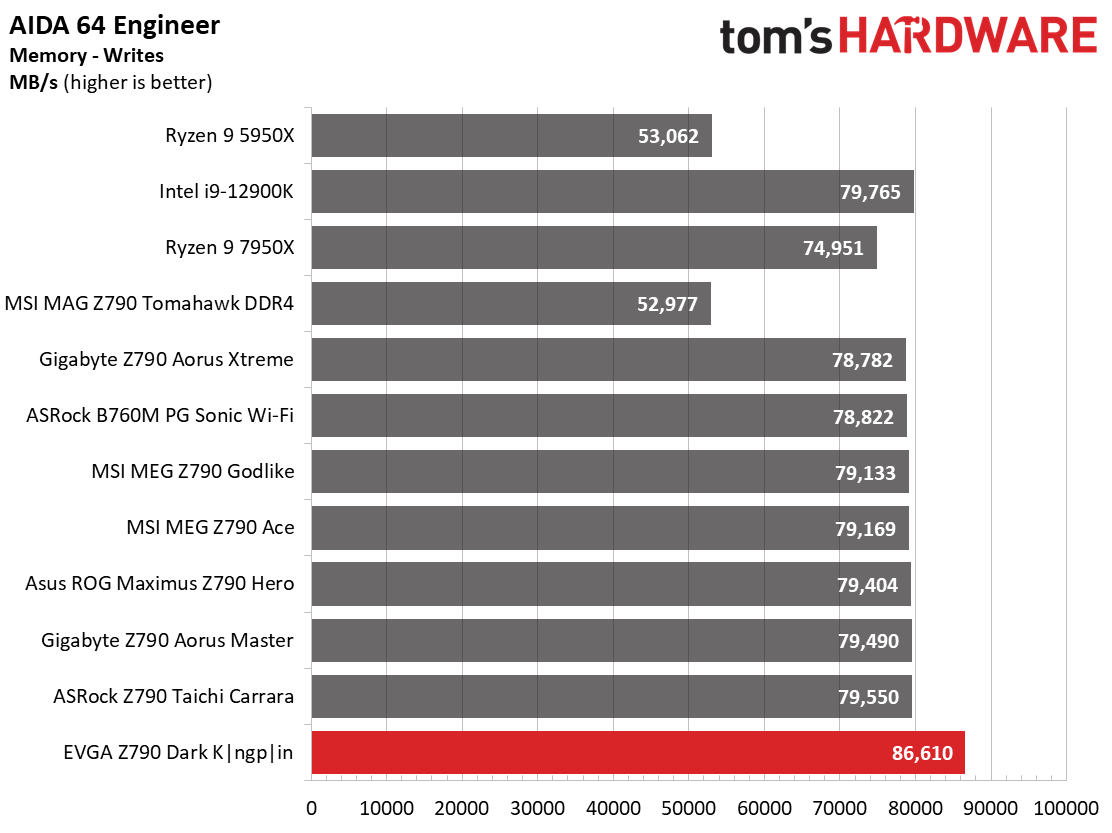
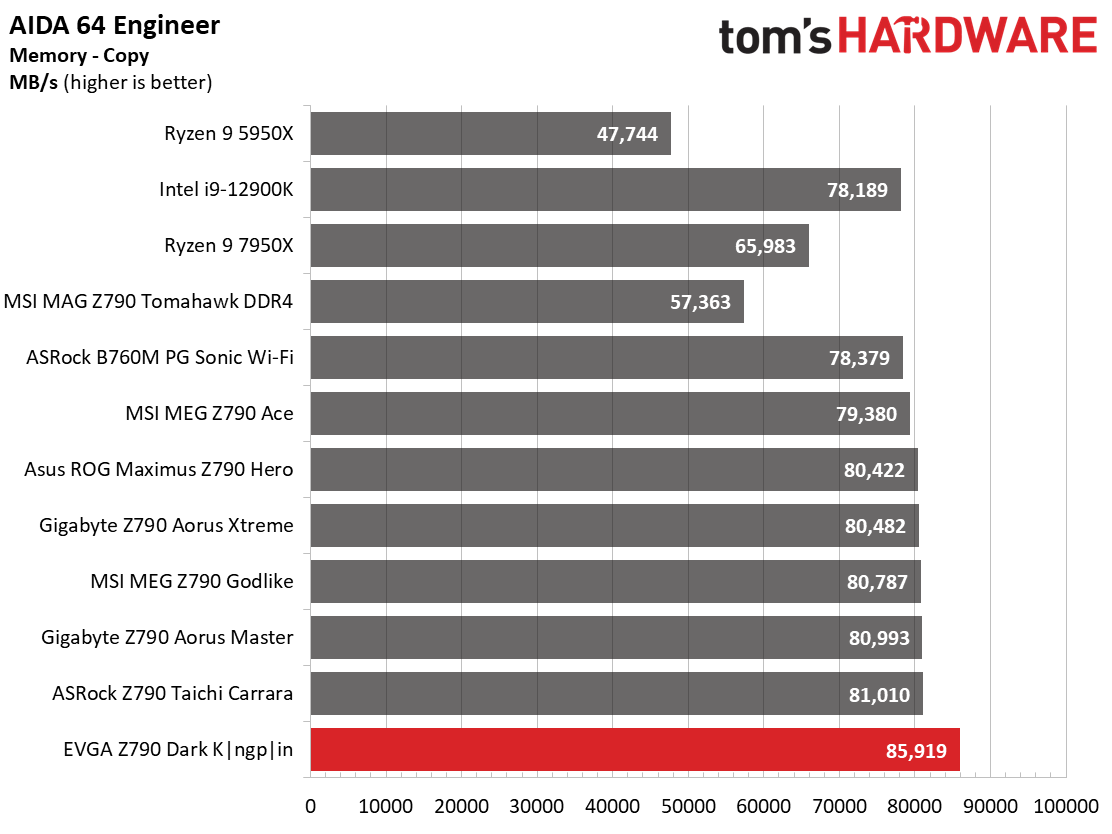
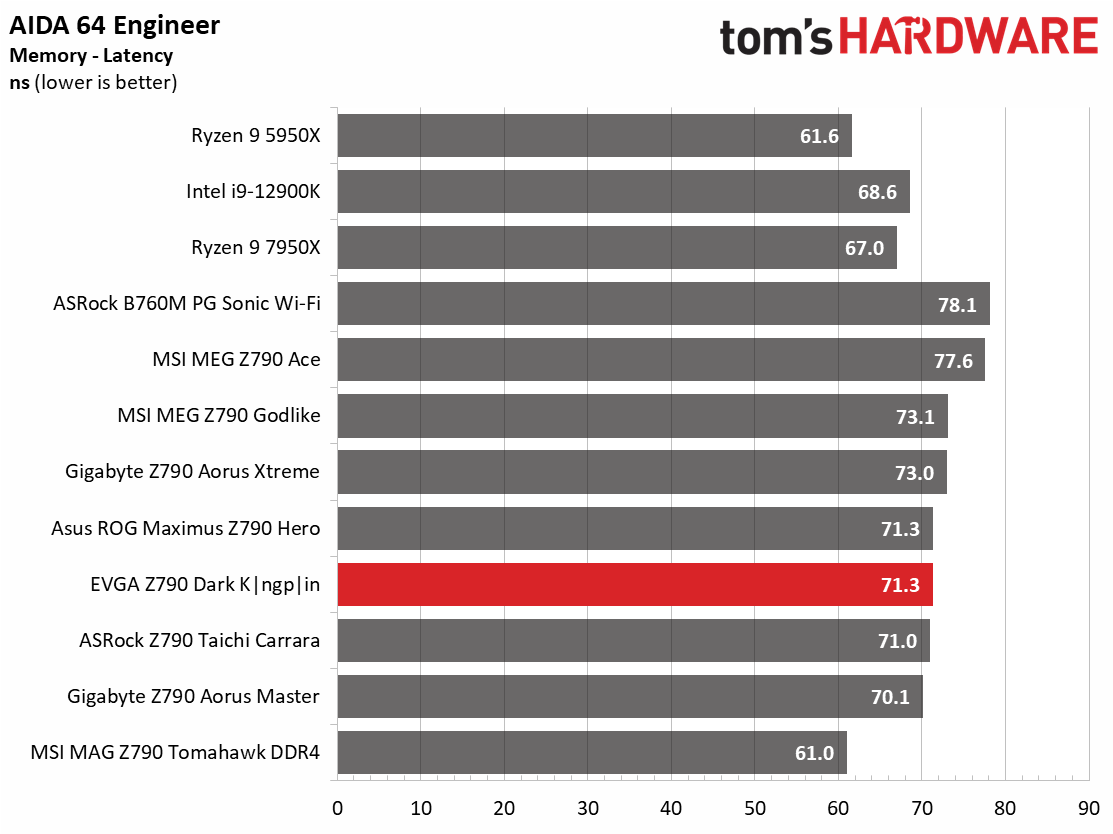
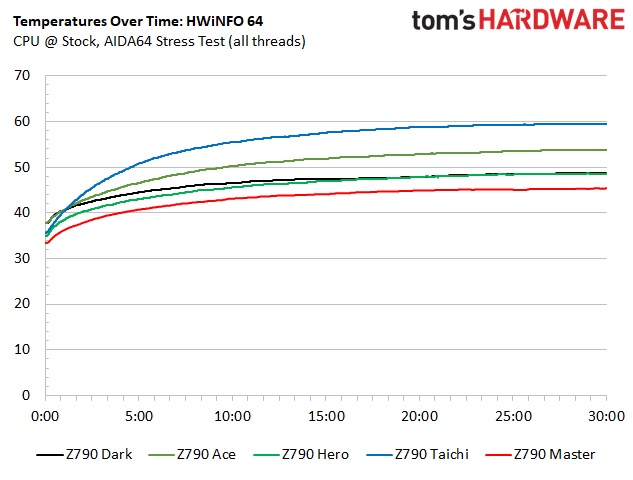
Across our synthetic benchmarks, the Z790 Dark performed well overall. It was a bit slower than average in Cinebench and POV–Ray multi-threaded, but it did well in the Procyon tests (Office and Video/Photo editing) and exceedingly well in RAM bandwidth. Like with any modern board and CPU, if you keep temperatures in order/not throttling, you’ll get better performance.
Timed Applications
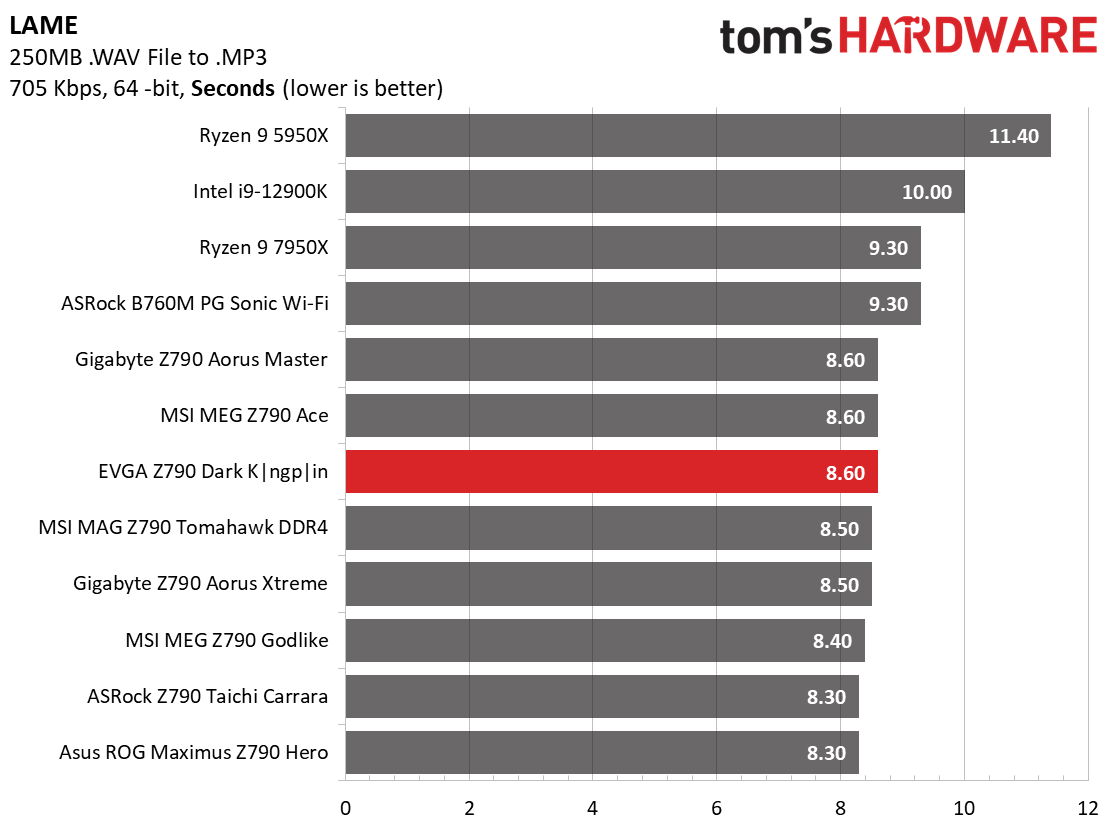
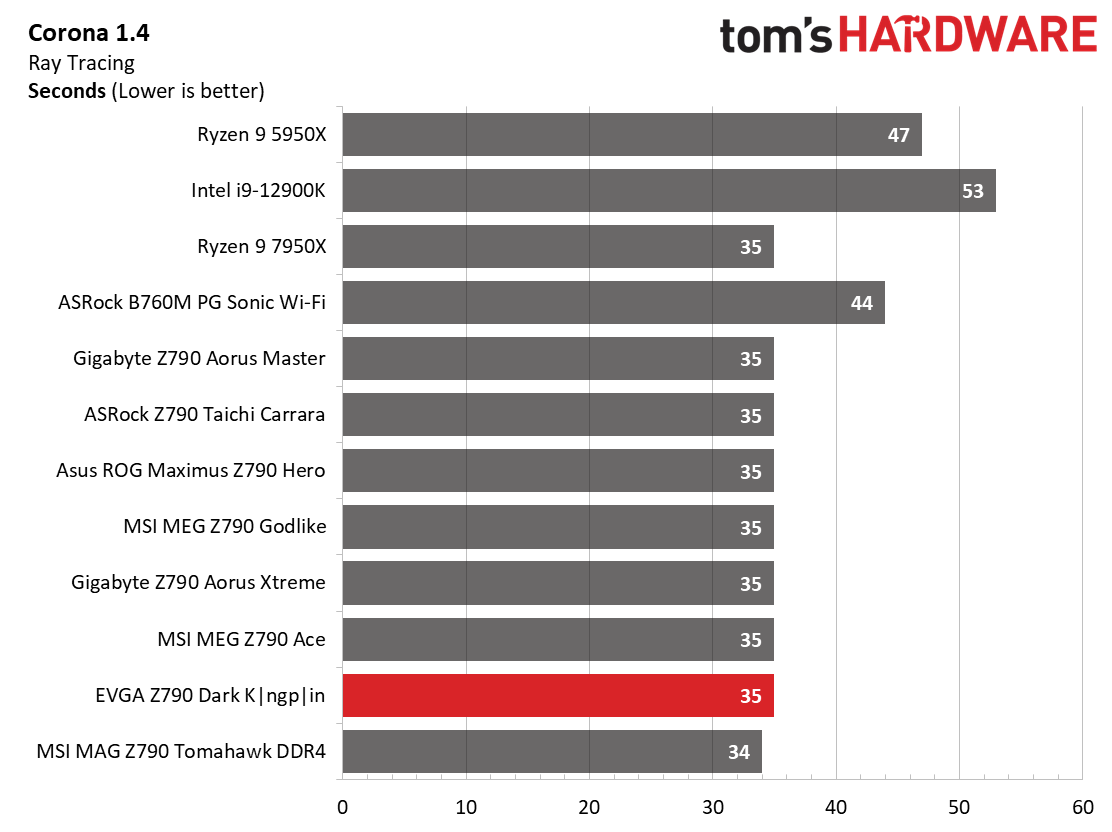
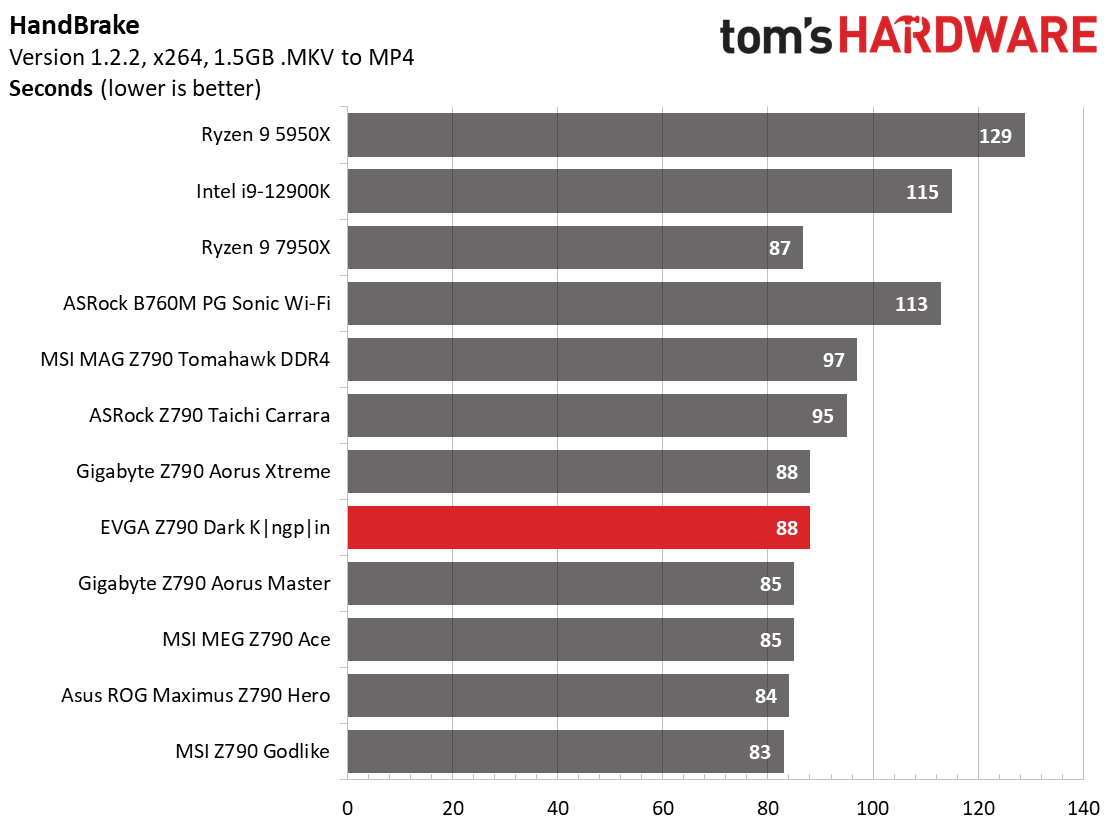
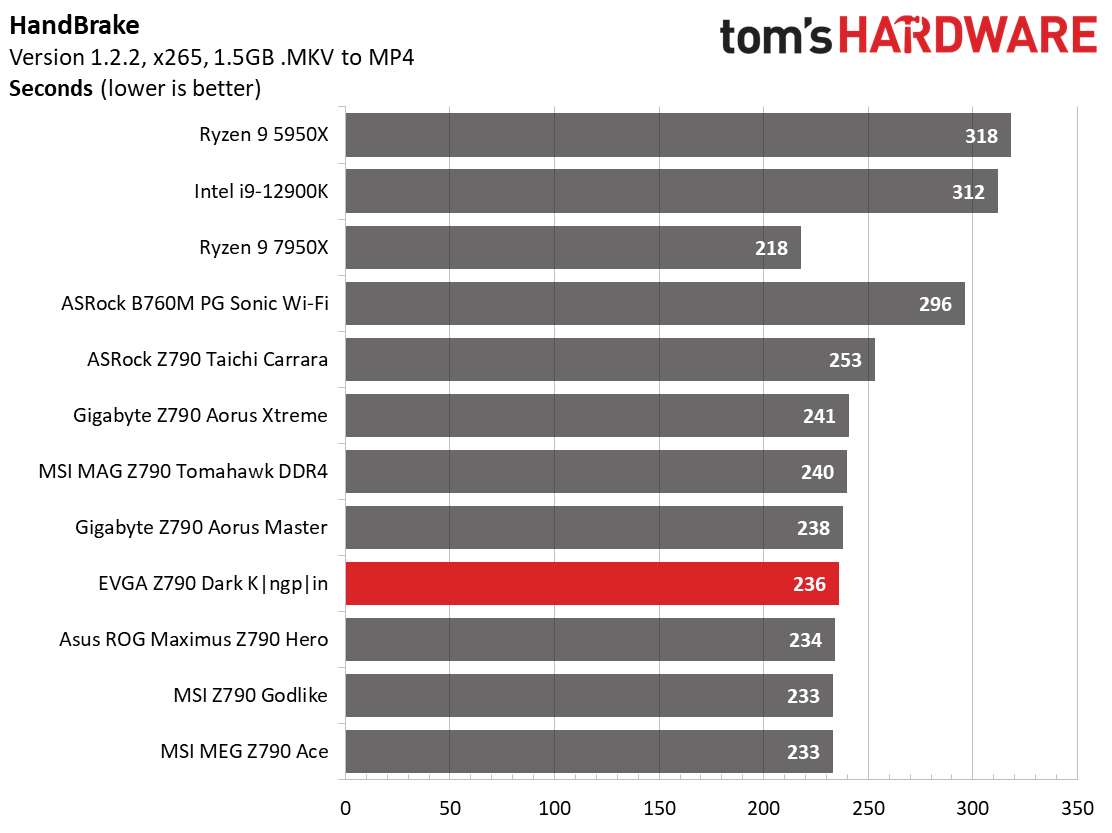
In the timed applications, the Z790 Dark was above average in Corona, average in LAME, and both Handbrake tests. There’s nothing to worry about in these applications!
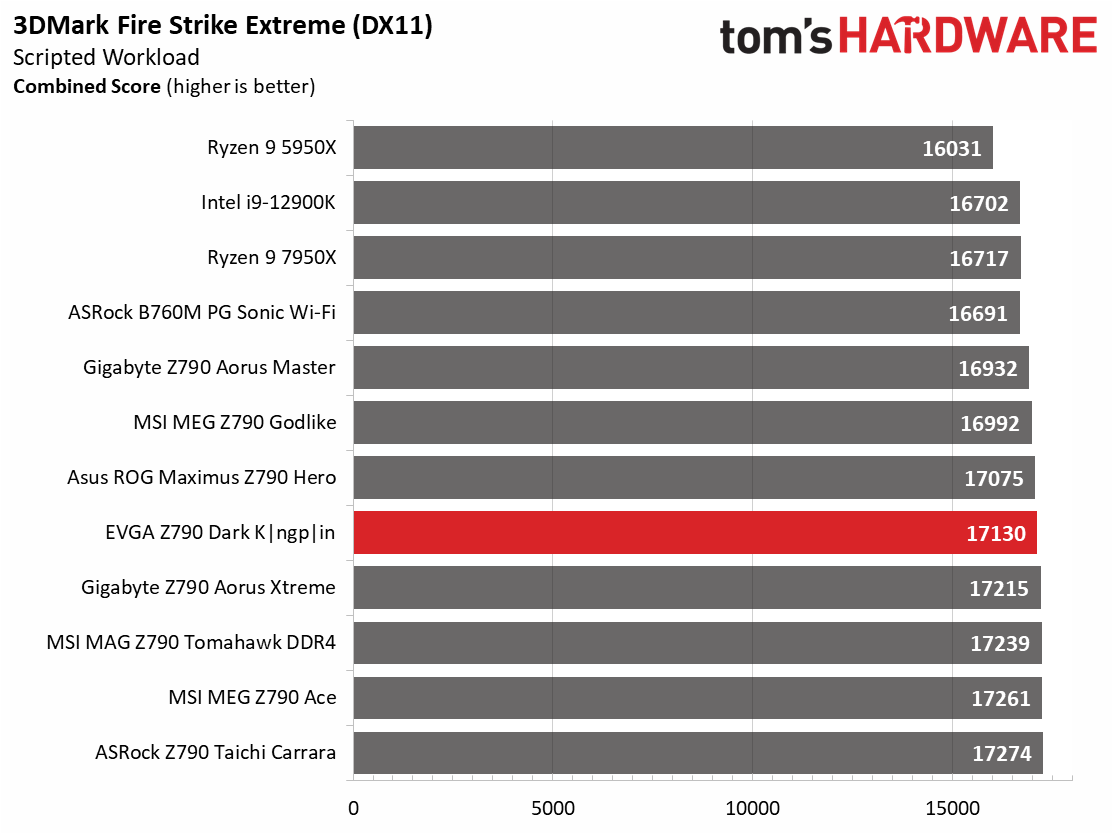
3D Games and 3DMark
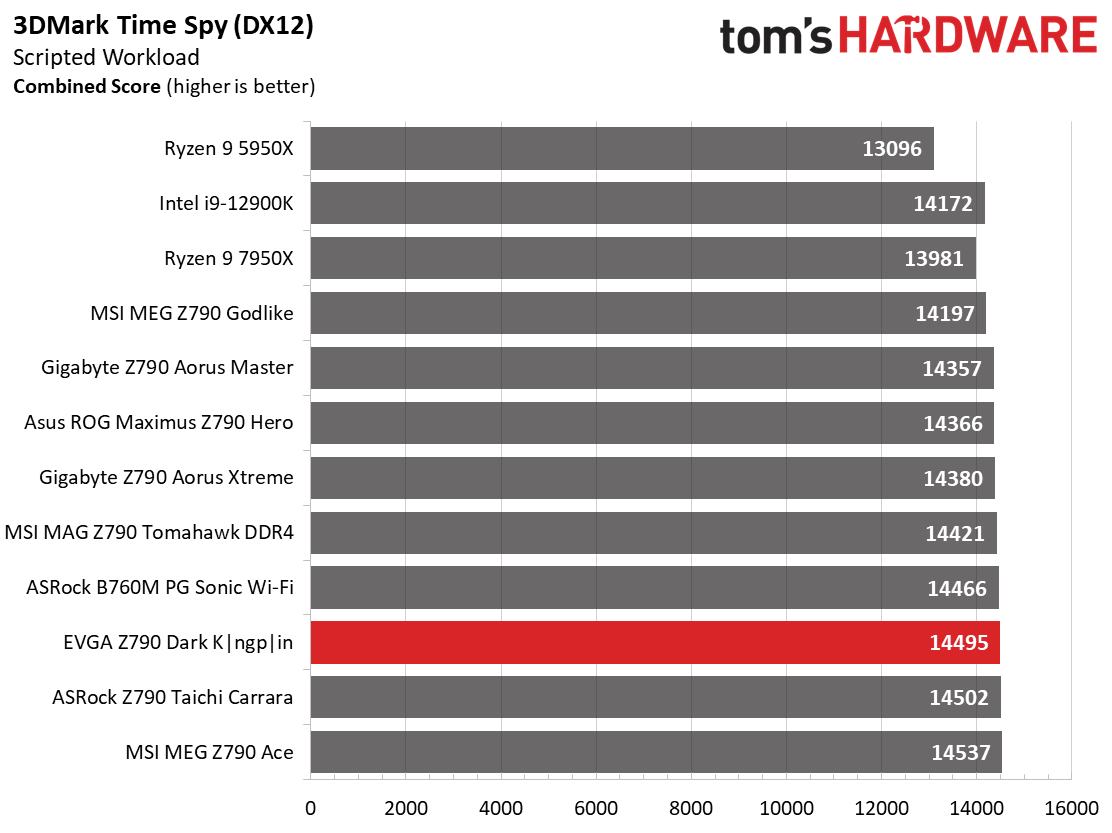
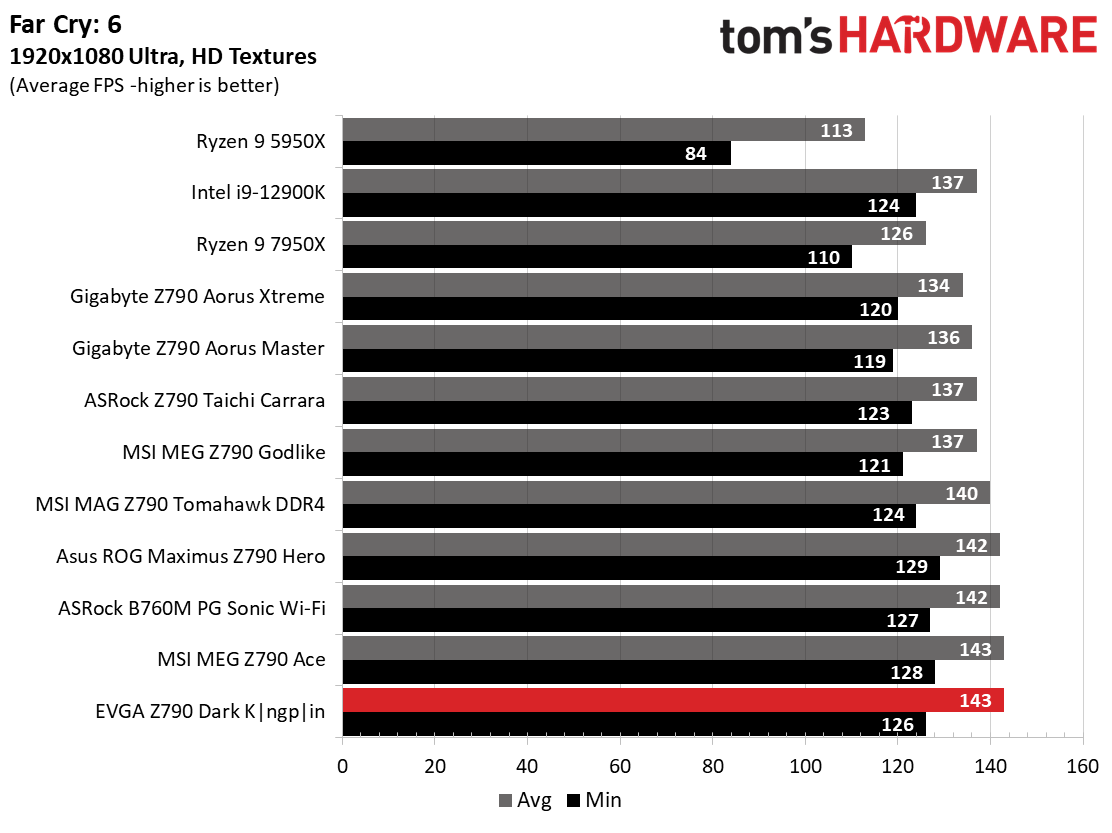
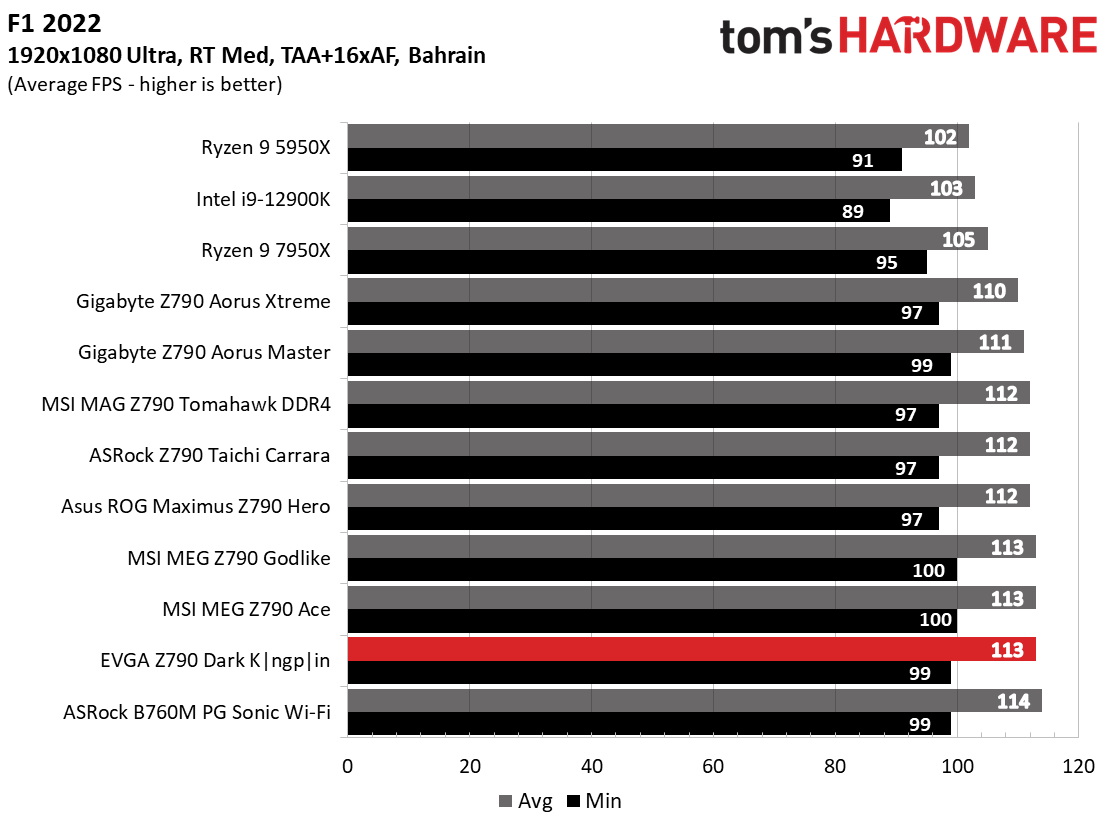
Starting with the launch of AMD’s Ryzen 7000 platform, we’ve updated one of our games, F1 21 to F1 22, while keeping Far Cry 6. We run the games at 1920x1080 resolution using the Ultra preset (details listed above). As the resolution goes up, the CPU tends to have less impact. The goal with these settings is to determine if there are differences in performance at the most commonly used (and CPU/system bound) resolution with settings most people use or strive for (Ultra). We expect the difference between boards in these tests to be minor, with most falling within the margin of error differences. We’ve also added a minimum FPS value, which can affect your gameplay and immersion experience.
To be succinct, the Z790 Dark is a competent gaming board. The 3DMark results were around the average, while the gaming tests showed our board up toward the top on average frames per second and average on minimums. You’d be hard-pressed to notice a difference without looking at a frame counter.
Overclocking
When overclocking, we aim to increase the power and add stress to the VRMs. We do so by increasing the clock speed and voltage until we’re at the thermal threshold for the processor during stress testing. However, where these CPUs are allowed to run with ‘boost’ speeds, those speeds are closer to the limit than ever before.
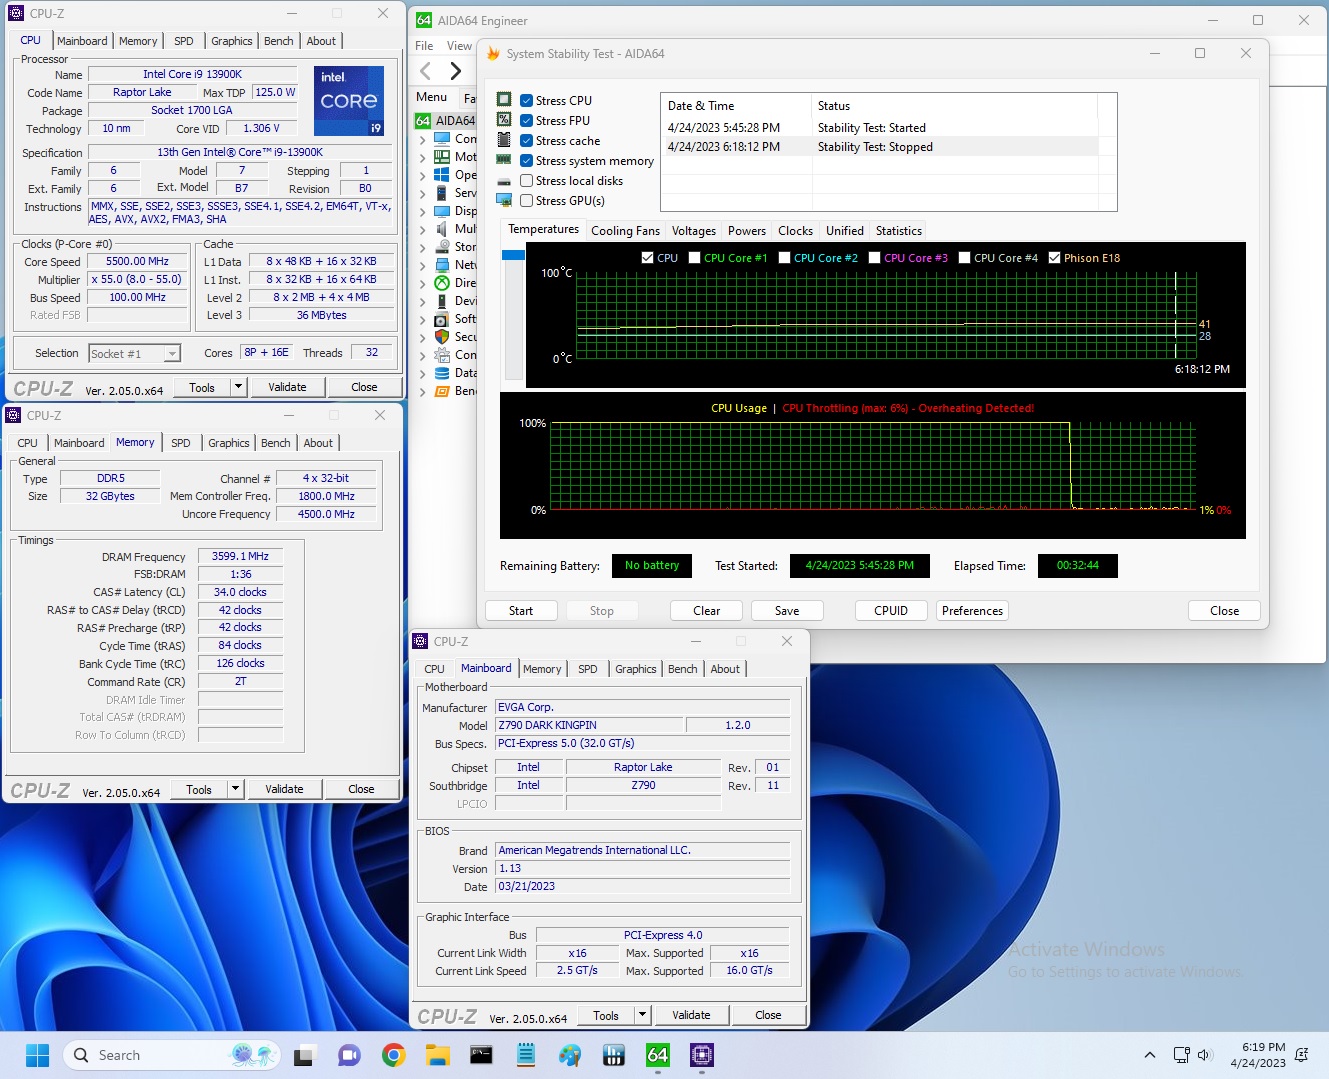
With our i9-13900K, the approach was different. We had to lower the voltage from what we recorded during stress tests to overclock our chip. We increased the clock speeds of the “P” and “E” cores by 100 MHz and 200 MHz, respectively, over the turbo boost and limited by our cooling. We ended up with 5.6 GHz P core and 4.5 GHz E core clocks using about 1.34V (from DMM). Temperatures peak just under the throttling point with this configuration. And as we’ve noted elsewhere, this is the intended performance for Intel’s flagship CPU.
Overclocking on the Z790 Dark on ambient cooling was as easy as you’d expect. Like with past motherboards, we set 1.35V in the BIOS, and on the Dark, load voltage in Windows is close enough to what was set in the BIOS not to enable LLC (for our meager overclock). As expected, the VRMs didn’t flinch (remember we tend to use a bit LESS power overclocking to our clock speeds), and the board ran stably throughout testing.
Using the latest BIOS (v1.13 at this time), it was smooth sailing on the memory side, too—all three memory kits, up to DDR5-7200, worked by simply enabling the XMP profile. As always, your mileage may vary, as reaching these speeds depends on the memory kit, BIOS, and processor. Still, most combos should be able to reach DDR5-7200 speeds on the Intel platform.
Power Consumption / VRM Temperatures
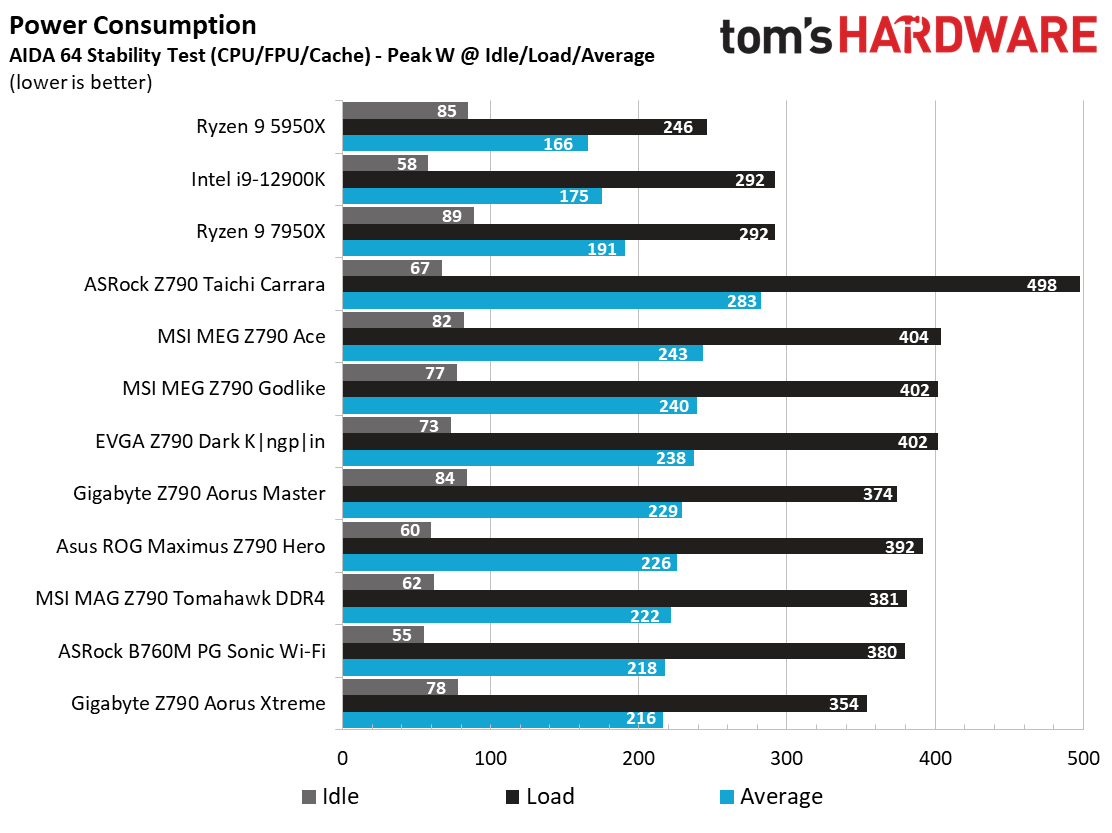
We used AIDA64’s System Stability Test with Stress CPU, FPU, Cache and Memory enabled for power testing, using the peak power consumption value. The wattage reading is from the wall via a Kill-A-Watt meter to capture the entire PC (minus the monitor). The only variable that changes is the motherboard; all other parts remain the same. Please note we moved to use only the stock power use/VRM temperature charts, as this section aims to ensure the power delivery can handle the chip even when overclocked. Since we’re using less power to get more clocks, those datasets are more novel than useful. We’re also temperature limited on the processor, so adding more power isn’t possible without increased throttling.
Idle power consumption on the premium Z790 Dark sat around 73W and peaked at 402W under load. The idle and load values more or less match up with other high-end boards. There’s nothing out of line on power use, but the Dark does use more juice than the average (as is expected with a high-end motherboard).
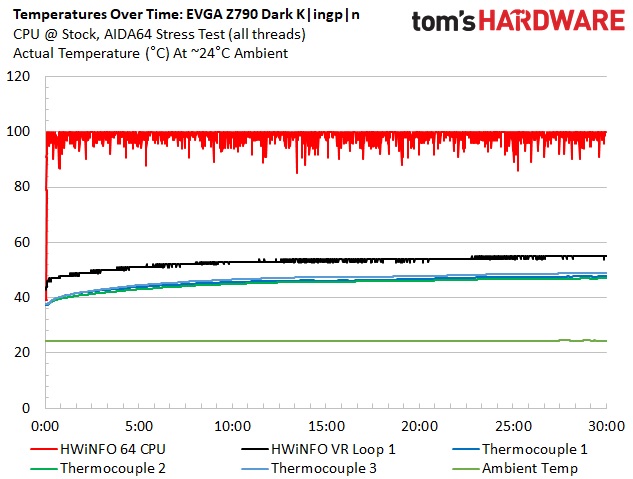
VRM temperatures on our board peaked at just under 49 degrees Celsius, a great result for a 400W load (at the wall). The temperatures are well within the specifications of the high-end 105A SPS MOSFETS, so there’s nothing to worry about here, no matter what kind of overclocking you’re doing.
Bottom Line
For those looking to get the most out of their processor and memory through overclocking, the Z790 Dark Kingpin is one of the best options available, especially if your overclocking adventures involve sub-ambient cooling methods. That said, it’s more than competent as a daily driver too. Hardware-wise, the only thing missing is a PCIe 5.0-capable M.2 socket. The board has overbuilt power delivery, three M.2 sockets, eight SATA ports, ample USB count on the rear IO (including a 20 Gbps Type-C port), dual NICs (2.5 and 10 GbE), and a premium (though last-gen) audio solution. Performance across our testing places this board as average to above average, depending on what test you’re looking at. It gamed well, showed promise in the Procyon test suite, and had the most memory bandwidth among its peers.
Regarding competition, you can group this with overclocking boards like the Gigabyte Z790 Tachyon ($599.99) and the Asus ROG Strix Z790 Apex ($699.99). You can also put it up against the flagships, and outside of a 40 Gbps port and PCIe 5.0 M.2 socket(s), it compares well specs-wise and is cheaper than some of those. Compared to its kind, the Z790 Dark holds up well on specs but does cost more at $799.99 (assuming you can find the Tachyon or Apex in stock). All of these boards will hold up to sub-ambient/extreme overclocking as they are built for it. Of these, only the Apex has a PCIe 5.0 M.2 socket. Otherwise, it’s PCIe 4.0 x4 sockets (of which the Apex has the most at five). Outside of that, the specs are similar enough among them. It’s going to come down to price and appearance.
Ultimately, we love what the EVGA Z790 Dark Kingpin has to offer. While the price is higher than its peers, it’s currently the only one you can find in stock anywhere close to MSRP. Availability aside, it has a unique appearance with the rotated socket area and black-on-gold theme that stands out inside your chassis. The horizontal ports and sockets around the edges, along with the notch, are there to help clean up the wires, something the Asus doesn’t have. In all, the Z790 Dark is a well-rounded but expensive option in the premium mid-range/high-end and overclocking spaces. It’s not a great value among Z790 motherboards, but it is one of the more unique, capable, and overbuilt of the bunch.
MORE: Best Motherboards
MORE: How To Choose A Motherboard
MORE: All Motherboard Content