If Windows 10 has been your favorite version so far, but you had to move to Windows 11, you're not alone, and you should know that many users share that feeling.
Although Windows 11 builds on the foundation of its predecessor, it also introduces a new design language and interface tweaks that can feel unfamiliar. Changes like the centered Taskbar, the stripped-down Start menu, and the new version of File Explorer and Settings app may take some getting used to.
The good news is you can customize many of these elements to make it look a little more like the Windows 10 experience. Whether you prefer built-in tweaks or third-party tools, it's possible to restore the classic Start menu, reposition the Taskbar, and bring back the traditional File Explorer layout.
In this how-to guide, I'll outline two ways to customize your desktop to resemble the Windows 10 experience on Windows 11.
Warning: These instructions involve making system changes. As such, it's important that you create a full backup before proceeding in case something breaks and you need to roll back to a good working state.
How to make Windows 11 look like 10 without third-party tools
These are the subtle changes you can make to your setup to make it look a little more like the older version.
Start menu and Taskbar alignment
On Windows 10 and previous versions, the Taskbar and Start menu have always been aligned to the left, which is a layout many users find familiar. On Windows 11, however, the default center alignment gives the interface a more modern look, but it can feel unfamiliar. Fortunately, the new version of the operating system includes a setting that lets you shift these elements back to the traditional left-aligned position.
To set the legacy alignment for the Taskbar to the left side of the screen, use these steps:
- Open Settings.
- Click on Personalization.
- Click the Taskbar page on the right side.
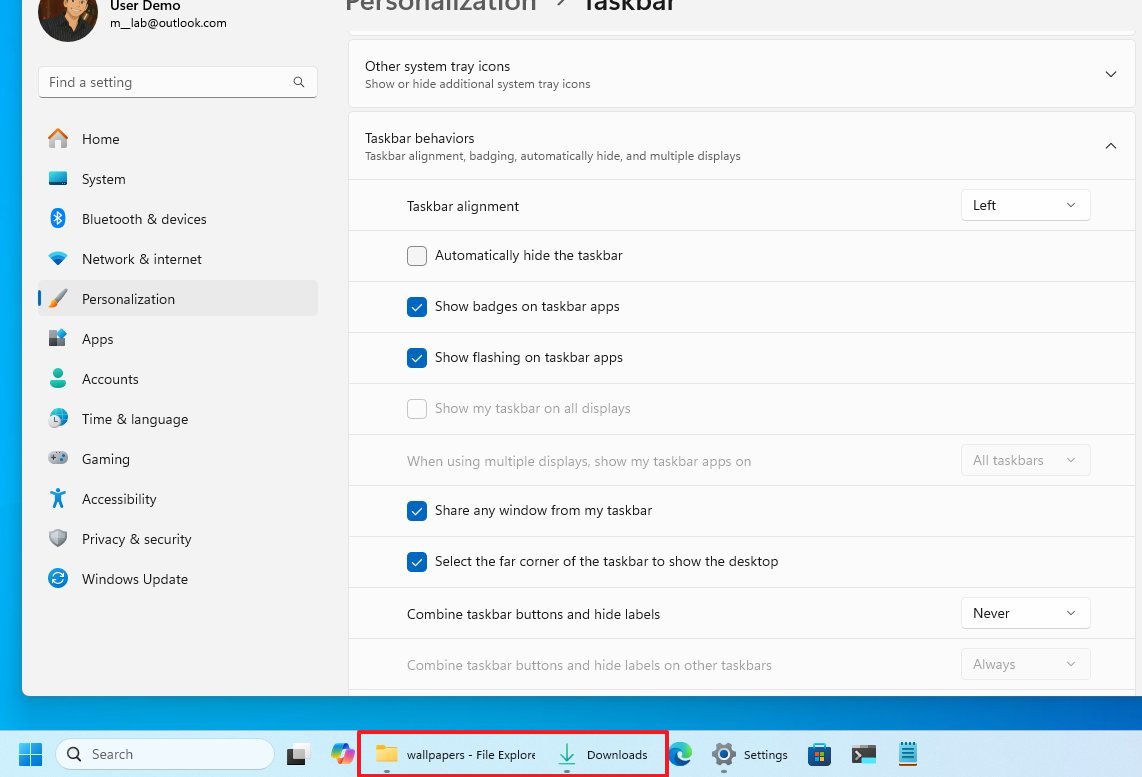
- Click the "Taskbar behaviors" setting.
- Select the Left option for the "Taskbar alignment" setting.
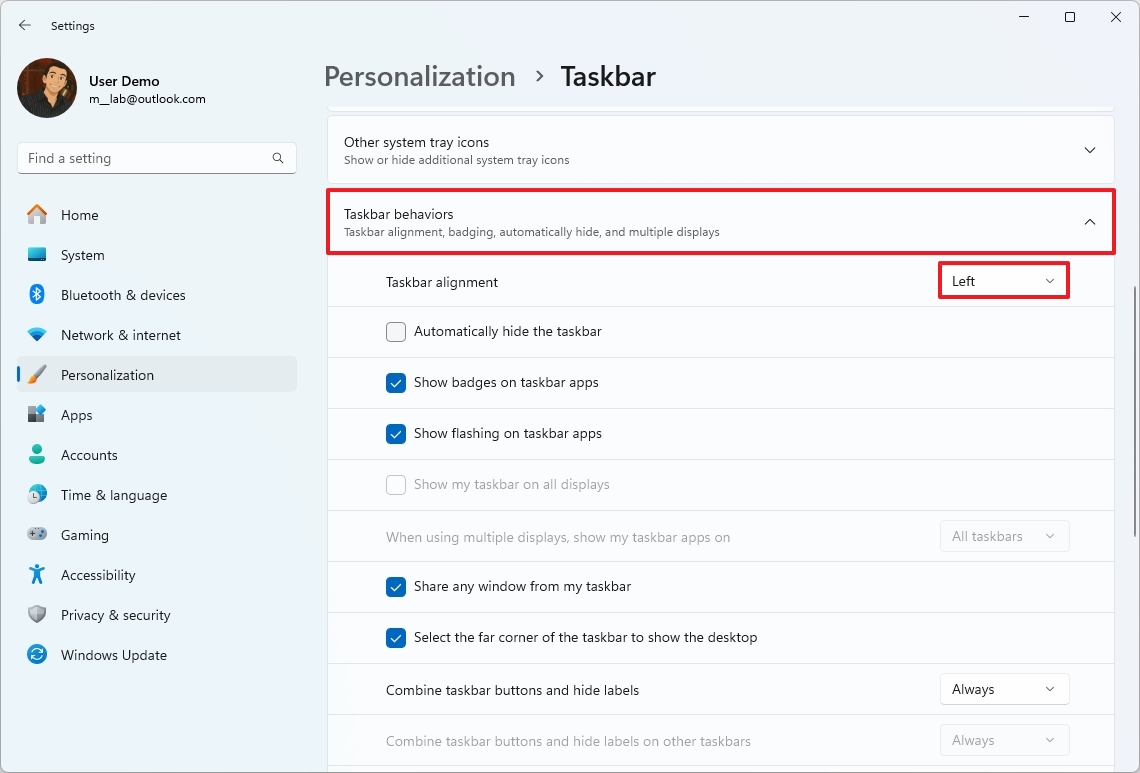
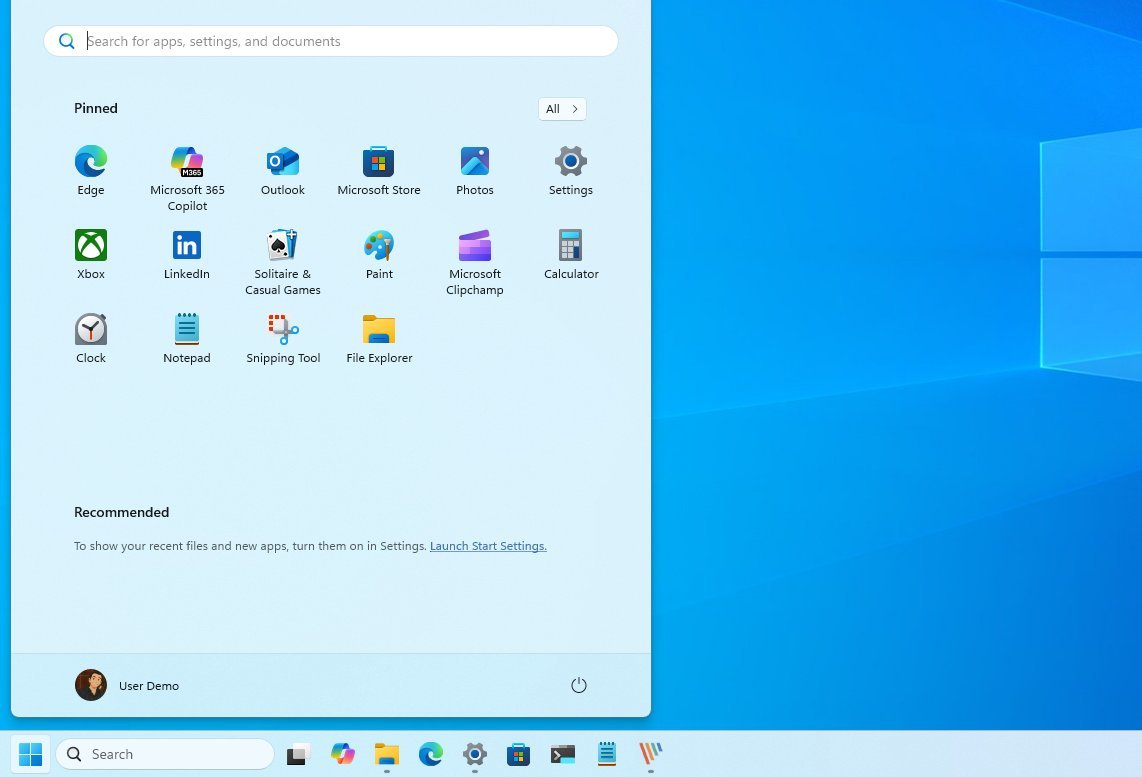
Once you complete the steps, the Taskbar buttons and Start menu should align to the left.
Show app labels in Taskbar
Windows 10 had a straightforward setting within the Taskbar settings that controlled how application buttons behaved, including whether labels were displayed. On Windows 11, Microsoft introduced a redesigned experience that didn't include this option, but later on, the company brought back the behavior.
To show labels for apps in the Taskbar, use these steps:
- Open Settings.
- Click on Personalization.
- Click the Taskbar page on the right side.
- Click the "Taskbar behaviors" setting.
- Select the Never option for the "Combine taskbar buttons and hide labels" setting.
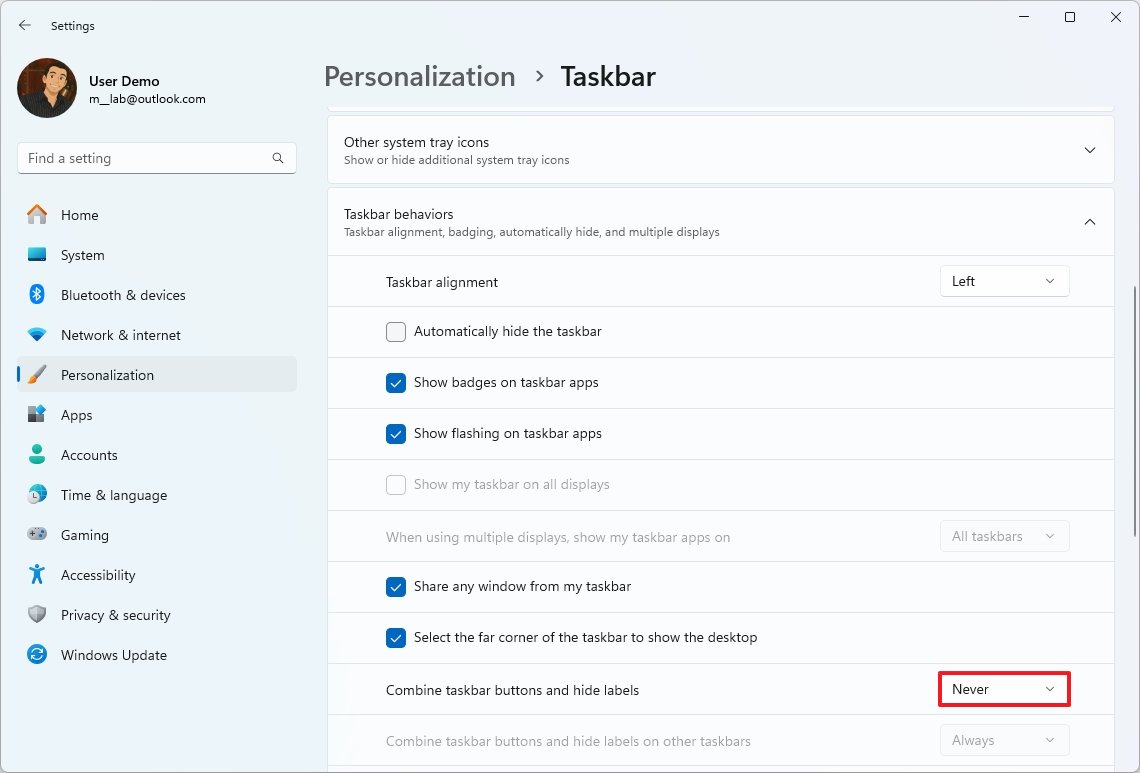
After you complete the steps, the Taskbar will ungroup and display labels of running applications.
Switch to classic File Explorer and context menu
In addition to the desktop elements, another significant change was the introduction of a new File Explorer, which, even though it retained the familiar structure, introduced an unnecessary learning curve for many users.
Fortunately, the company still keeps the legacy file manager around for compatibility with other experiences, but it's not quite easy to access.
To switch to the classic File Explorer on Windows 11, use these steps:
- Open Start.
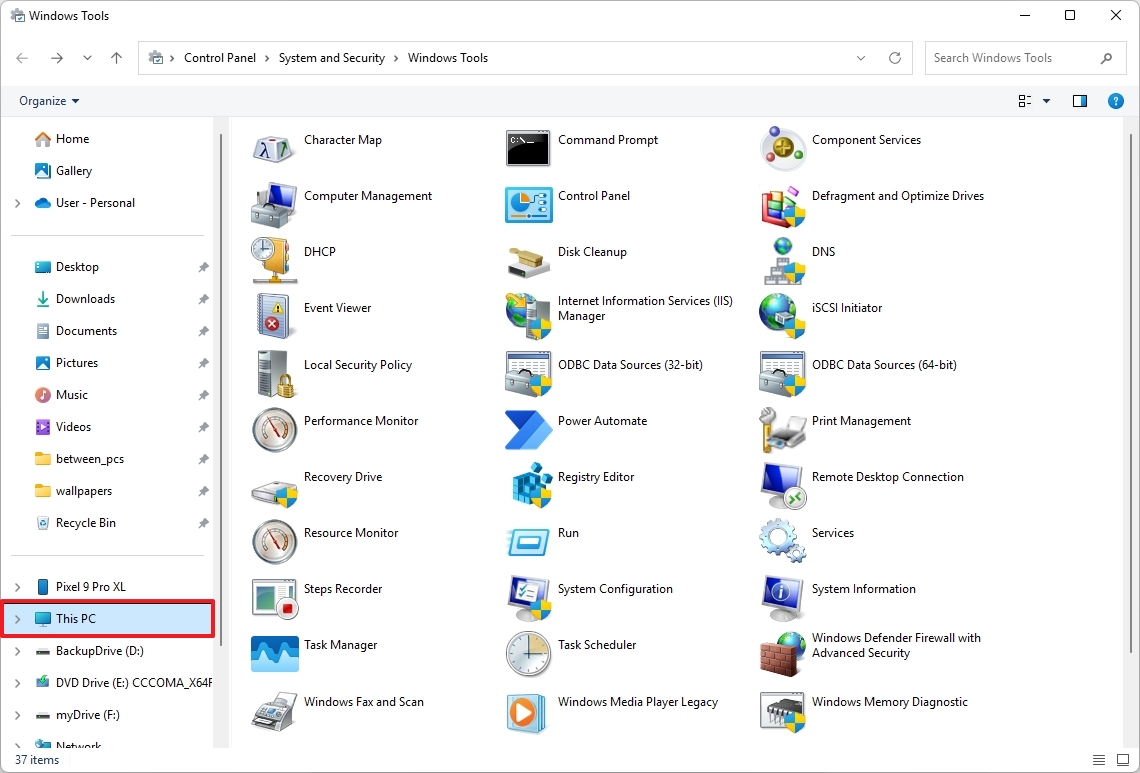
- Search for Windows Tools and click the top result to open the app.
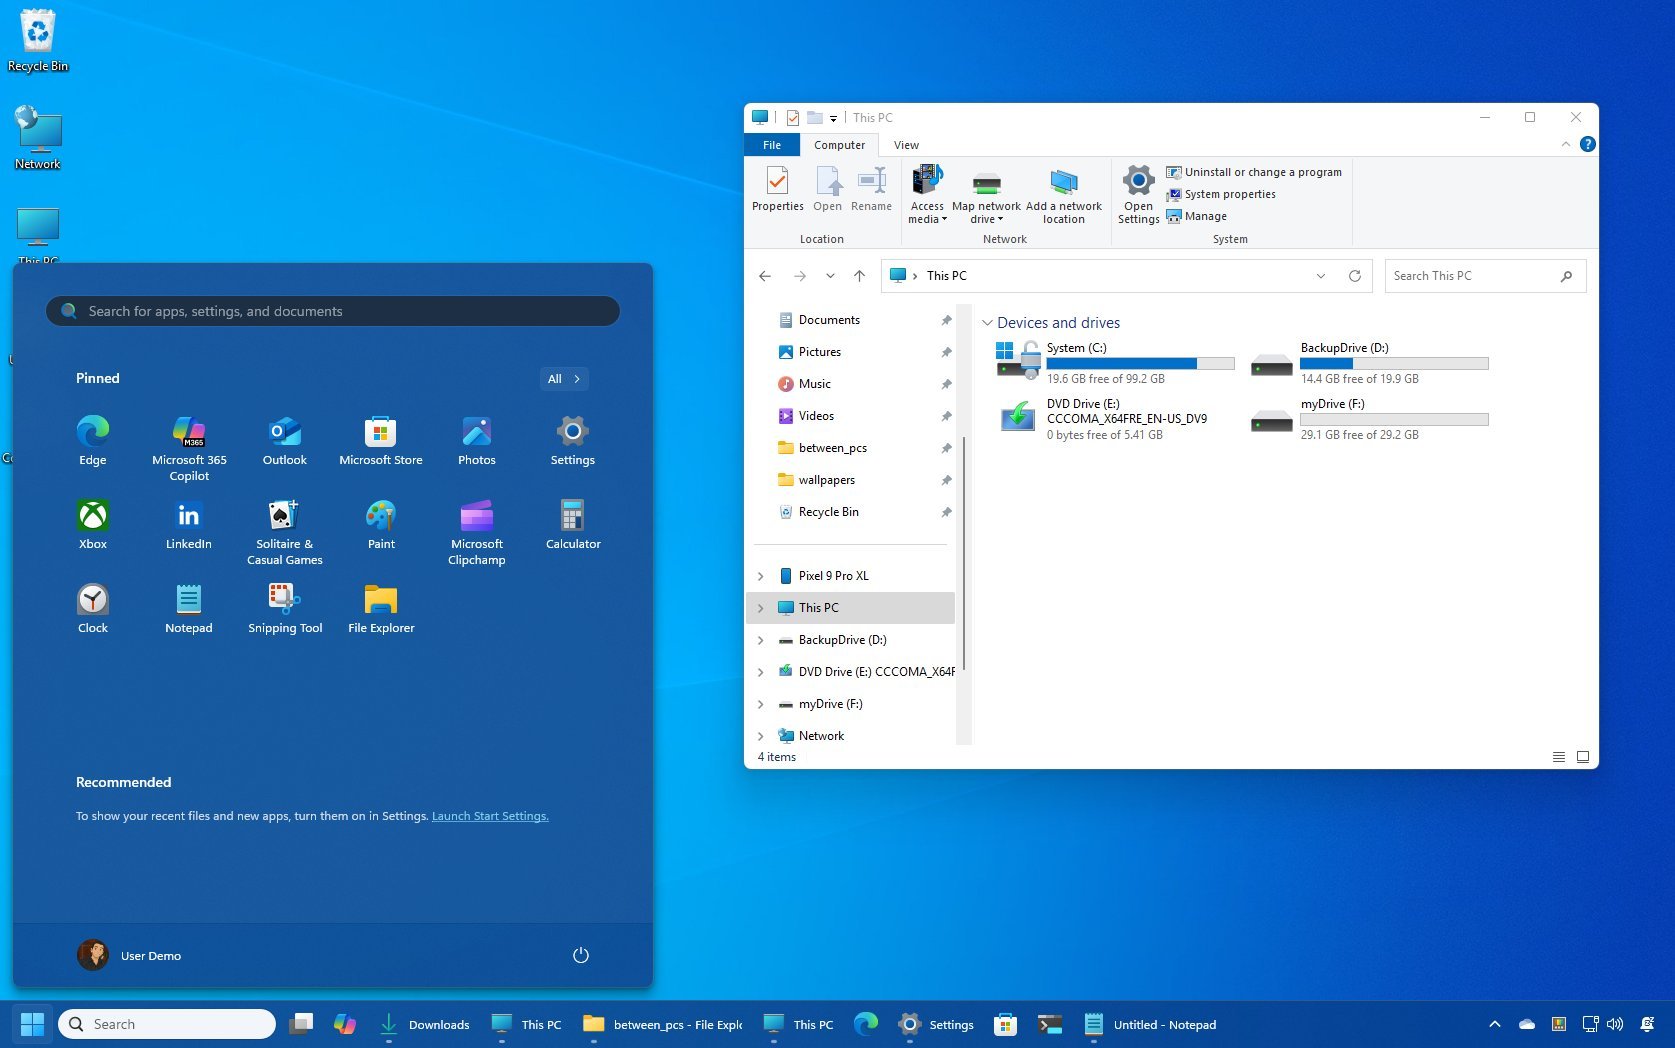
- Click on Home or This PC to switch to the classic version of File Explorer and the context menu.
- (Optional) Right-click the Windows Tools app and choose the "Pin to taskbar" option.
- (Optional) Right-click the File Explorer icon and select the "Unpin from taskbar" option.
- Quick note: You want to perform this action because when you switch to the Home or This PC page, the Windows Tools icon will switch to the File Explorer icon.
After you complete the steps, you can access the classic version of File Explorer, which also brings back the classic context menu during this experience.

Alternatively, you can always access the classic context menu using the "Shift + Right-click" shortcut in the modern version of File Explorer.
Change color scheme
If you want a more legacy experience, then you want to change the color settings to bring back the color accent for title bars and around the app frame.
To customize the accent color to match the legacy elements, use these steps:
- Open Settings.
- Click on Personalization.
- Click the Colors page on the right side.
- Select the "Custom" option in the "Choose your mode" setting.
- Select the Dark option for the "Choose your default Windows mode" setting.
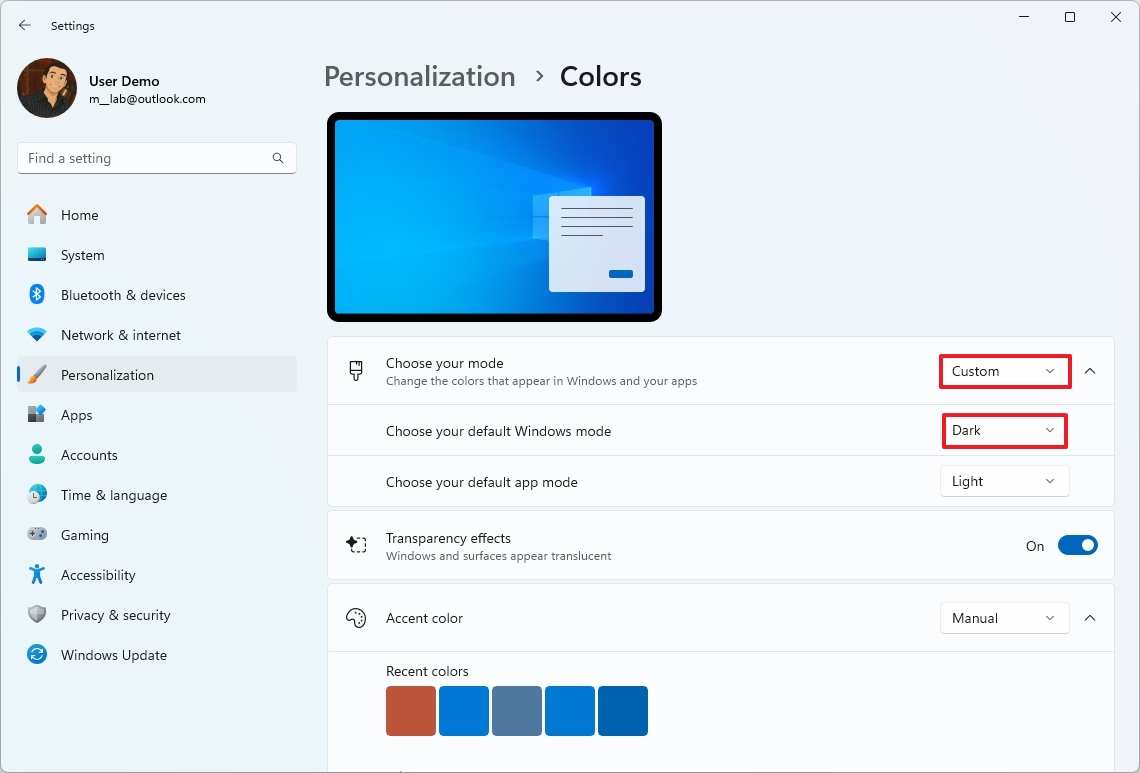
- Choose the color scheme with the "Accent color" setting.
- Turn on the "Show accent color on Start and taskbar" toggle switch.
- Turn on the "Show accent color on title bars and window borders" toggle switch.
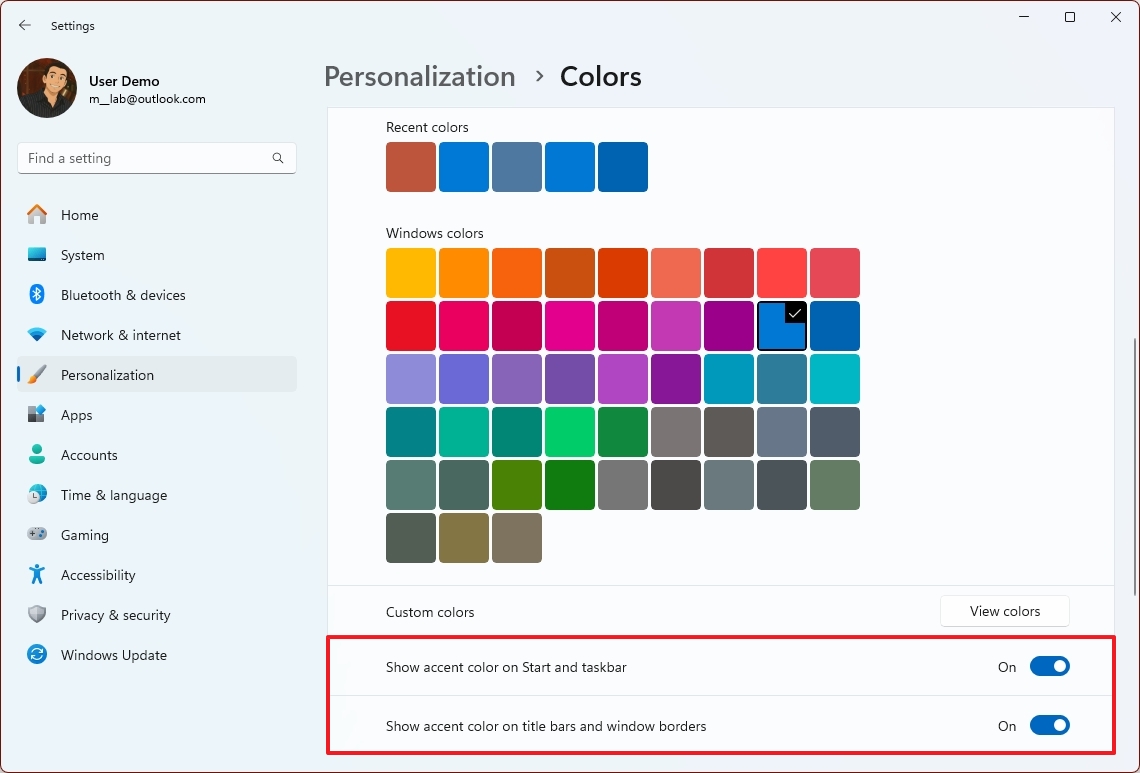
Once you complete the steps, the desktop experience will have a more legacy feeling, like on Windows 10.
Show scrollbar for apps
On Windows 10, apps like File Explorer always show the scrollbar, but in the new version of the operating system, the scrollbar will only show on hover. However, you can always turn off the functionality for a more classic experience.
To always show the scrollbar on Windows 11, use these steps:
- Open Settings.
- Click on Accessibility.
- Click the Visual Effects page on the right side.
- Turn on the "Always show scrollbars" toggle switch.
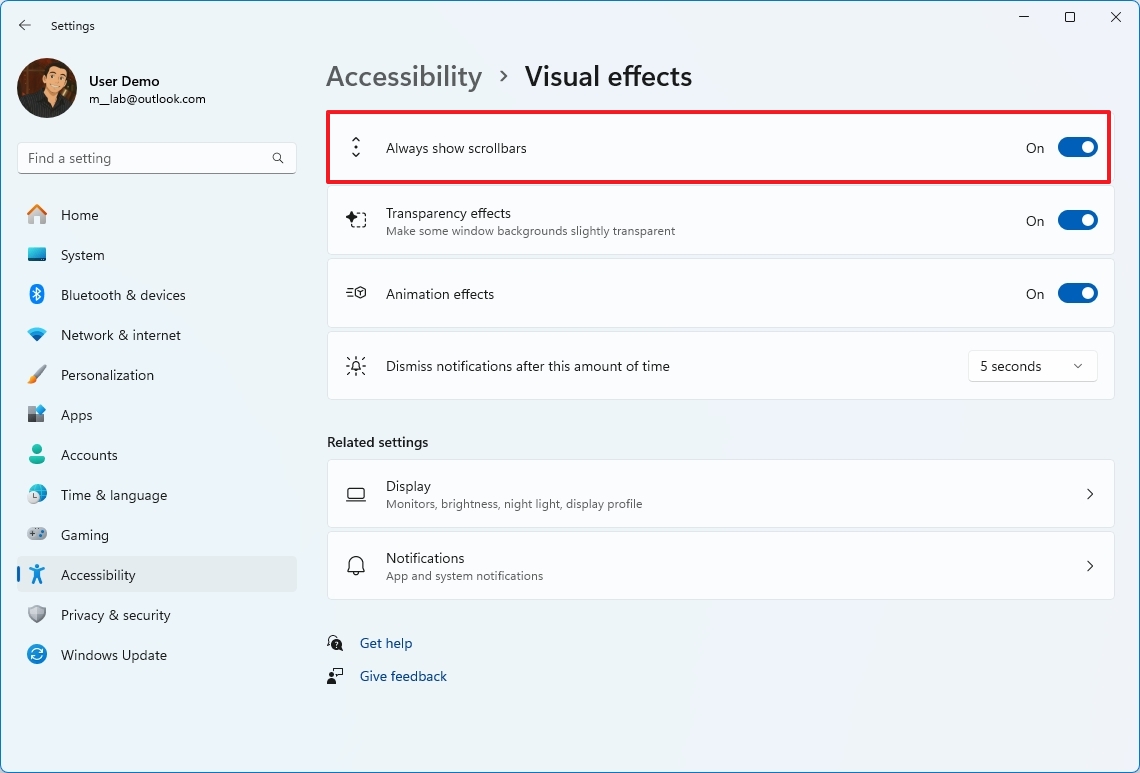
After you complete the steps, compatible apps will always show the scrollbar on Windows 11.
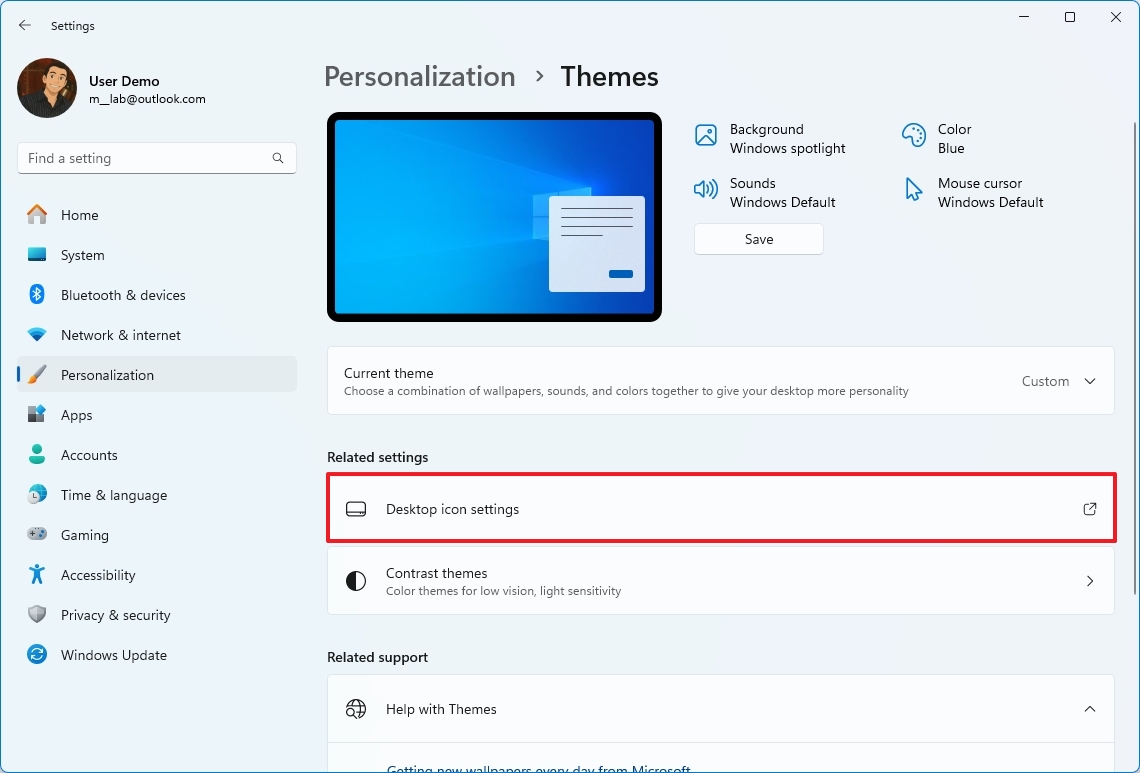
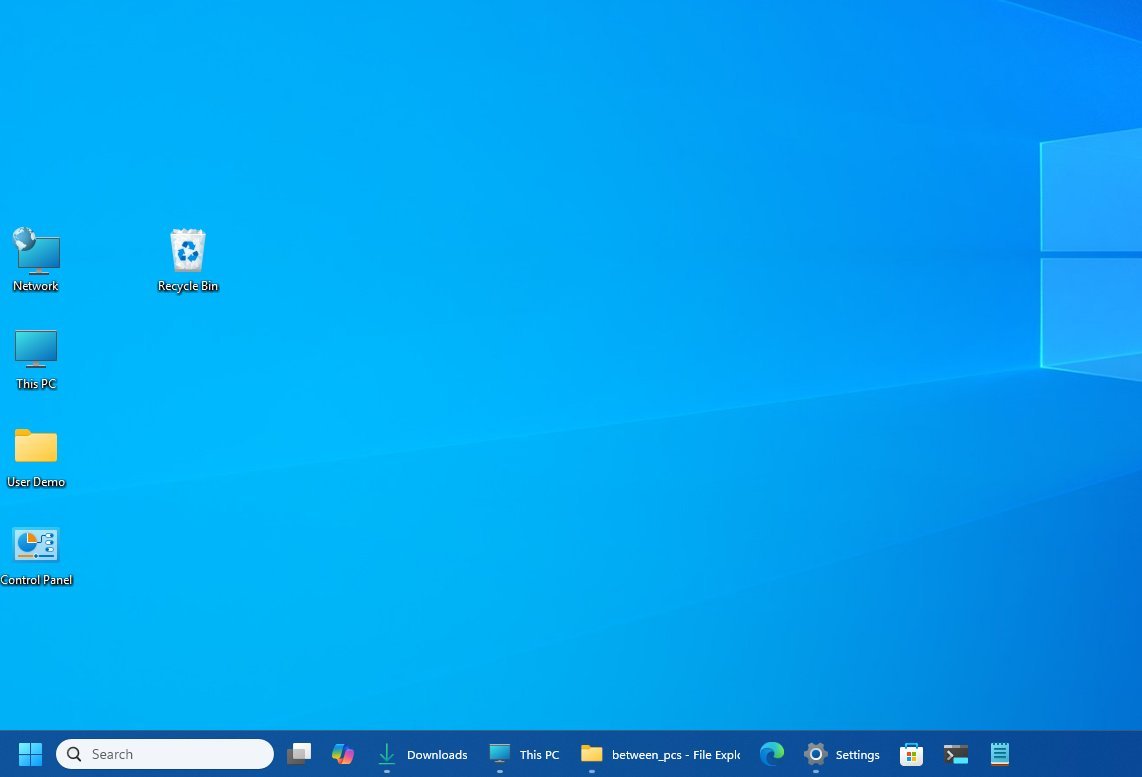
Show classic desktop icons
Showing classic desktop icons (such as This PC, Network, and Control Panel) on Windows 11 can also help to bring back a familiar Windows 10 (and even older versions) experience.
To show the legacy desktop icons on Windows 11, use these steps:
- Open Settings.
- Click on Personalization.
- Click the Themes page on the right side.
- Select the "Desktop icon settings" option.
- Check the icons to show on the desktop, including "Control Panel," "Network," "Computer," "Recycle Bin," and others.
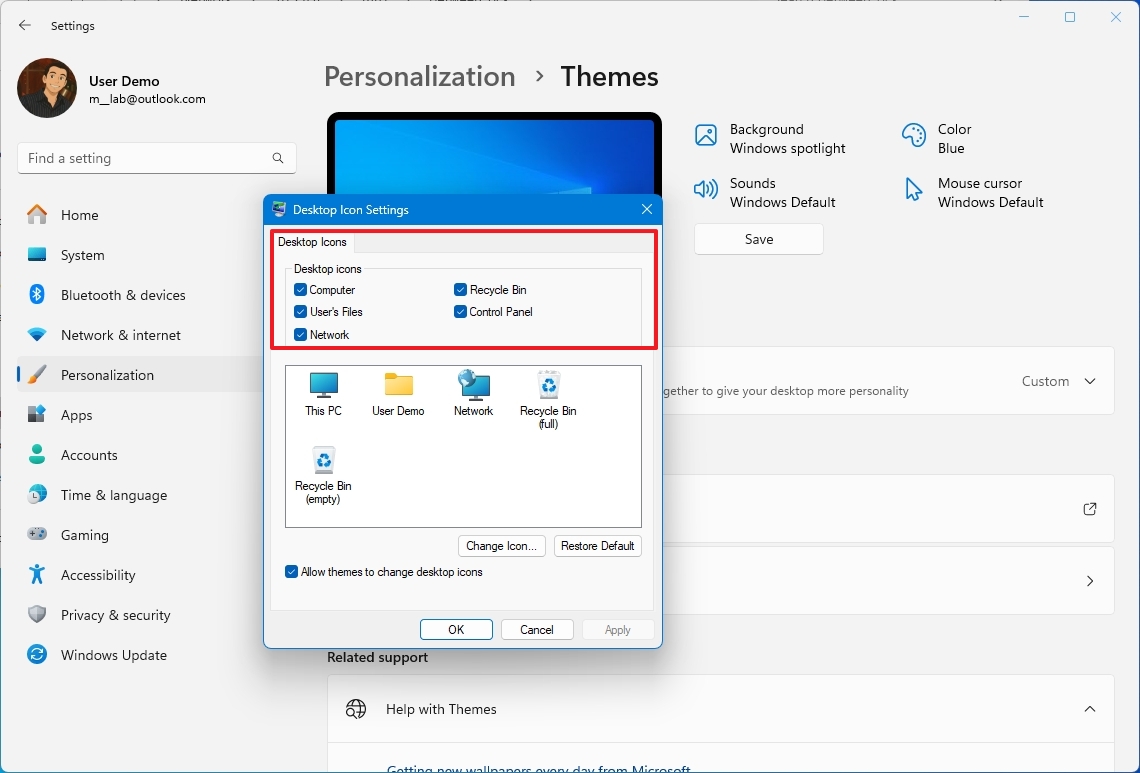
Once you complete the steps, you will have a more familiar desktop setup similar to one on Windows 10 and older versions.
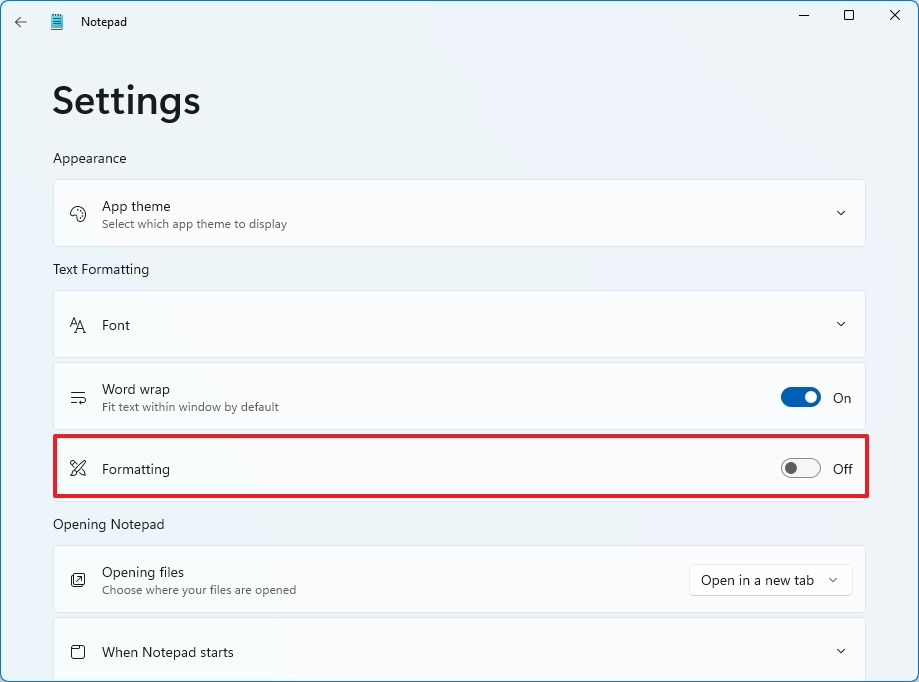
Disable non-legacy features in Notepad
This is optional, but if you use the Notepad app on a daily basis, you may want to turn off new AI features for a more classic experience.
To disable all the AI features available in Notepad, use these steps:
- Open Notepad.
- Click the gear button to open the settings page.
- Turn off the Formatting toggle switch to disable the Markdown support (if applicable).
- Click the "When Notepad starts" setting.
- Select the "Start new session and discard unsaved changes" option.
- Turn off the "Recent files" toggle switch to disable the menu with your most recent text files.
- Turn off the "Spell check" toggle switch to disable auto-correction for misspelled words.
- Turn off the "Autocorrect" toggle switch to disable underlines for misspelled words.
- Turn off the "Copilot" toggle switch to disable the AI features.
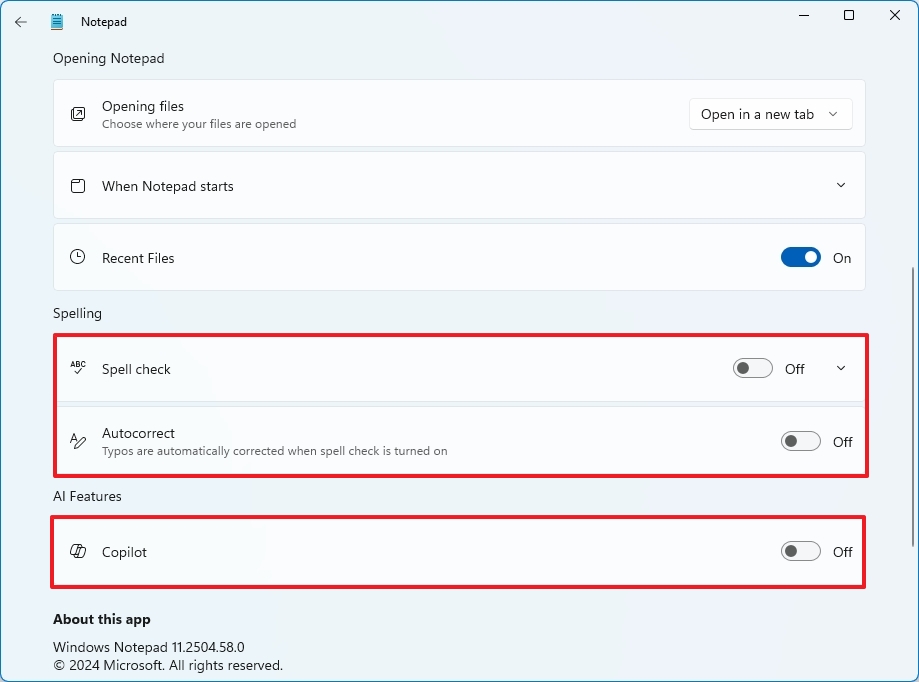
After you complete the steps, you will end up with a more classic Notepad.

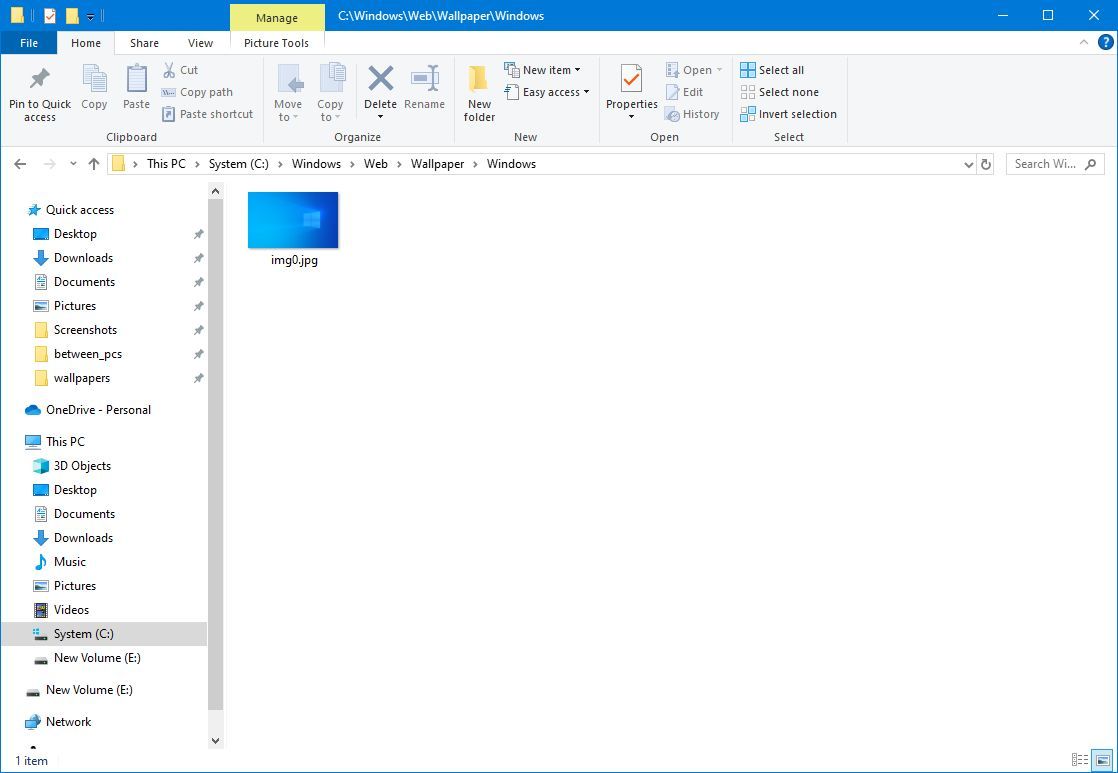
Quick tip
If you still have access to a Windows 10 setup, you can grab the default wallpaper from the C:\Windows\Web\Wallpaper\Windows location, and you can set this background as your new default experience on the Windows 11 desktop.
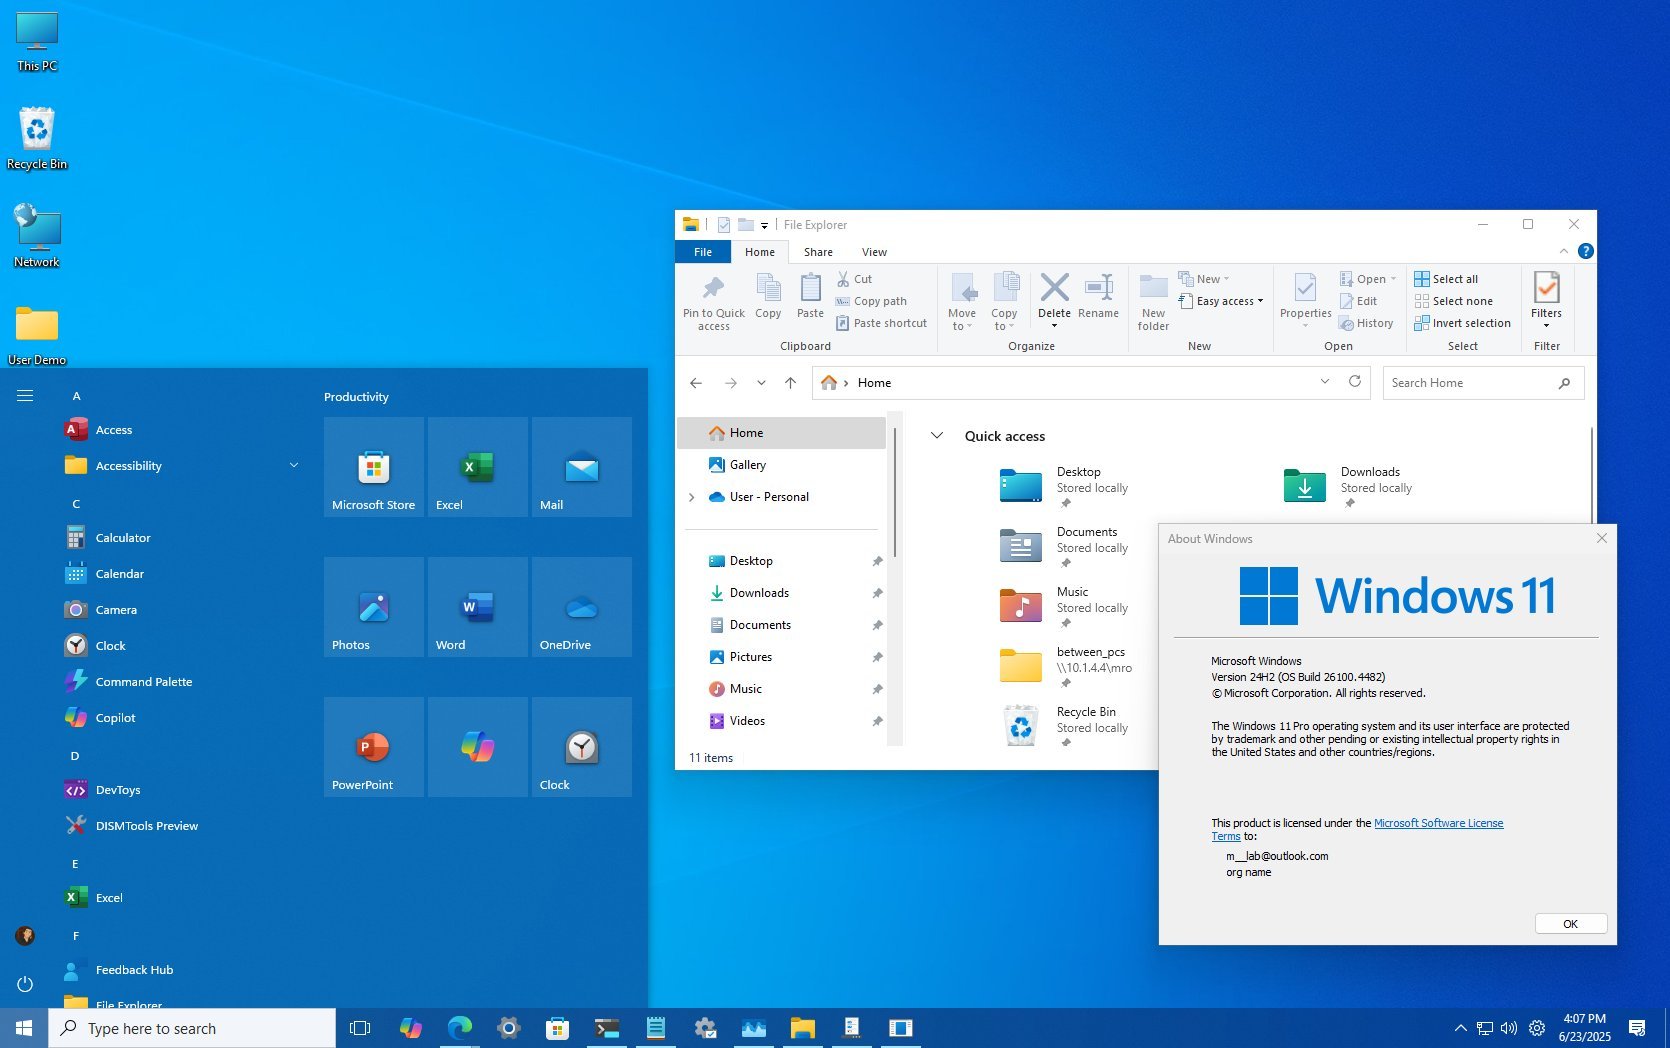
This is a preview of Windows 11 with Windows 10 tweaks without extra tools.
How to make Windows 11 look like 10 with third-party tools
In addition to the customizations you can implement locally in the operating system, you can also use third-party tools to change the appearance of Windows 11.
However, my disclaimer here is that I do not recommend any of these tools for work or school devices, as these types of third-party applications are known to break the operating system at random times, usually after system updates.
Also, the web browser may even flag them as untrusted, but it's often because these tools make changes to the core behavior of the operating system.
Also, only pick and use one tool at a time to avoid conflicts. However, you can use any of these tools in combination with the tweaks that don't require third-party applications.
ExplorerPatcher
ExplorerPatcher is a popular free, open-source utility designed to restore various interface elements present in earlier versions of the operating system, primarily Windows 10. It aims to give you more control over the appearance and functionality.
Install ExplorerPatcher
You can typically download the ExplorerPatcher tool from its official GitHub page, but it's easier to install it through the Windows Package Manager.
To install the ExplorerPatcher on Windows 11, use these steps:
- Open Start.
- Search for Command Prompt, right-click the top result, and choose the Run as administrator option.
- Type the following to install the tool and press Enter: winget install --id valinet.ExplorerPatcher
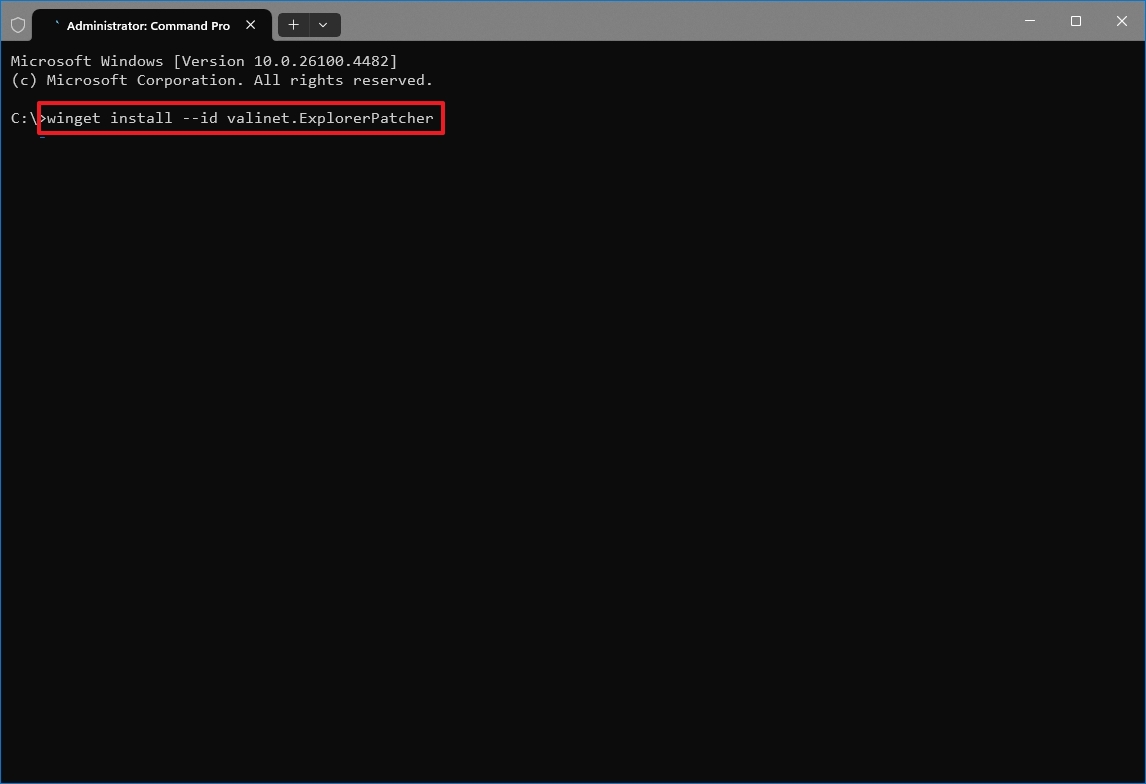
Once you complete the steps, the tool will be installed on your computer, and you can proceed to customize the appearance of the operating system.
Customizing with ExplorerPatcher
To bring some of the traditional look to the new version of the operating system, right-click the Taskbar, choose the "Properties" option, and then select the area to customize.
Taskbar
On the Taskbar tab, select the "Windows 10 (ExplorerPatcher)" option in the "Taskbar style" setting and click the "Restart File Explorer" option at the bottom-left corner to apply the changes and unveil other settings.
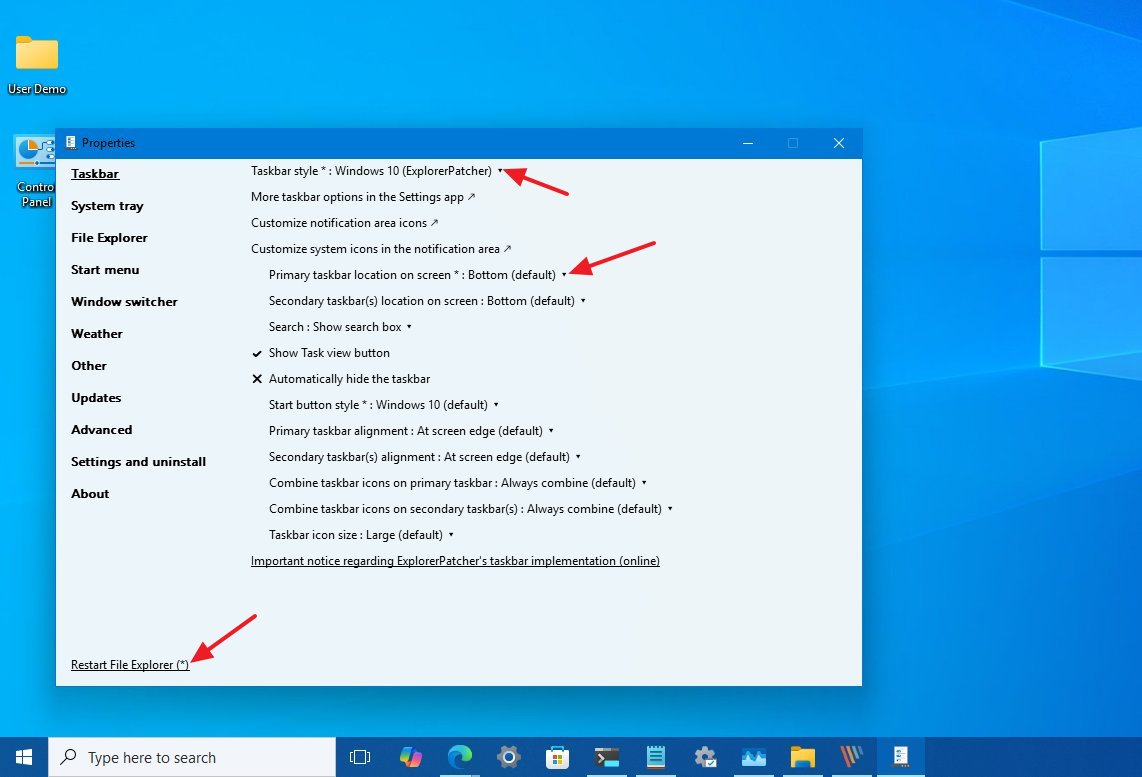
(Optional) Choose the "Top" option to change the Taskbar position to the top of the screen in the "Primary taskbar location on screen" setting. The option is only possible when using the tool's own version of the Taskbar.
The rest of the default settings should suit most scenarios, but you can further customize the appearance according to your preferences.
File Explorer
On the File Explorer tab, you can tweak several settings. On this page, you can check the "Disable the Windows 11 context menu" to revert to the classic version that includes every possible option for a specific element.
You can check the "Always use legacy file transfer dialog" to switch to the classic dialog for file transfers.
If you want to switch from the modern to the classic version of File Explorer, choose the "Windows 10 Ribbon" option in the "Control Interface" setting.
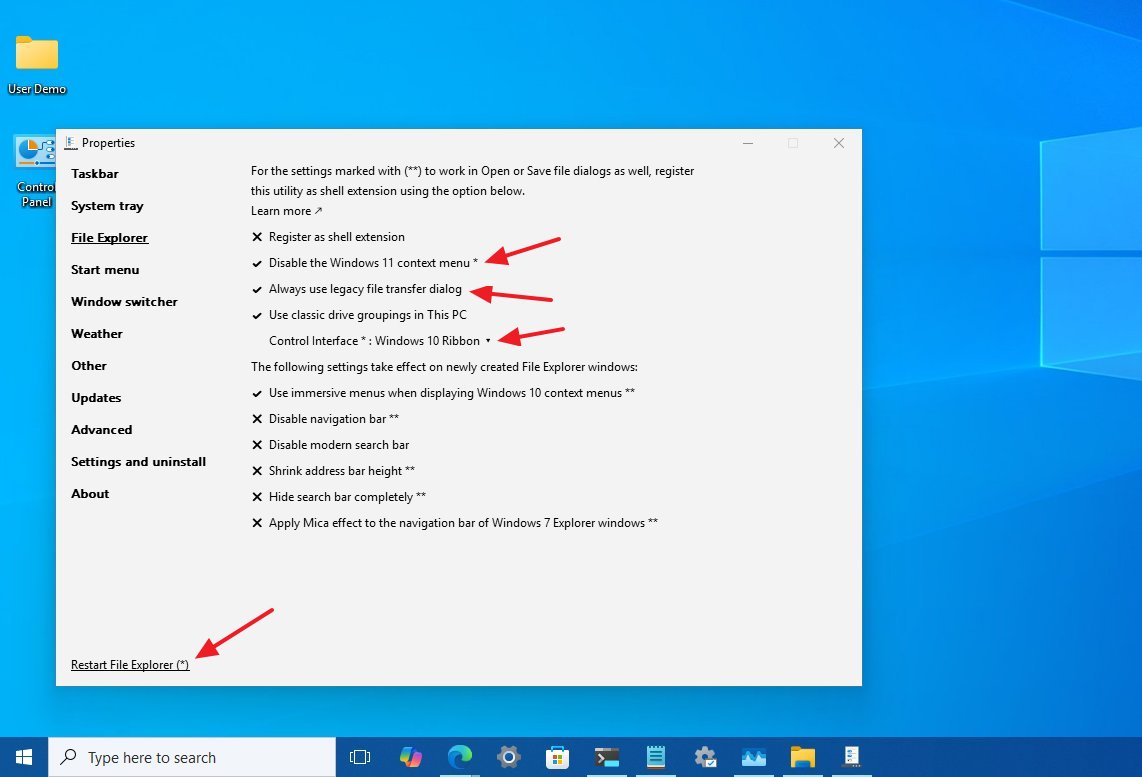
Finally, click the "Restart File Explorer" option at the bottom-left corner to apply the changes and unveil other settings.
The remaining default settings are recommended for most users.
Start menu
On the Start menu tab, you can bring back the classic menu, remove the rounded corners for elements on the screen, and more.
If you want to bring back the classic Start menu from Windows 10, select the "Windows 10" option in the "Start menu style" setting.
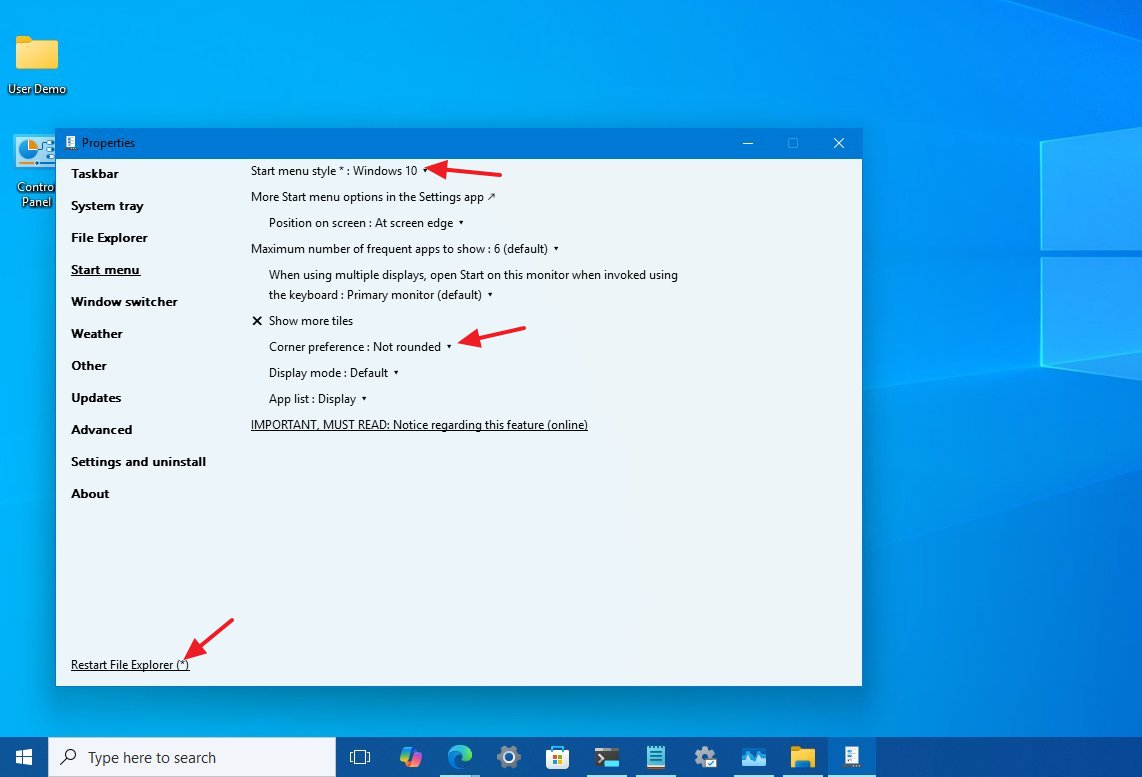
This is optional, but you can also choose the "Not rounded" option for the "Corner preference" setting.
After you're done configuring the menu settings, click the "Restart File Explorer" option at the bottom-left corner to apply the changes and unveil other settings.
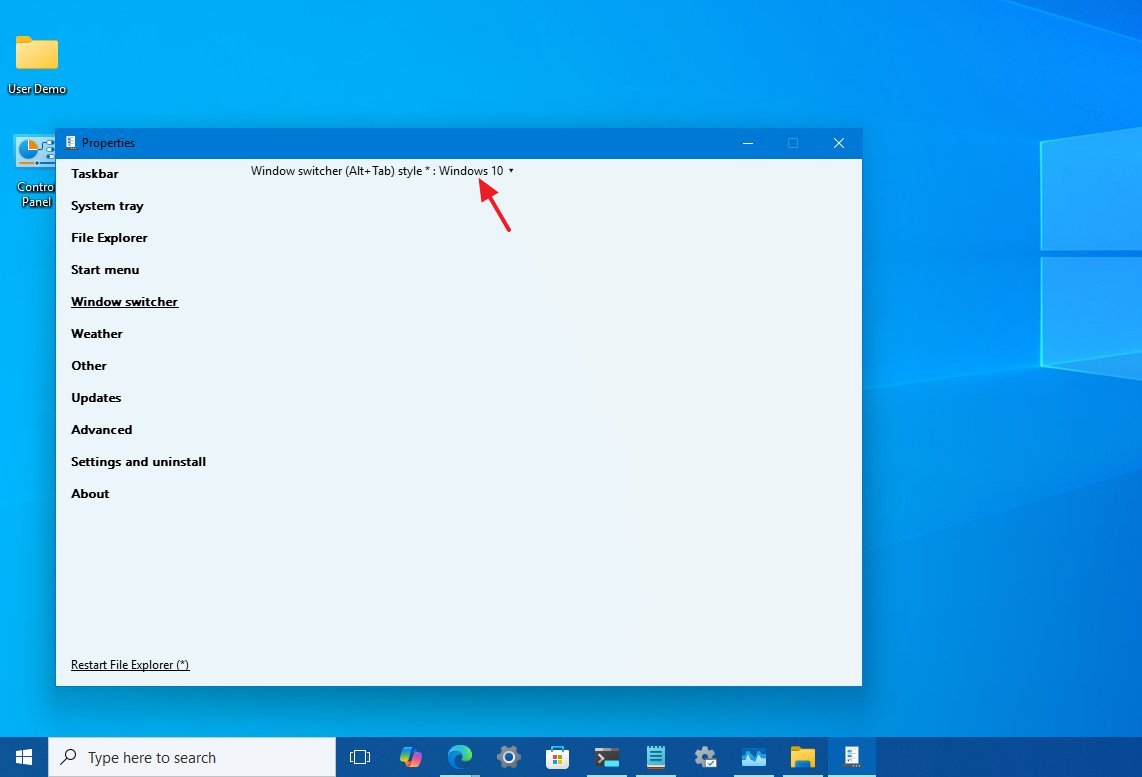
Window Switcher
On the Window Switcher page, you can bring back the legacy "Alt + Tab" experience.
This is an optional tweak since the window switcher available on Windows 11 is visually very similar. However, the latest version of the operating system includes various improvements, including tab integration with Microsoft Edge.
This is an optional tweak since the window switcher available on Windows 11 is visually very similar. However, the latest version of the operating system includes various improvements, including tab integration with Microsoft Edge.
If you're changing this setting, click the "Restart File Explorer" option at the bottom-left corner to apply the changes and unveil other settings.
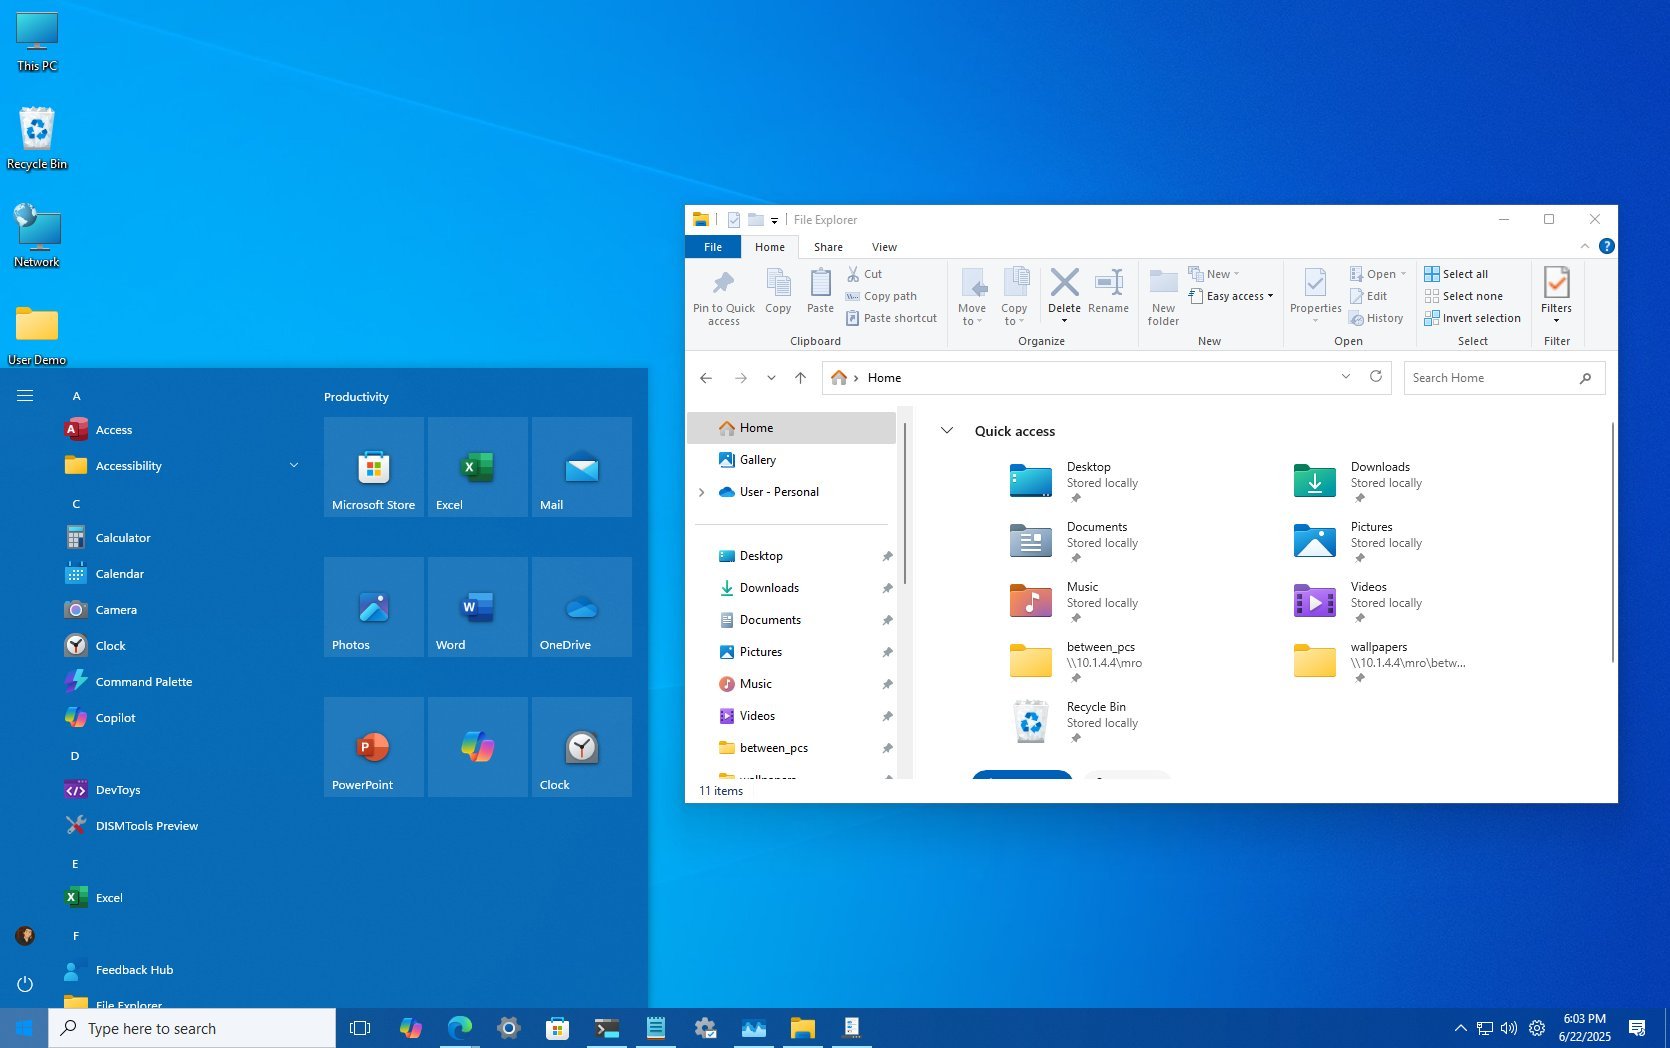
This is a preview of Windows 11 with Windows 10 tweaks using the ExplorerPatcher tool.
Uninstall ExplorerPatcher
Once you are ready for the Windows 11 interface, you can uninstall ExplorerPatcher using these steps:
- Open Start.
- Search for Command Prompt, right-click the top result, and choose the Run as administrator option.
- Type the following to install the tool and press Enter: winget uninstall --id valinet.ExplorerPatcher
Once you complete the steps, restart the computer to revert to the new Windows 11 experience.
Windhawk
Windhawk is also a popular open-source customization tool that can change the default behavior of the operating system, in this case, Windows 11. It's designed to make it easier for anyone to tweak and modify various aspects of the operating system and individual programs, where some customization options have been removed or made more difficult to access.
This tool provides a framework for developers to create and share small code snippets, called "mods," that modify the behavior or appearance of Windows 11 (or 10) and apps.
Install Windhawk
You can typically download the Windhawk tool from its official web page, but it's easier to install it through the Windows Package Manager.
To install the Windhawk, use these steps:
- Open Start.
- Search for Command Prompt, right-click the top result, and choose the Run as administrator option.
- Type the following to install the tool and press Enter: winget install --id RamenSoftware.Windhawk
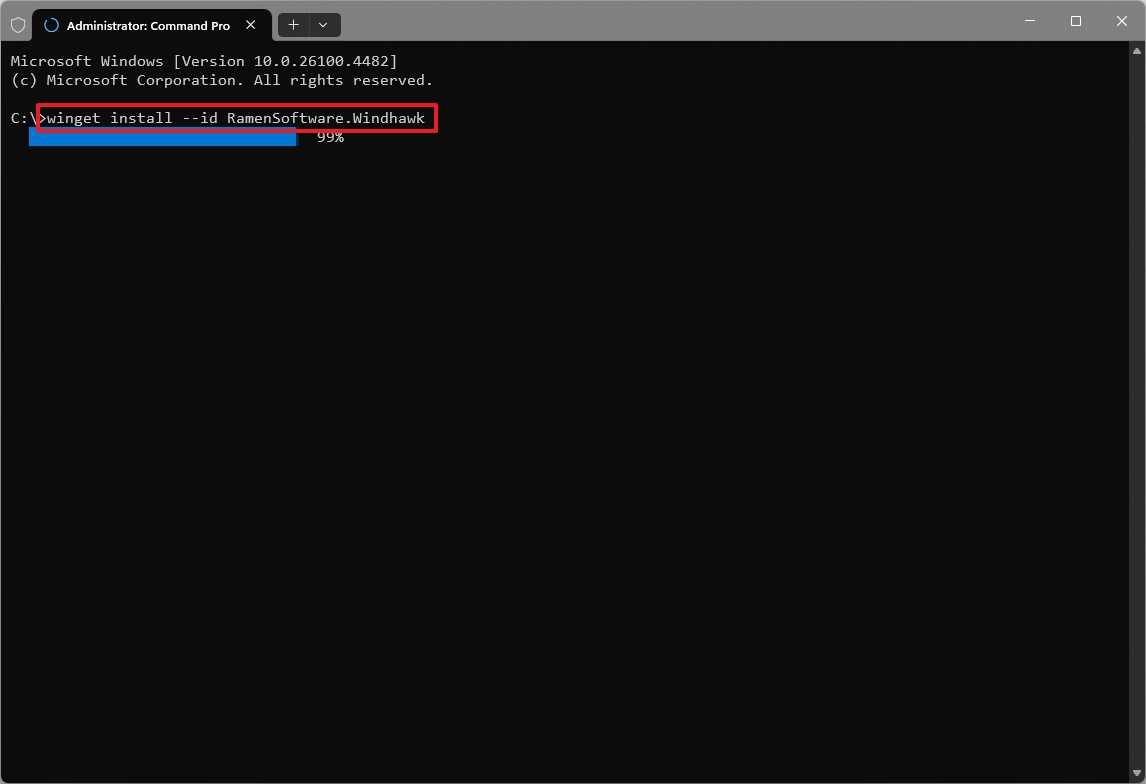
After you complete the steps, the app will be installed on your device, and you can now proceed to add mods to change the appearance of Windows 11.
Customizing with Windhawk
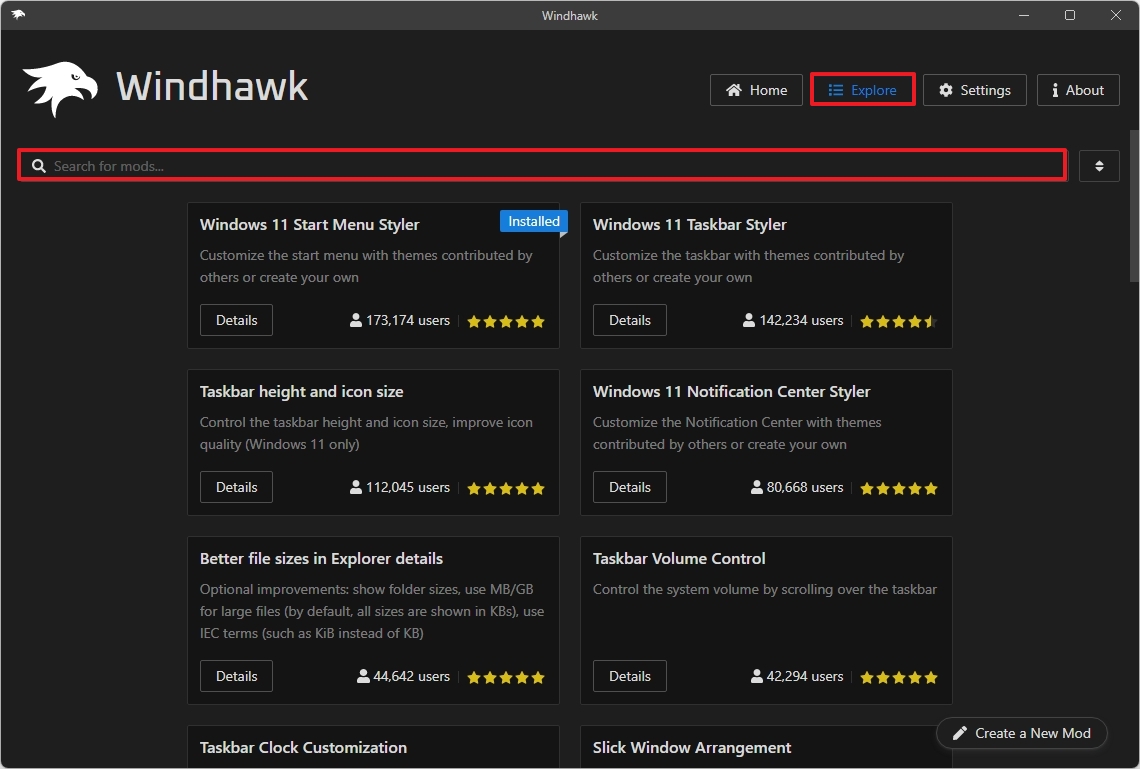
To change the appearance of Windows 11 to bring back some of the Windows 10 elements, open the Start menu, search for Windhawk, and click the top result to open the app.
Once in the tool, click "Explorer," then you'll have to search, install, and configure each mod.
Classic Taskbar
While in the "Explorer" tab, search for "Enable Win10 taskbar on Win11 24H2," click the "Details" button, and then the "Install" button.
Once it's installed, open the "Home" tab and turn on the toggle switch for the mod.
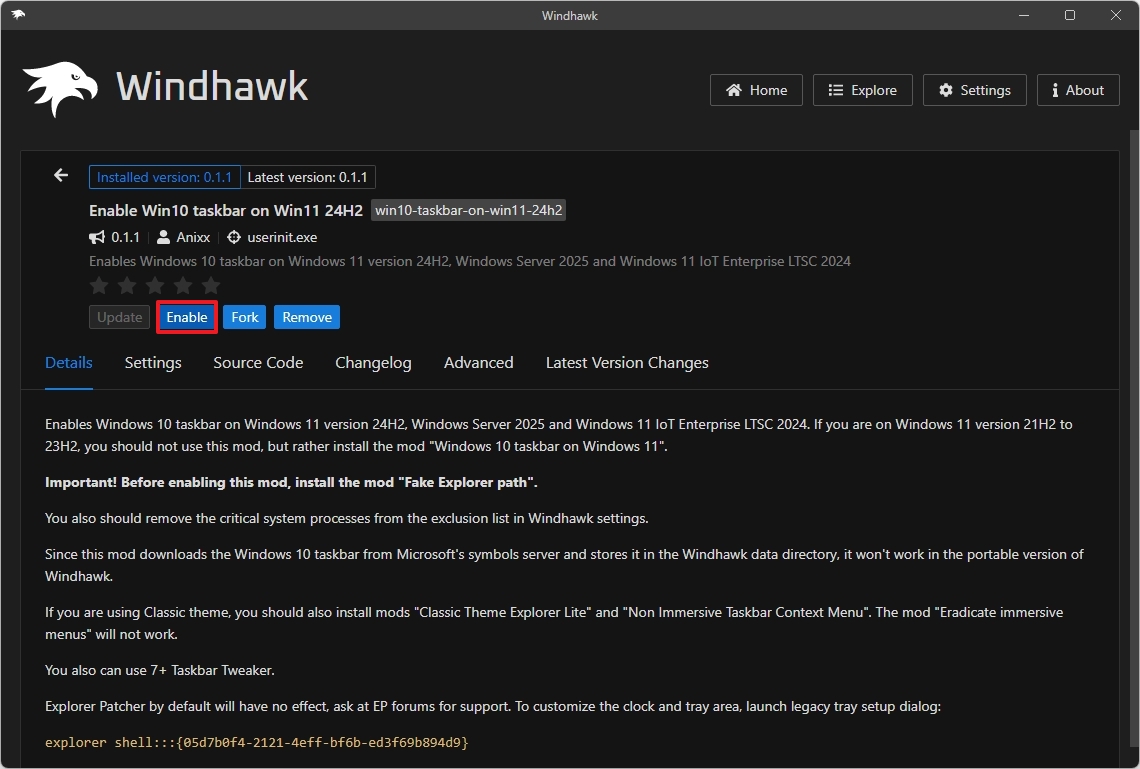
During my testing, this was the only mod that replicated the look and feel of the Windows 10 Taskbar more accurately. However, it centers the Start menu by default and doesn't offer an option to change the alignment. So, if you prefer the Start menu aligned to the left, this mod might not be the right choice for you.

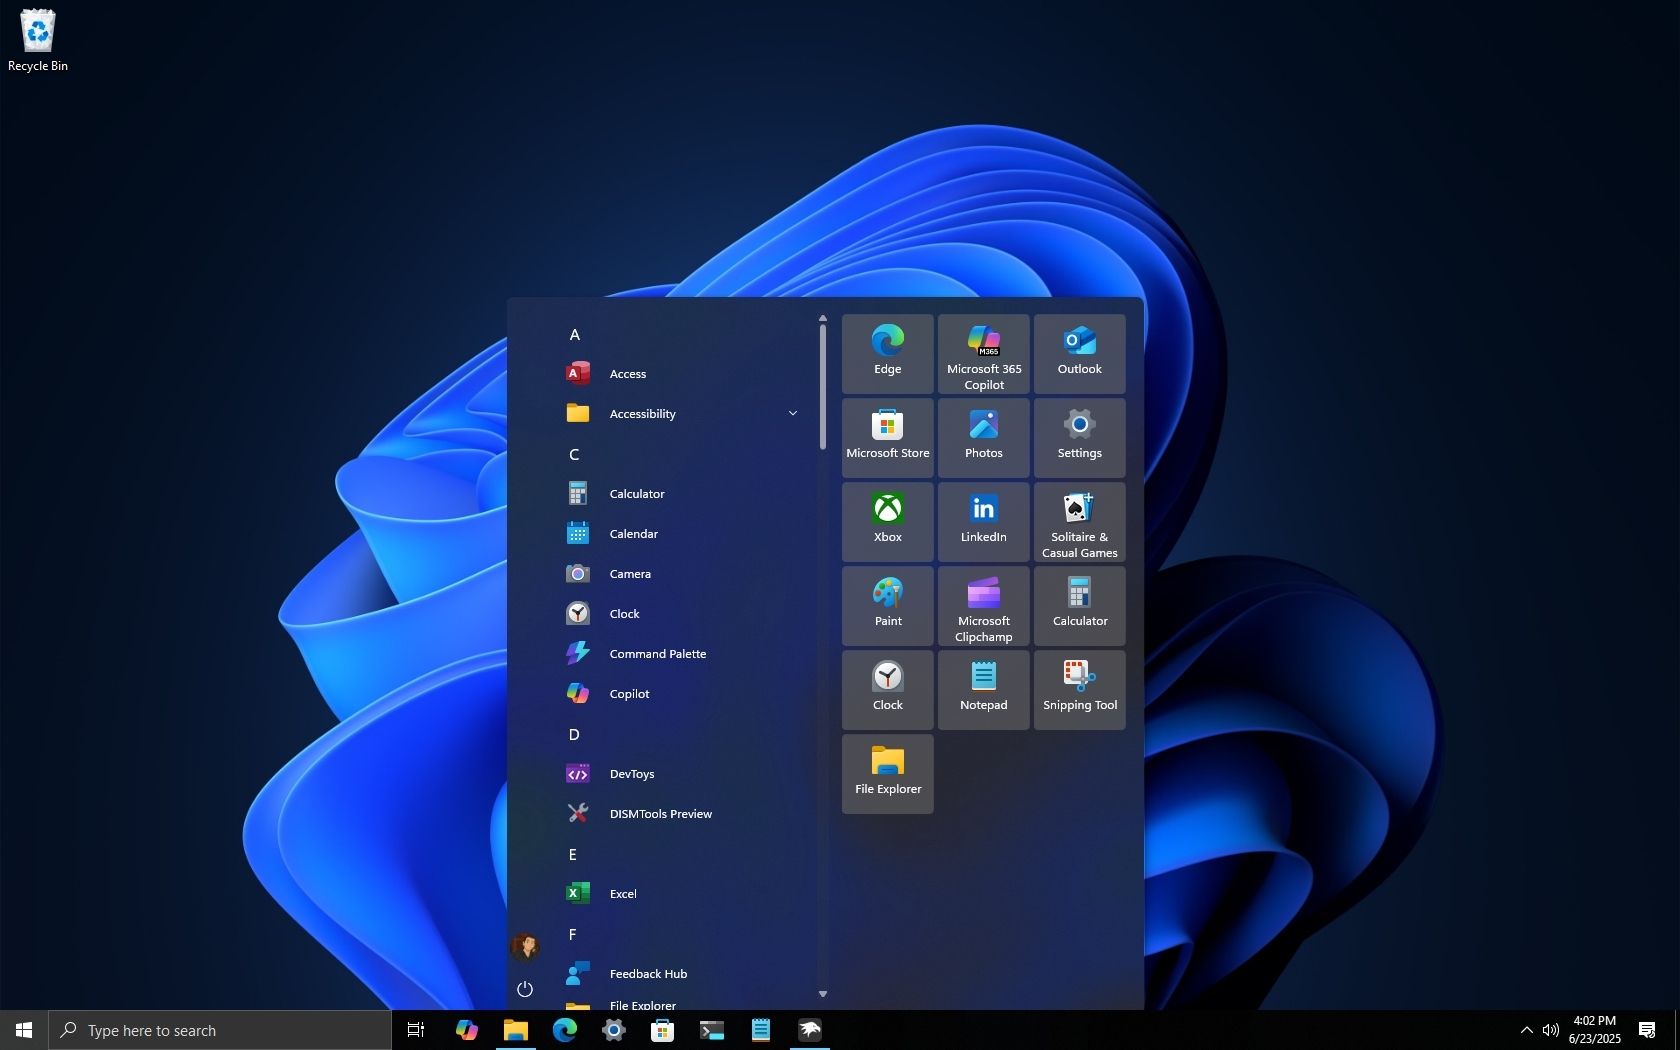
Classic Start menu
Open the "Explorer" tab, search for "Windows 11 Start Menu Styler," click the "Details" button, and then the "Install" button.
Once it's installed, open the "Home" tab, turn on the toggle switch for the mod, and click the "Details" button.
Click on the "Settings" tab, and choose the "Windows11_Metro10" option from the "Theme" setting, and click the "Save settings" button (if applicable).
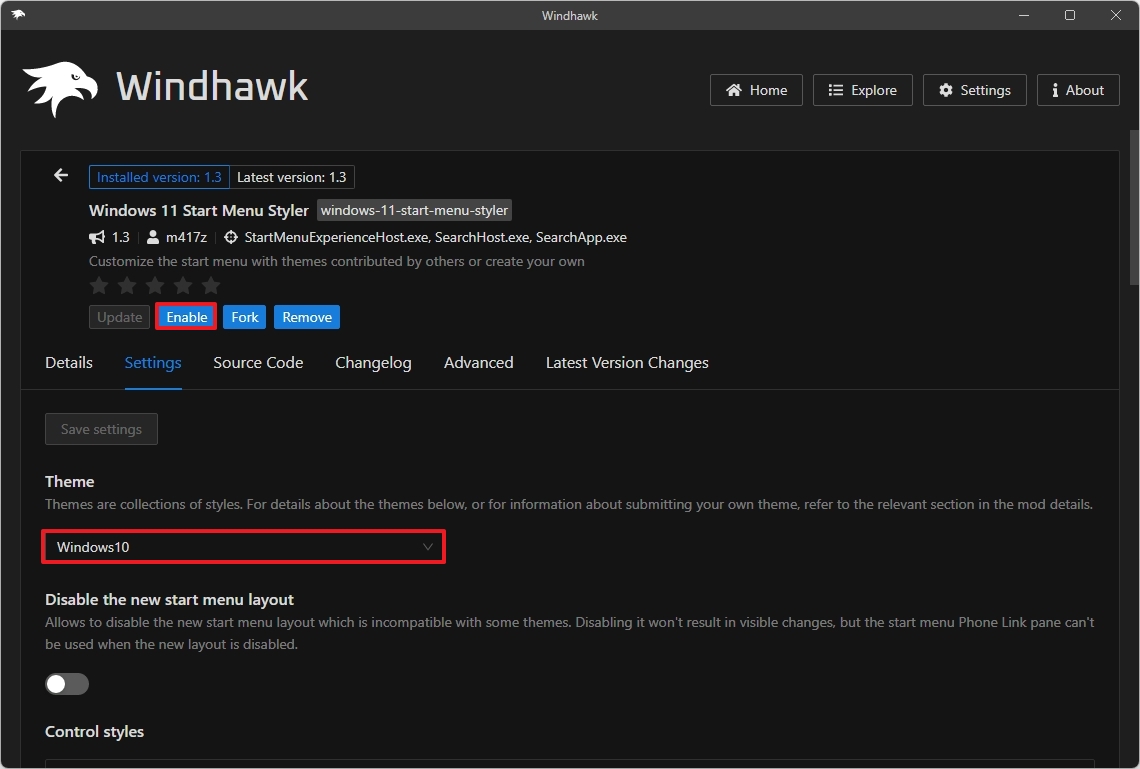
The Start menu design only offers a dark mode color. If you plan to use this mod, you may want to change the color system on Settings > Personalization > Colors.
Classic File Explorer
While in the "Explorer" tab, search for "Classic Explorer navigation bar," click the "Details" button, and then the "Install" button.
Once it's installed, open the "Home" tab and turn on the toggle switch for the mod.
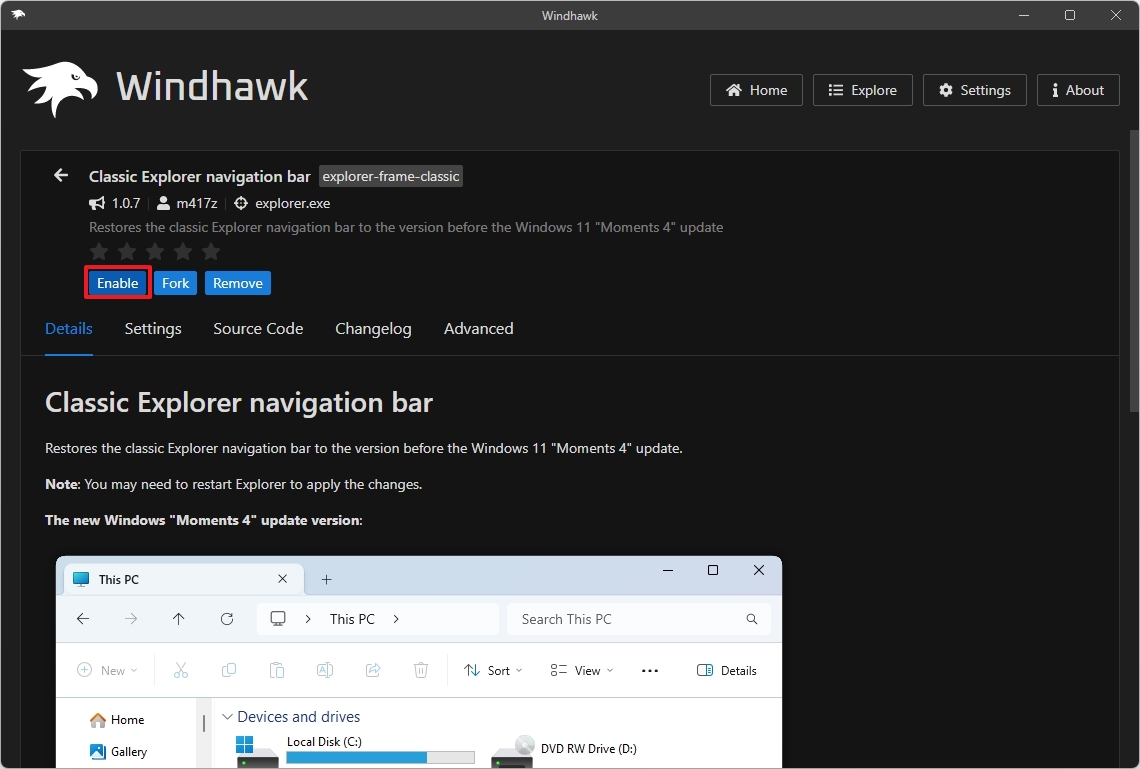
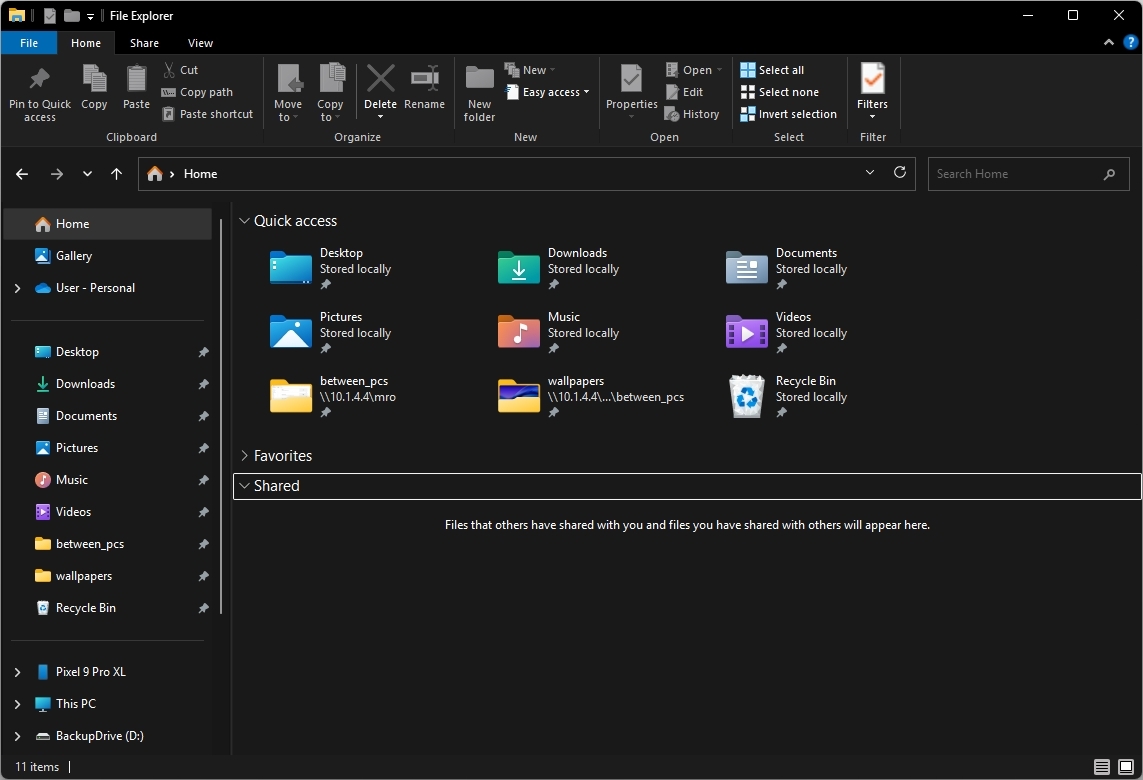
After enabling this mod, you will have a more classic version of File Explorer that also enables the classic context menu.
Uninstall Windhawk
Once you are ready for the Windows 11 interface, you can uninstall Windhawk using these steps:
- Open Start.
- Search for Command Prompt, right-click the top result, and choose the Run as administrator option.
- Type the following to install the tool and press Enter: winget install --id RamenSoftware.Windhawk
After you complete the steps, the app will be uninstalled, and your experience should revert to the Windows 11 look and feel.
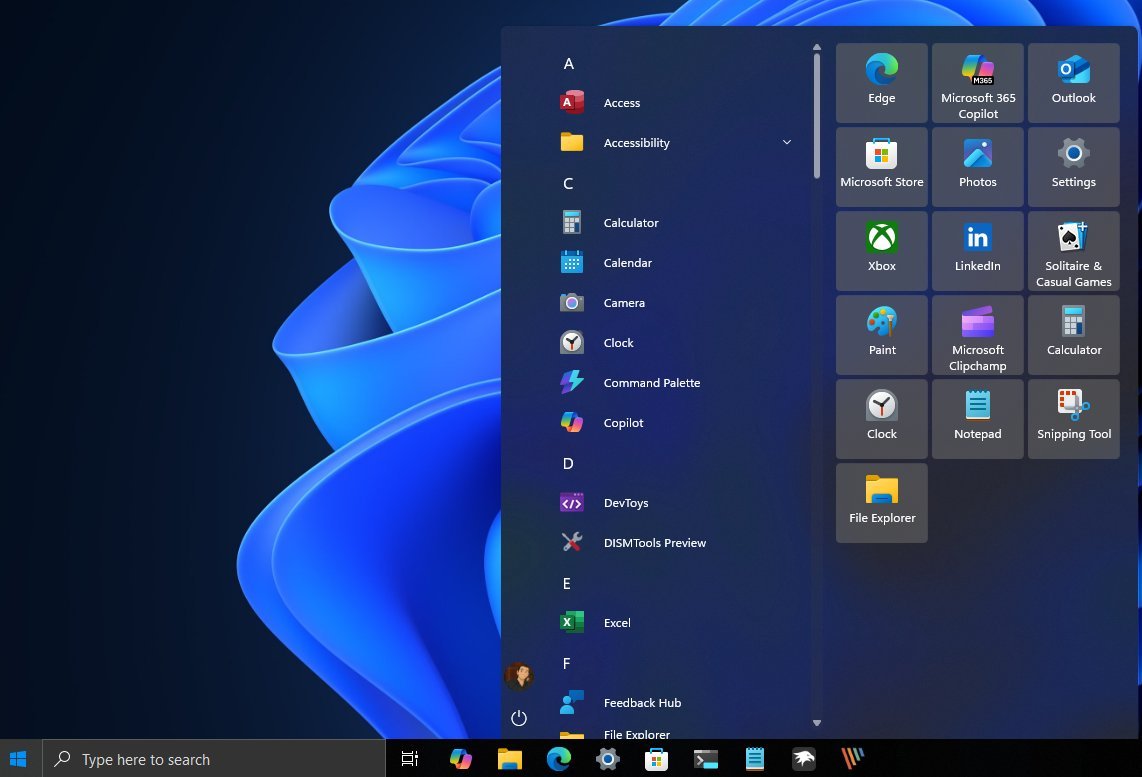
This is a preview of Windows 11 with Windows 10 tweaks using the Windhawk tool.
If you want an even more classic experience, you can also use other tools like the Open Shell app to change the Start menu to Windows 7, Vista, and even XP era.
Which elements of Windows 11 do you wish you could revert to the Windows 10 experience? Let me know in the comments.
More resources
Explore more in-depth how-to guides, troubleshooting advice, and essential tips to get the most out of Windows 11 and 10. Start browsing here: