Megabonk offers plenty of items to utilize with your builds, some of which work well with any character, weapon, or tome.
The number of items at the start is somewhat limited, but you get more options as you complete different challenges, quests, and more. You can add the items with Silver, which can pop up inside the game.
This guide will help you understand which items are the best to equip on your run.
Table of contents
Complete Megabonk items tier list
To separate the items, I have used four distinct tiers.
- S-tier items work well with almost any character and weapon.
- A-tier items work well with most characters and weapons.
- B-tier items have niche scenarios, but their effects fall off quickly.
- C-tier items have particular use-case scenarios at best.
S-tier
- Beefy Ring: A must-have for any tank build since damage scales up with the max HP. Your character benefits from a higher HP pool and more damage.
- Forbidden Juice: I love crit builds, and Forbidden Juice provides +10% crit chance. This is the best item for any build that focuses on improving crit damage. It's a must-have item if you want to use a build with guaranteed crit hits.
- Gym Sauce: Works well with any build as the item provides +10% damage to every hit. This is one of the most universal items in the game that is useful for every character.
- Overpowered Lamp: Provides extra proc chance on hits and helps scale up elemental attacks. It's a valuable item, as most weapons inside the game deal elemental damage.
- Moldy Cheese: High poison chance that works well on mobs and bosses alike. Even if you're not using a character like Amog, inflicting poison stacks on enemies is one of the best ways to cause damage over time.
- Turbo Socks: Works great with slower champions, thanks to +15% movement speed. It's a noticeable boost, especially for tank characters who aren't mobile.
- Za Warudo: What can be better than freezing time, and all enemies alongside! It can help you to get out of tough spots when mobs have swarmed you. You can finish the enemies before the time freeze is over.
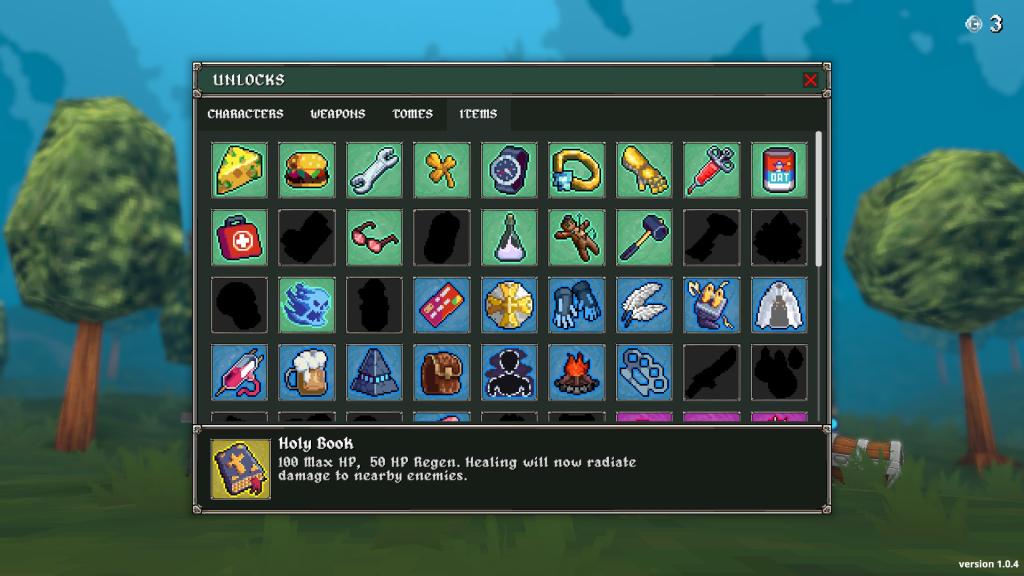
- Holy Book: You get extra max HP and regen; healing now translates into damage to nearby enemies.
- Anvil: All weapon (yes, all) upgrades will offer +1 stats. This is typically an item you'll want to have before approaching the late-game phase, as weapon scale-ups can feel slightly weak against more formidable enemies.
A-tier
- Turbo Skates: Converts speed to attack speed, and works well with movement speed-focused builds. This item forms a good combo with Turbo Socks, as it directly converts the speed buffs the socks provide.
- Clover: Increases overall luck, leading to better tomes and items. This item works in the same fashion as the Luck Tome and is beneficial if you're looking for that extra bit of luck.
- Lightning Orb: The best item in the game regarding AoE damage and stuns affected enemies. If you use the Lightning Staff, this item is a must-have, but it can work well with any projectile-focused build.
- Spicy Meatball: Add extra damage to your hits with explosions. The explosions provide AoE damage and help to clear swarms in the later parts of your run.
- Chonkplate: Offers Lifesteal, and extra healing converts to overheal, leading to boosted temporary health. Chonkplate, when used in the right builds, will allow you to heal the damage dealt by enemies instantly.
- Phantom Shroud: Adds the ability to evade bonus damage and raises movement speed. Another item that works well with slower characters and adds a bit of survivability on the side.
- Soul Harvester: Generate homing souls with every kill.
- Shattered Knowledge: You can use the XP shards to damage enemies. This is an item that is useful in any stage of your run. The more XP you gain, the more damage you'll deal.
- Toxic Barrel: Works well with other items and weapons that require Poison damage. This item releases toxic waste when you take damage, poisoning all nearby enemies. This item has a good synergy with Amog.
B-tier
There's not much to add about the B-tier and C-tier choices. In short, I have added my opinions about the names on the B-tier if you fancy using them in your runs.
- Big Bonk: When it lands, it does 20x damage. But the chance of that happening is 2% (no typos here).
- Power Gloves: The blast procs are random, but the chances are too low for my liking. If you want fun on your run, the Power Gloves is a good Legendary-tier item to have.
- Golden Glove: While earning +15% gold from killing enemies is useful, the boost is relatively low for my liking.
- Golden Sneakers: S-tier with Agility-focused builds, but not much use if you're not moving enough. You'll want good movement speed to roam the map and earn money. Stationary builds won't be able to max out this item.
- Mirror: Handy against bosses due to the small invulnerability and reflects hits, but not much use elsewhere.
- Eagle Claw: S-tier against airborne enemies due to 66% damage. It also offers 8% chance to push the enemy into the air. The usage scenario is very niche.
- Gas Mask: Very good with poison-focused build, as you'll gain Armor and Lifesteal. The main limitation is with the fact that not every character will benefit from the buffs.
- Joe's Dagger: Fun item, but there are better alternatives. This item has 1% chance to Execute an enemy, and raise your damage by 1% in the process. The odds of Execute are too low for this item to shine.
- Slutty Cannon: Would have been a higher tier if the chances of spawning missiles (20%) were higher. Works well with ranged characters like CL4NK, but don't go for it if you don't like relying on RNG.
- Sucky Magnet: Drags in XP around you, but not optimal for all builds. Works with characters that are typically slow.
C-tier
- Brass Knuckles: This item deals +20% damage, but only to nearby enemies. In short, the usage value goes down with every ranged character.
- Tactical Glasses: Deals +20% damage but only to enemies with 90% or higher health. The added damage isn't very useful for elite enemies and feels redundant for weak mobs.
- Slurp Gloves: While the ability of this item (damage nearby enemies and healing you for 7.5%) is helpful, it has a 9s cooldown. The cooldown is a tad too long for the item to function consistently.
- Leeching Crystal: You trade off your HP Regen for Max HP. The item could work with certain builds, but I don't like reducing HP Regen.
- Golden Shield: You get extra gold when you take damage, but to succeed, you'll want to prevent taking damage at all.
- Idle Juice: You do more damage by standing still, which is something you'll rarely want to do.
- Campfire: To get the heals, you'll have to stand still, which feels like a hindrance in the late-game stages.
Like our content? Set Destructoid as a Preferred Source on Google in just one step to ensure you see us more frequently in your Google searches!
The post Best Megabonk items tier list appeared first on Destructoid.