- Helldivers 2 review
- Helldivers 2 FAQ
- 7 must-know Helldivers 2 tips
- The best Helldivers 2 weapons
- Helldivers 2 bugs and issues
- How to skip Helldivers 2 queue
While your standard weapons and grenades will get you through most standard combat encounters in Helldivers 2, you'll need to call in special types of ordnance called stratagems whenever you encounter significant threats such as large hordes of Terminid bugs, thickly armored Automaton Hulks, and well-protected nests or bases. Available stratagems include powerful support weapons, autonomous sentry turrets, airstrikes from close air support fighters, and more, and each player in your squad can bring along four of them to use throughout every mission.
Unlocking stratagems is simple, as all you have to do is earn Requisitions by finishing levels and then spend them on the stratagems you want in the Ship Management menu while you're on your destroyer. However, choosing the right ones to unlock can be tough, as there's nearly 50 of them and some are much better — or worse — than others.
I've put around 100 hours into Helldivers 2 since it launched at the start of February, and have taken all of these stratagems into battle alongside the best weapons in the game several times. As a result, I've got a good grasp on which ones are the best and which ones should generally be avoided, and I've used that information to put together a tier list below. In the sections under that, I've also gone over the best stratagems from each stratagem category, as well as the best ones to use in the early game, during solo play, and when you're fighting Terminid bugs or the Automaton bots.
Helldivers 2 stratagems ranked: Tier list
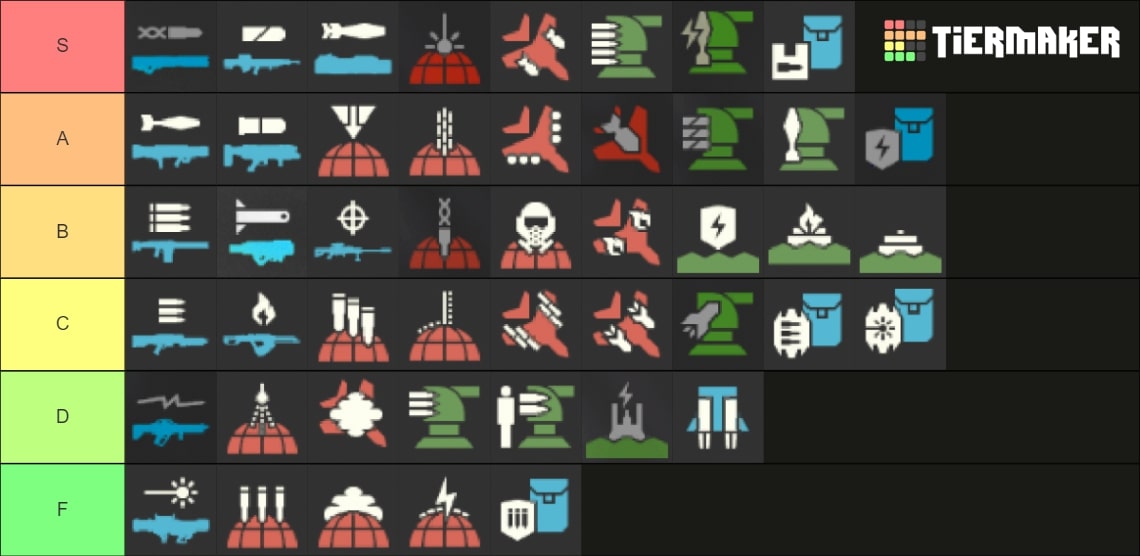
There are a whopping 47 different stratagems in Helldivers 2, including a wide variety of support weapons, artillery barrages, orbital strikes, air support call-ins, defensive sentry turrets, and more. The vast majority of them are viable in a number of different scenarios, but some are often the best options available — and some are also very underwhelming, and aren't worth unlocking or using.
To help you decide which ones you should focus on getting first and which ones you should ignore or avoid, I've ranked each and every stratagem in a tier list you can view in the image above or in the table below. I largely chose their placements based on my own experiences since I've unlocked and tested every stratagem in the game now, though the opinions of the community have influenced the list as well.
Note that while I believe you'll generally find the most success by using the stratagems in high tiers like S or A, I also strongly encourage you to try out the other stratagems yourself and see if they mesh well with your chosen playstyle. I'm not a fan of the Jump Pack and put it in D-tier since I don't think it's that useful, for example, but there are Helldivers who swear by it and say its ability to quickly get you on high ground you wouldn't be able to reach otherwise can be a difference maker.
Another thing to keep in mind is that some of the stratagems in mid-tiers like B are actually some of the strongest ones you can take into missions with specific objectives or enemy types. For example, even though I put the Orbital Gas Strike in B-tier, it's one of my favorite stratagems to use against the Terminid bugs specifically since it can cover bug breaches with toxic, corrosive gas. It's significantly less useful against the Automatons, though, which is why it's not higher on the list.
Best Helldivers 2 support weapons
Arguably the most important Helldivers 2 stratagems are support weapons, which are what you'll be using when there are either too many foes on the battlefield and you can't deal with them effectively with your regular weapons, or when the threats you're up against are thickly armored. Here are my favorites:
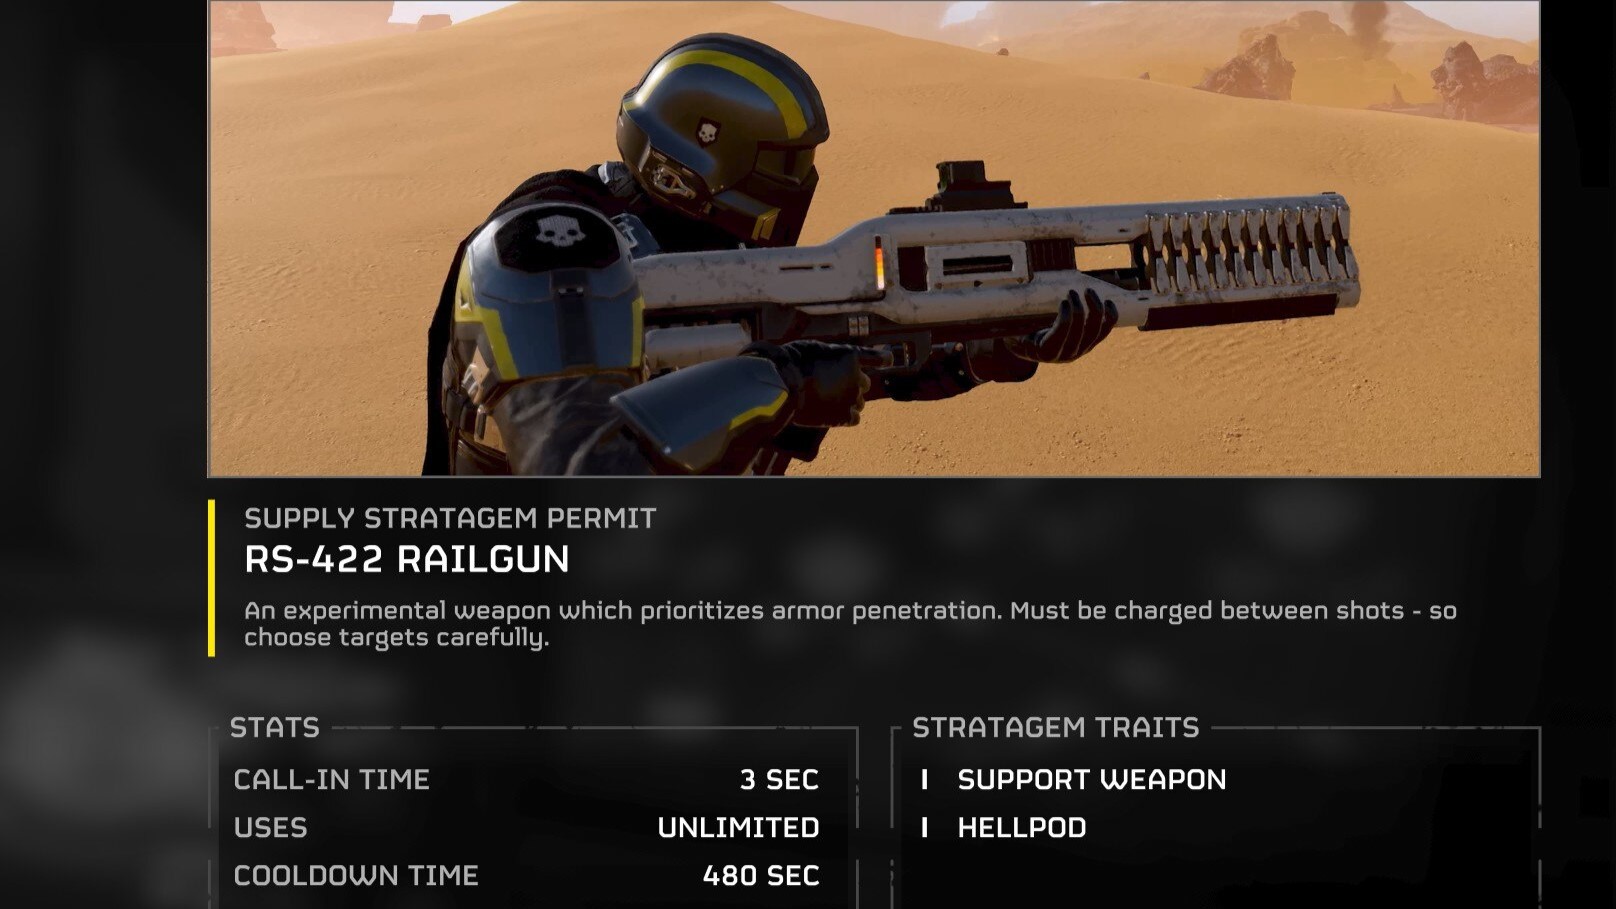
- Railgun: Without question, the Railgun is the best support weapon in the game right now. When switched into "Unsafe" mode — make sure you don't overcharge it too long, or you'll blow yourself up — charged shots with it can one-shot Hulks and Bile Titans with headshots, and it can also easily blow the armor off a Charger's leg to expose that weak spot. Useful for one-shotting other medium-armor units like Devastators and Hive Guards, too. The only drawback is that it requires being accurate, as it has zero area-of-effect and the projectile size is very small.
- Autocannon: The best alternative to the Railgun. Though its ammo pack takes up your backpack slot and it doesn't have the one-shot potential of the Railgun, it reloads quite quickly, and its explosive rounds don't require you to be as precise. Also deals more damage than the Railgun against weak points specifically weak to explosives, such as glowing Automaton heatsinks or big sacs on large Terminids.
- Expendable Anti-Tank: You can call a pair of these expendable rocket launchers down every 70 seconds, and while they don't typically insta-kill heavy units like Hulks or Chargers, they excel at blowing off their limbs/armor plating and exposing them to small arms fire. You can also use them to one-shot Automaton dropships by hitting one of their engines, which the Railgun and Autocannon can't do. Unlockable very early in the game.
- Recoilless Rifle: A strong alternative to the Expendable Anti-Tank. It functions the same and does about the same damage, too, but the difference is that you get one rocket launcher with an ammo backpack instead of expendable launchers you can spam frequently. Reloads very slowly, but if a teammate wears the backpack, they can reload the weapon for you rapidly. This enables you to fire off tons of rockets in quick succession.
- Grenade Launcher: A great support weapon against both Terminids and Automatons. Can be used to quickly spam down a crowd of infantry units, including medium-armored targets like Scout Striders, Devastators, and Hive Guards. Can clear a dropship of the reinforcements it's carrying before it even drops them, too. Useless against heavily armored enemies unless you can hit their weak spot, though — and even then, the damage is underwhelming.
- Machine Gun: The humble Machine Gun is the first support weapon the game gives you, but that doesn't mean it's bad. In fact, it's one of my favorites to use whenever I'm not on anti-armor duty, as it's great for mowing down tons of infantry — armored or no — whenever you're able to prone with it to counteract its recoil. In a pinch, you can also fire it into a heavy unit's weak point, which will take it out after a few seconds of sustained fire.
Best Helldivers 2 Orbital stratagems
Some of the most versatile stratagems in Helldivers 2 are its orbital strikes. These are best used to eliminate specific targets or to call in heavy artillery against large fortifications or groups of enemy units. Below, I've listed what I consider to be the best of them.
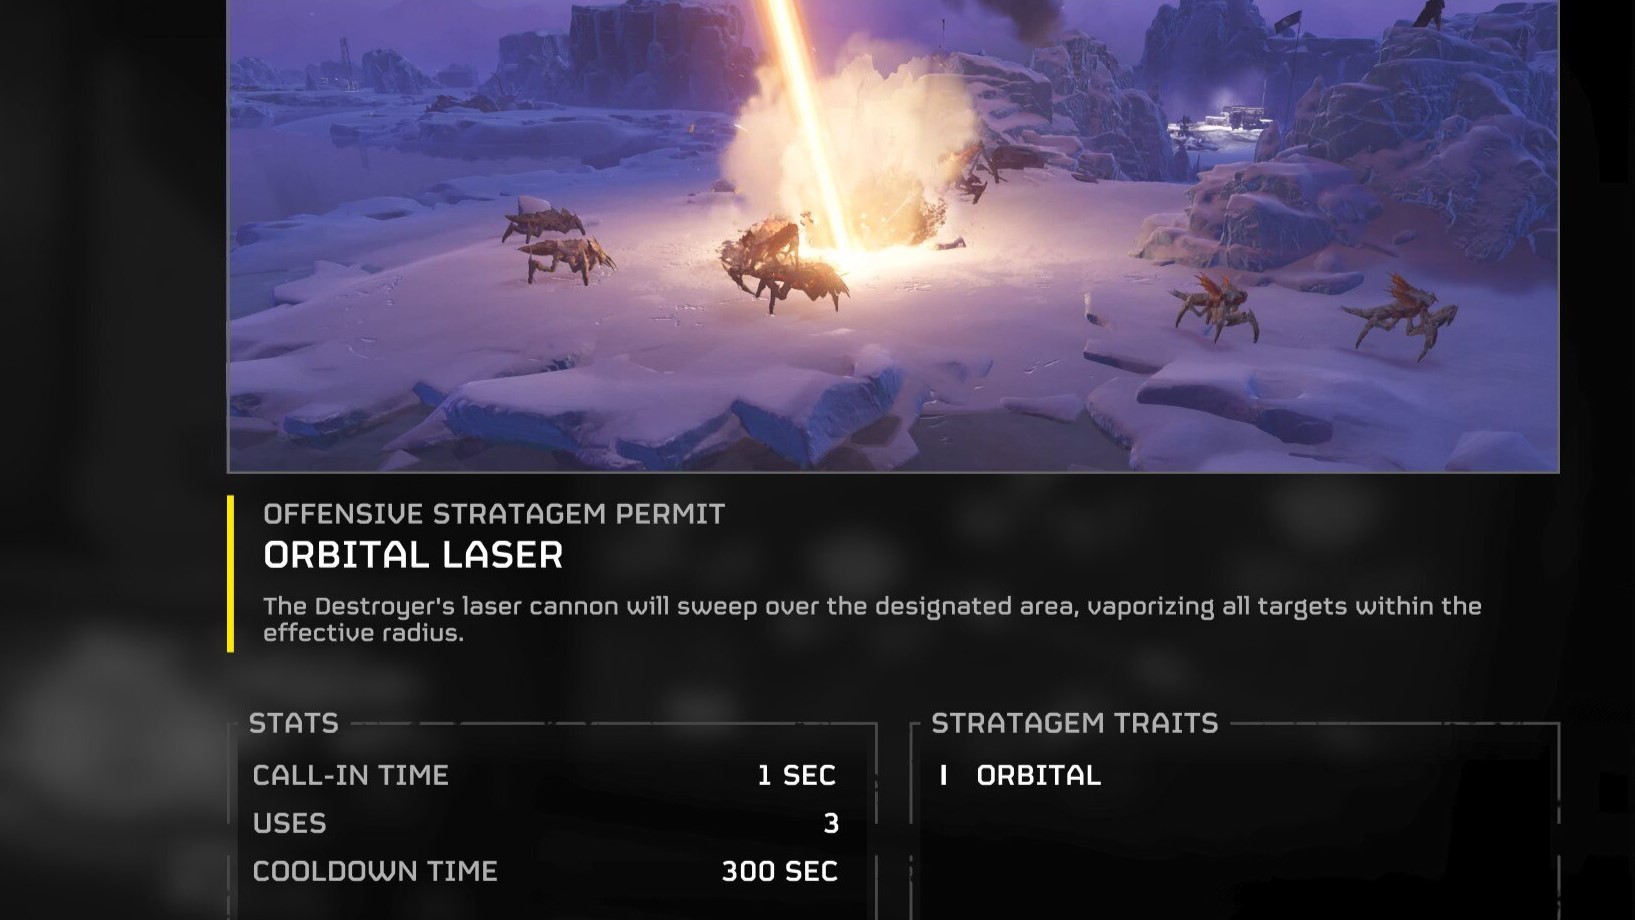
- Orbital Laser: This ridiculously powerful laser only has three uses per mission and has a lengthy five-minute cooldown, but can be used to sear dozens of enemy units or multiple heavily-armored enemies and structures to a crisp. The flames it leaves behind can do damage-over-time, too, and the laser won't even hurt your allies unless they come into direct contact with it.
- Orbital Precision Strike: The best stratagem to use if you want a structure like a bug nest or bot fabricator destroyed quickly. Its fairly low cooldown and call-in time also make it an excellent option for softening up clumps of enemy troops.
- Orbital Gatling Barrage: This is the perfect orbital strike for taking out a swarm of bugs or Automatons. Though the gatling rounds don't damage buildings, they make quick work of infantry units and have an exceptionally low cooldown and call-in time.
- Orbital Railcannon Strike: The sole purpose of this stratagem is to insta-kill a big threat like a Hulk, Tank, Charger, or Bile Titan. It has unlimited uses, and despite its 210-second cooldown, it's great to have on hand in higher difficulties.
- Orbital Gas Strike: Perfect for covering up a bug breach, as the gas will weaken the Terminids that come out and make them much easier to mow down. Also solid when used in chokepoints. Low cooldown makes it very spammable over the course of a mission.
- Orbital 380mm HE Barrage: The big guns. Terribly imprecise, but also ridiculously powerful. I like calling it into large Automaton bases and watching the fireworks as it blows (almost) everything inside to smithereens, but it's not particularly strong against the Terminids.
Best Helldivers 2 Eagle/Hangar stratagems
Hangar stratagems — also often referred to as "Eagle" stratagems since that's the name of the close air support aircraft that flies them in for you — are similar to Orbital ones in that they're typically called in to either destroy structures or wipe out threats bearing down on you. They're different, though, in that the Eagle pilot eventually has to return to your ship to rearm after a few uses, which begins a cooldown that lasts for two minutes and 30 seconds.
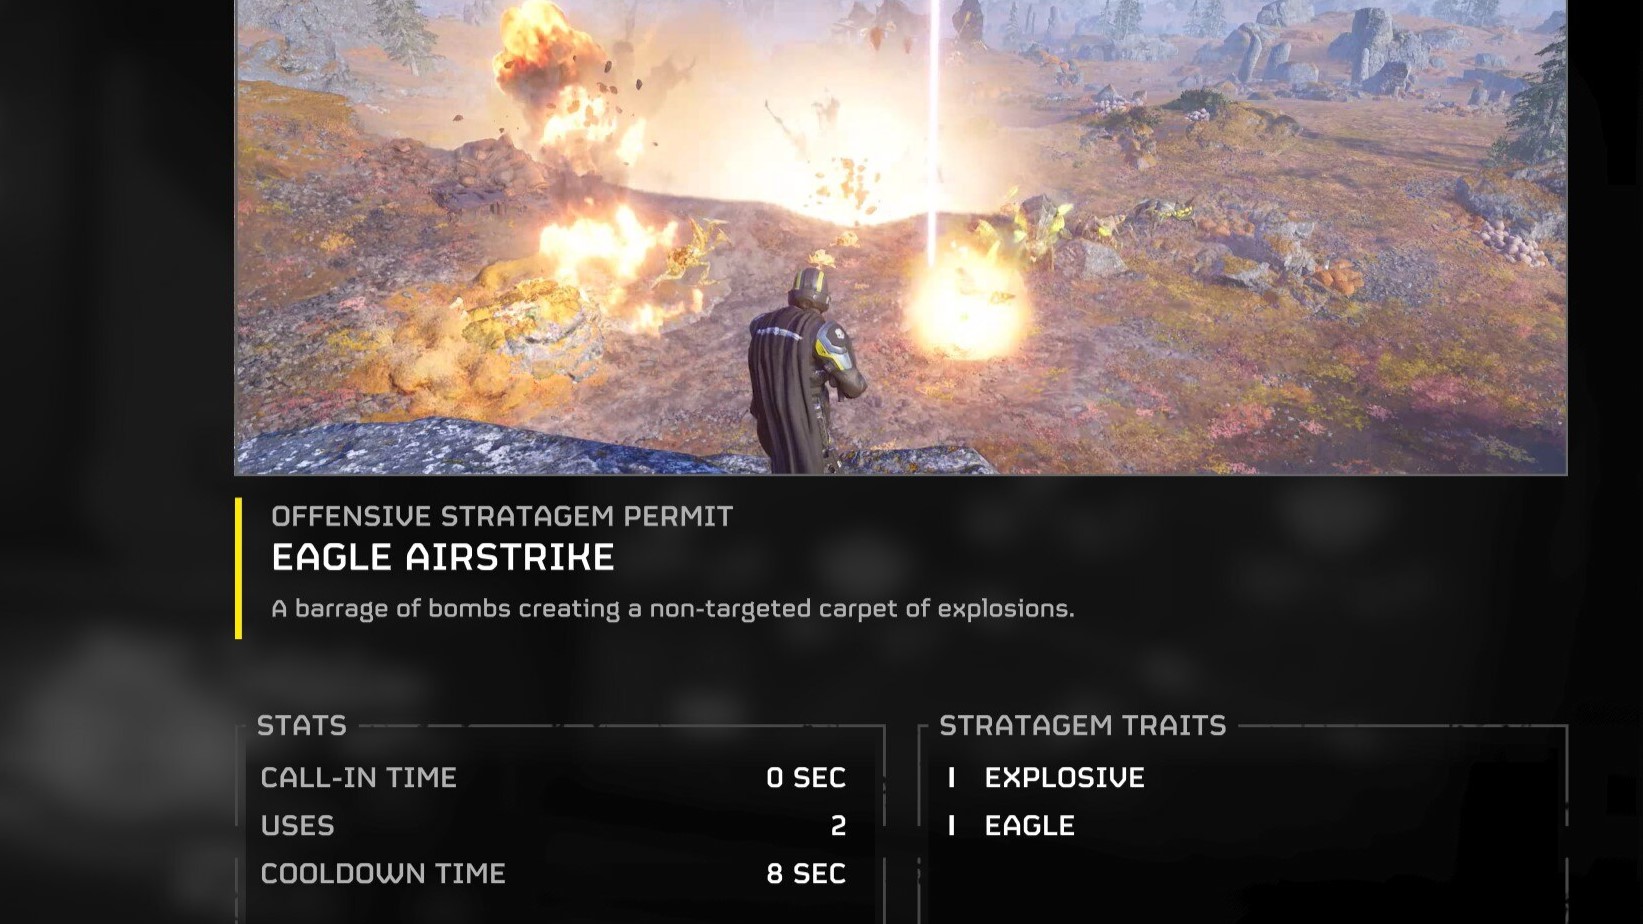
- Eagle Airstrike: One of the first Eagle strikes you can get, and also the best in the game. Can be used twice before rearming, and carpet bombs the area perpendicular to where you threw the beacon from with explosives capable of destroying all but the heaviest of units as well as bug nests and bot fabricators.
- Eagle Cluster Bombs: An amazing anti-infantry alternative to the Airstrike. Doesn't damage structures, but effectively wipes out any unarmored enemies caught in its path.
- Eagle 500kg Bomb: The nuke. Can one-shot most bosses as long as they're close to where it lands, and also eviscerates regular units near it, too. Can only be used once before the pilot has to rearm, but with the Expanded Weapons Bay ship module upgrade, you'll get two uses.
- Eagle Napalm Airstrike: A situational airstrike that's most effective against hordes of Terminids, but solid against approaching Automatons as well. Instead of dealing raw damage, this instead creates a wall of flame that cuts approaching enemies off and forces them to either find another way to you or run through the fire and take extreme damage.
- Eagle Strafing Run: Essentially a faster, but less powerful version of Eagle Cluster Bombs that also has one fewer use per rearm. It's okay, but you have better options.
- Eagle 110mm Rocket Pods: These low-yield explosives hit armored targets fairly hard, but not hard enough to one-shot big threats like Chargers or Hulks, and they also don't have an area-of-effect radius. You'd be better off with a different anti-armor stratagem.
Best Helldivers 2 Sentry/Fortification stratagems
If you're defending a position or want to back up an attack with some supportive fire, bring along some of the best Sentry or Fortification stratagems. These will protect you by either cutting enemies down outright or by crowd controlling them, and one can even be used to create a large energy shield for your team to stand in.
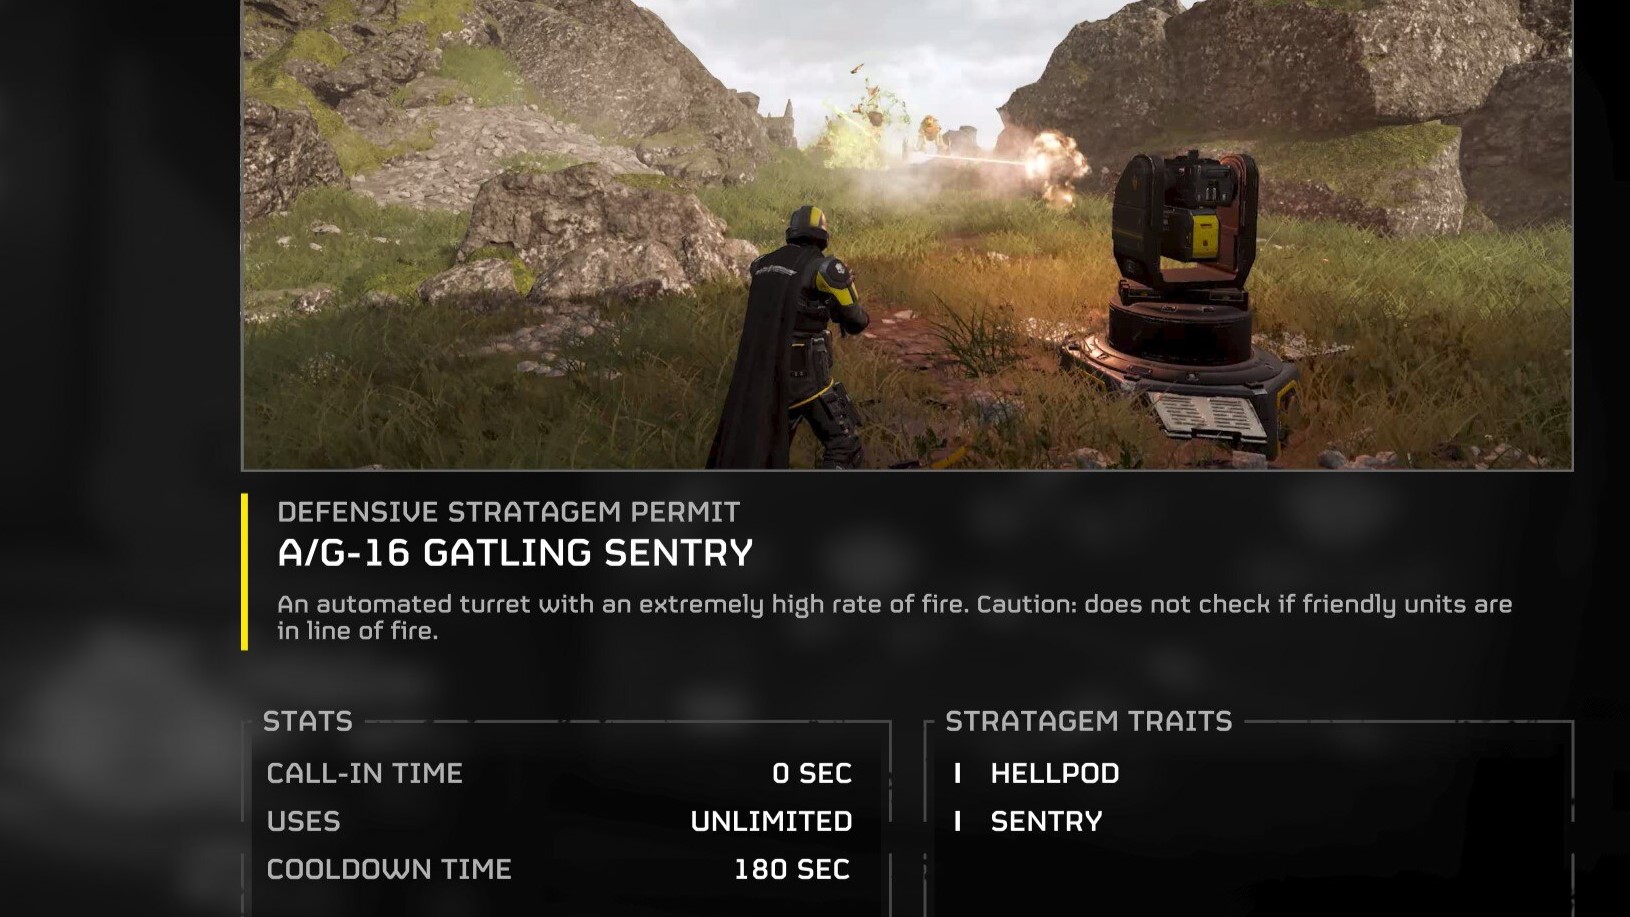
- Gatling Sentry: The best all-around sentry in the game. Can't damage heavies, but can easily mow down just about anything else — including any teammates who get in its way. Try and put it on high ground and choose an angle where it won't be behind allies to ensure that doesn't happen.
- EMS Mortar Sentry: Amazing against Automatons, and good against bugs, too. Instead of damaging enemies, this turret shoots EMS mortars that stunlock and slow them for several seconds instead. This halts their momentum and makes them easy to pick off.
- Autocannon Sentry: This heavy sentry is slow to turn and won't shoot anything directly next to it, but give it the space and angle it needs, and it'll blast even the heaviest units to pieces.
- Mortar Sentry: An excellent sentry, but only when you actually position yourself properly and use it in the right context. It rains powerful mortars down on enemies, but if those enemies are near you or allies, some teamkilling is bound to happen. This makes them a poor choice against Terminids since their rush tactics mean they'll be on your tail constantly, but against Automatrons or in defense-style missions where you can stop the bugs from ever actually getting in your face, they're top-tier.
- Shield Generator Relay: This fortification is pretty bad for Terminids, but it's perfect for robots. It brings up a durable shield your entire team can stand in for protection from ranged attacks while firing out of it, making it very useful when you're completing objectives or extracting.
- Incendiary Mines: These mines explode and spread flame when an enemy walks over them, making them a very effective area denial tool. Best used against the bugs, but a solid pick in any mission.
Best Helldivers 2 Backpack stratagems
Some stratagems can be worn on your character's backpack slot, and will provide helpful support to either you or your teammates when used. Note that you won't be able to use them while also carrying an ammo backpack for a support weapon.
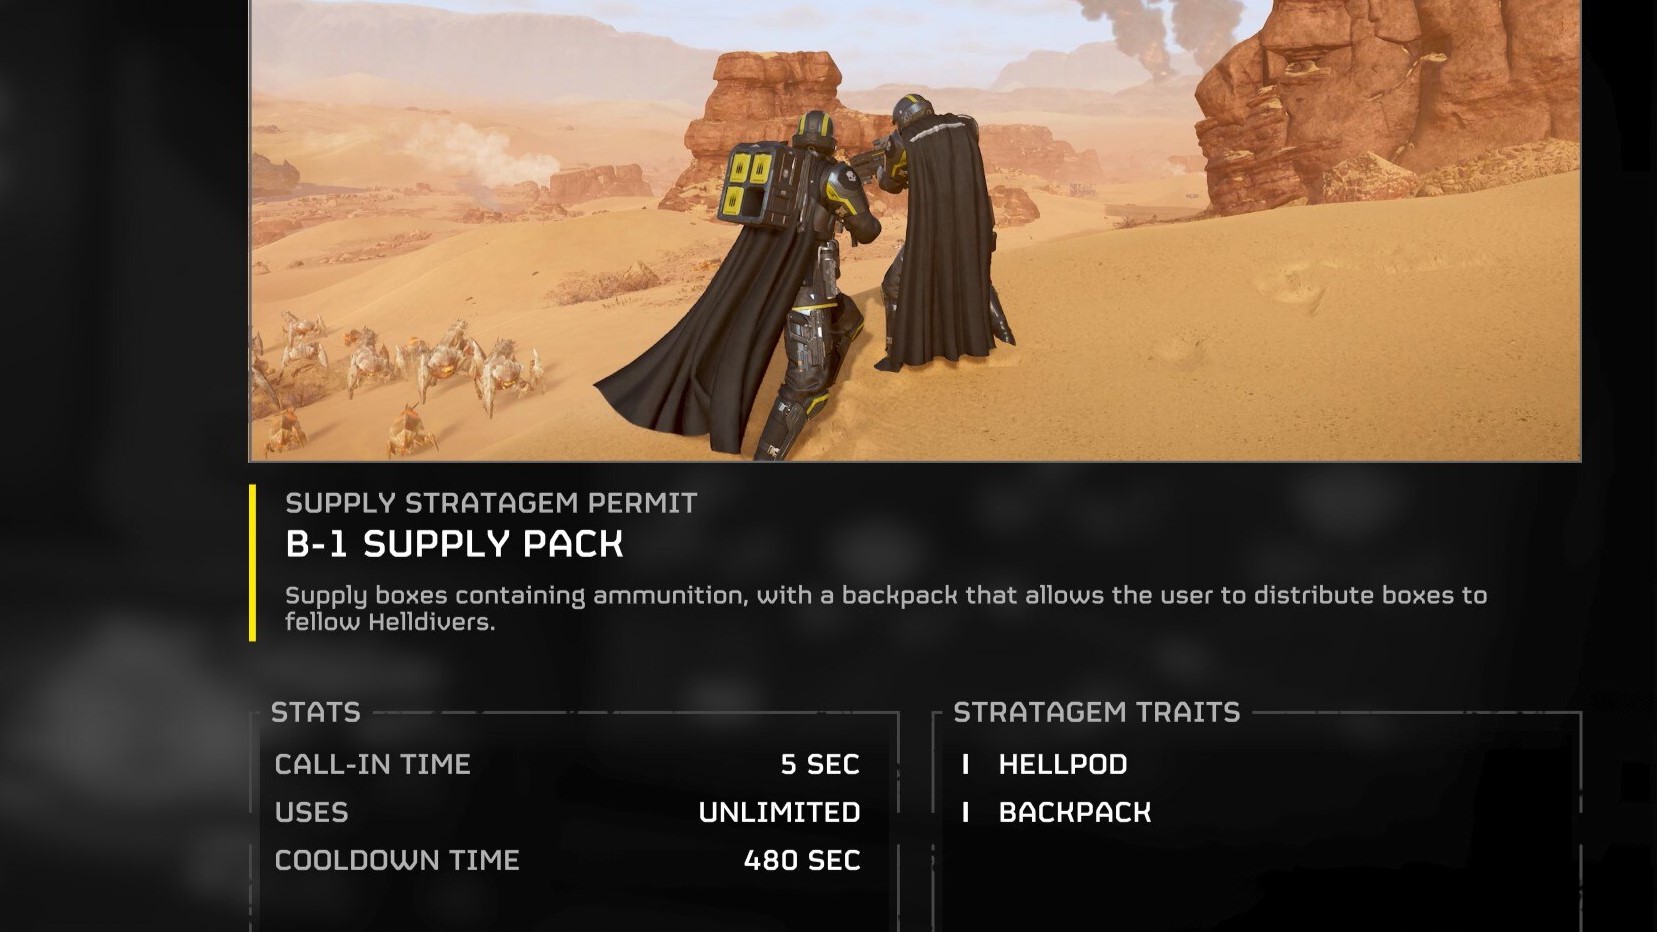
- Supply Pack: Without question, this is the best backpack item in Helldivers 2, though your team only needs one of them. It can be used to dispense ammo and stims to allies, or to yourself if need be. You can then refill the backpack by picking up the crates from Resupply call-ins.
- Shield Generator Pack: Another high-tier backpack that gives you a personal energy shield. It works against both melee and ranged attacks and is thus useful against both bugs and bots, but it's especially helpful against the Automatons since it negates tons of the chip damage you'd normally take when fighting them. This will save your life.
- "Guard Dog": You can briefly deploy a drone that fires on enemies with an assault rifle as you move around, effectively giving your squad a temporary fifth member. Solid against the Terminids, as it'll gun while you run from the horde.
- "Guard Dog" Rover: The same as the regular Guard Dog, but it uses a laser rifle instead. Not as effective in my experience, though.
- Jump Pack: You can use this to get a burst of vertical movement and fly onto pieces of high ground you couldn't get to otherwise. Very situational and not worth using in my opinion, but some swear by it.
- Ballistic Shield Backpack: Use this and you'll deploy a tanky ballistic shield you can fire around with your sidearm. Blocks way more damage than the personal energy shield does, but forces you to use your secondary and doesn't hold up against heavier attacks. Ultimately, not worth using.
Best Helldivers 2 early game stratagems

Many of the best stratagems can't be unlocked until you've leveled up quite a bit and have earned lots of Requisition currency. These ones, though, are available very early on and aren't terribly expensive to unlock, but are also still pretty powerful.
- Machine Gun: Arguably the best support weapon until you reach Challenging difficulty. You get access to it right away, and it's ideal when facing lots of unarmored units.
- Stalwart: An alternative to the standard Machine Gun with less power, but better handling and a faster reload speed. It struggles on higher difficulties once armored infantry starts to become common, but it shreds in lower ones.
- Expendable Anti-Tank: The ability to call down two powerful rocket launchers every 70 seconds is the perfect early game solution to the armored enemies you'll face on difficulty Challenging and above.
- Orbital Precision Strike: Another one you don't have to unlock, and since it's good against clumps of enemies as well as individual structures, it stands tall as one of the best stratagems in the game.
- Orbital Gatling Barrage: Available very early, this is another excellent Orbital call-in that reliably decimates large groups of infantry.
- Eagle Airstrike: The reliable explosive power of the Eagle Airstrike carpet bomb is unlockable very early, too. Ultimately, you won't find a more useful multipurpose stratagem in the game.
- Gatling Sentry: I'd skip over the Machine Gun Sentry and go straight for this one, as it's essentially a direct upgrade. It remains a top-tier pick from the start of the game to endgame-level missions.
- Supply Pack: Another S-tier item you can get very quickly after your first few levels. Use this to give your allies ammo when they need it, and they'll love you.
Best Helldivers 2 stratagems for solo play
Dropping into the battlefield on your own? Consider taking the following stratagems in your loadout, as while they're amazing in a team, they're especially valuable while playing solo.
- Railgun: It's the best support weapon in team play, and it's also the best when you're alone since it gives you room for a Shield Generator Pack, has plenty of ammo, and is quick to reload. At high difficulties, you'll need this to take out big threats like Hulks, Chargers, and Bile Titans.
- Autocannon: You can opt for the Autocannon if you'd prefer something that demands less precision for taking out big enemies, and it's also stronger than the Railgun against things like Automaton Tanks, base cannons, and mortar artillery objectives. However, to reload it you'll need the included ammo backpack, and that means no personal shield.
- Orbital Laser: Despite its long cooldown and limited uses, I like taking the Orbital Laser on solo runs because it's guaranteed to take pressure off you and give you an opportunity to run away and approach a situation differently.
- Eagle Airstrike: Unsurprisingly, the best multipurpose Eagle call-in is also the best one to use in solo missions. Whether you need to take out a group of threatening enemies or blow bug nests/bot fabricators to pieces, it'll get the job done perfectly, and it has a solid overall uptime too.
- Gatling Sentry: If you find yourself in a big fight, having a Gatling Sentry at your side can be a life-saver. Just make sure you take out big armored targets so the turret doesn't waste all its ammo trying to damage them.
- Shield Generator Pack: When it's just you against every enemy on the map, the Shield Generator Pack's personal energy shield is a godsend. It will save you from lots of heavy hits that might have one-shot you otherwise, and when your Reinforcements are as limited as they are in solo runs, that's big value.
Best Helldivers 2 stratagems for bugs
The bugs of the Terminid faction fight you by constantly trying to rush you down and get in your face, so you'll want to choose stratagems that are effective at fighting those tactics. Here's what I recommend using:
- Railgun: Capable of one-shotting Bile Titans with headshots, as well as other medium-armored bugs like Hive Guards and Brood Commanders. Easily cracks the armor off of Chargers, too, allowing you to follow up with small arms fire to the exposed weak points.
- Expendable Anti-Tank: A good early game alternative that deals tons of damage to Bile Titans, cracks Charger armor off and hurts them significantly, and one-shots Bile Spewers.
- Orbital Laser: Amazing against everything, including bug hordes. Throw it down and you'll toast them all. It'll destroy nearby bug nests, too.
- Orbital Gatling Barrage: The perfect answer to a swarm of smaller, unarmored bugs. Will rip them apart very quickly and efficiently.
- Orbital Gas Strike: Throw this at any bug breaches that open to significantly reduce the threat they pose. It won't be enough to stop the ensuring horde alone, but it'll weaken every bug as it comes out and make killing them much easier.
- Eagle Airstrike: Ol' reliable. Great at clearing a big group of bugs, and also an amazing tool to quickly blow up several holes in a large nest.
- Eagle Cluster Bomb: Use this when you want to delete a big swarm headed your way. The only Terminids it won't obliterate are Chargers or Bile Titans.
- Gatling Sentry: The Gatling Sentry is fantastic against both Terminids and Automatons, but it's especially powerful against the former since they don't have as many armored units.
Best Helldivers 2 stratagems for Automatons
In stark contrast to the Terminids, the Automaton robots fight more like a traditional military and have fewer, but more armored units that can effectively fight you from longer ranges. Here are the stratagems that have worked best against them in my experience:
- Railgun: When in "Unsafe" mode, the Railgun can one-shot Hulks — as well as the vast majority of other armored Automaton units — with charged shots to their head or rear weak point. This makes it an S-tier pick against the bots, especially in higher difficulties.
- Autocannon: Use this when you want something that's also effective against Automaton Tanks and the weak spots on fortifications like base cannons or anti-air turret objectives, as the Railgun is not.
- Orbital Laser: Call one of these down and it'll cut through even the heaviest units used by the Automatons. It'll also quickly destroy the structures in their bases, and can even destroy entire heavy bases all on its own at times.
- Orbital Precision Strike: Use this to take out fabricators, and also consider using it to destroy Automaton bunkers and machine gun nests if they're giving you trouble.
- Eagle Airstrike: This carpet bomb is great for quick clears on small and medium outposts, and can also wipe a platoon of armored infantry units off the map.
- EMS Mortar Sentry: Stops advancing Automatons in their tracks, including big units like Hulks. This freezes them in place and makes picking them off easy, which is invaluable in tense situations. Make sure you throw it a good distance away from the front line.
- Mortar Sentry: Bombards the robots as they push towards you, or can alternatively be used to lob explosives at their own fortifications. Very powerful, but try not to get close to the bots or else you might get blown up by one of your own mortars.
- Shield Generator Pack: The energy shield will absorb a lot of the random laser fire that would chip your health down if you didn't have it, reducing the amount of stims you'll have to use and ensuring you'll have some ready when you really need them.
Helldivers 2 is available now for $39.99 on both PS5 and PC, and so far, it's one of the best PC games of the year. Notably, the game also supports cross-platform play between PS5 and PC.