Looting is the most important aspect in ARC Raiders. It is what drives each venture topside, and the only way you can actually progress in the game.
Sure, crafting your own stuff is always better, but the components have got to come from somewhere, and it won't be long before you run out. That, and the blueprints are topside-only, so you're probably going to want to know which places to hit most often for the best goodies.
Here's our full loot guide.
ARC Raiders loot guide - best places to hit on every map
Before I outline the locations themselves, here are some general notions to keep in mind every time you venture topside:
- Loot everything: Any container, no matter where, has a chance to drop a valuable or rare item. Whether this is a blueprint, a key, or anything else is besides the point. What's more, each container gives 200 XP, helping you level up quickly.
- Common materials can be ignored: Unless you desperately need things like Fabric, Rubber, etc., you don't have to take them. Scrappy can give you enough of any common material after each match, so don't fill your inventory with useful stuff.
- Always carry an Augment with a Safe Pocket: Looting is crucial in this game, and losing important loot can be devastating. Putting stuff in your Safe Pocket ensures it's extracted, so don't go out hunting for valuables without it.
Now, here are our preferred looting locations on each ARC Raiders map:
Dam Battlegrounds
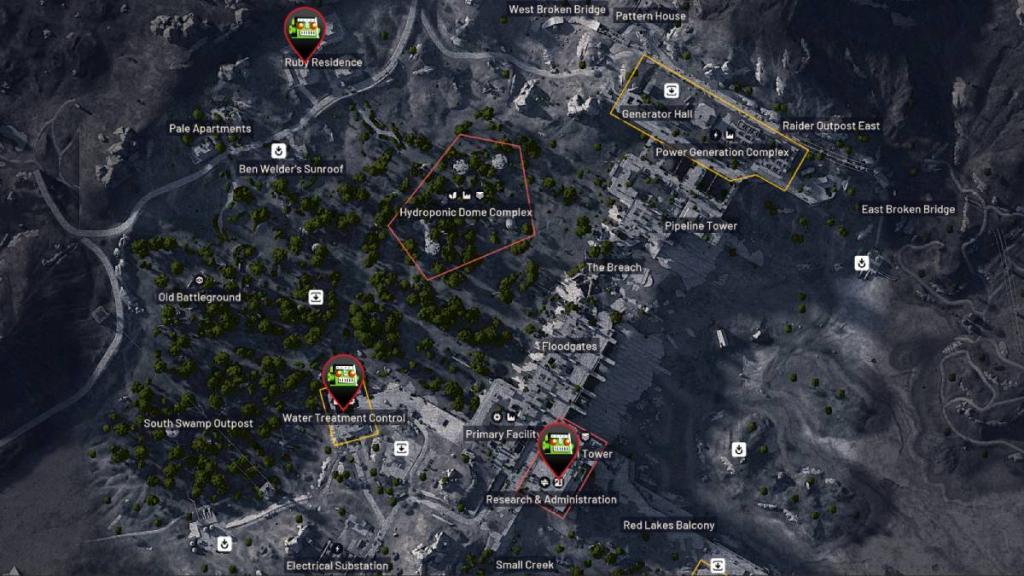
Dam is a fairly straightforward map and not the best for amazing loot. However, it has a few hotspots that tend to drop a few pinks here or there, so here they are:
- Research and Administration and Control Tower: Located right next to each other, these two locations spawn tremendous military-grade loot, including weapons, blueprints, weapon parts, rare components, and so on. They're the best two places on the map for loot, followed only by this next location.
- Water Treatment Control: Similar to the two above, and not far from them, this place also contains various military, tech, industrial, and other items of interest, so paying it a visit each time you drop into Dam is advisable. It's defended by various ARCs, which is why I'd prefer the previous location. However, that can also be useful, as the Turrets, Fireballs, and other ARCs inside can be easily farmed for good ARC-only components.
- Ruby Residence: This particular location is a goldmine for finding keys that spawn randomly (based on luck). There are plenty of floors and rooms to loot. You can also find plenty of useful loot that can be used for crafting and upgrading purposes.
Buried City
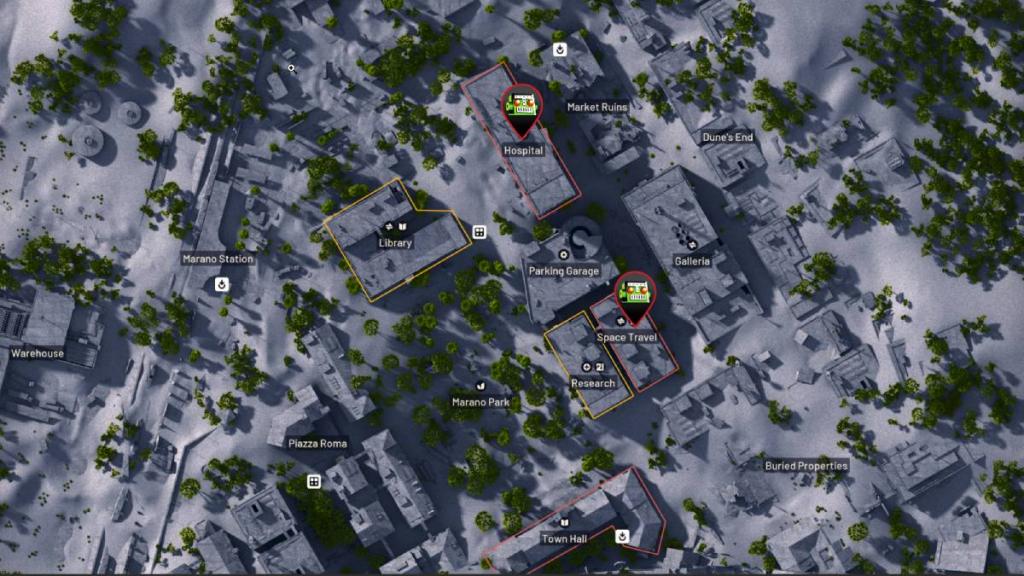
Buried City is a much denser map, one where loot can be found just about everywhere. However, it's a super hostile map that spawns countless powerful ARCs, including Bombardiers, Bastions, Rocketeers, and so on. They're patrolling the best loot locations, but you can still sneak past them and enter the following recommended loot zones:
- Space Travel Building: Located in the middle of the map, just above the Marano Park that is absolutely riddled with ARCs every single match, the Space Travel building is possibly the best single loot location on Buried City. It has tremendous odds to drop good items, is tied to various quests, and is super large and dense, further increasing the chances to find something valuable.
- Hospital: The Hospital is above the Space Travel building and is a great zone for medical items. It can spawn anything from basic bandages to valuable healing items. On top of that, each of its many lockers can drop amazing stuff that isn't medical, and given how many chests you can find around it, it can prove quite lucrative.
Spaceport
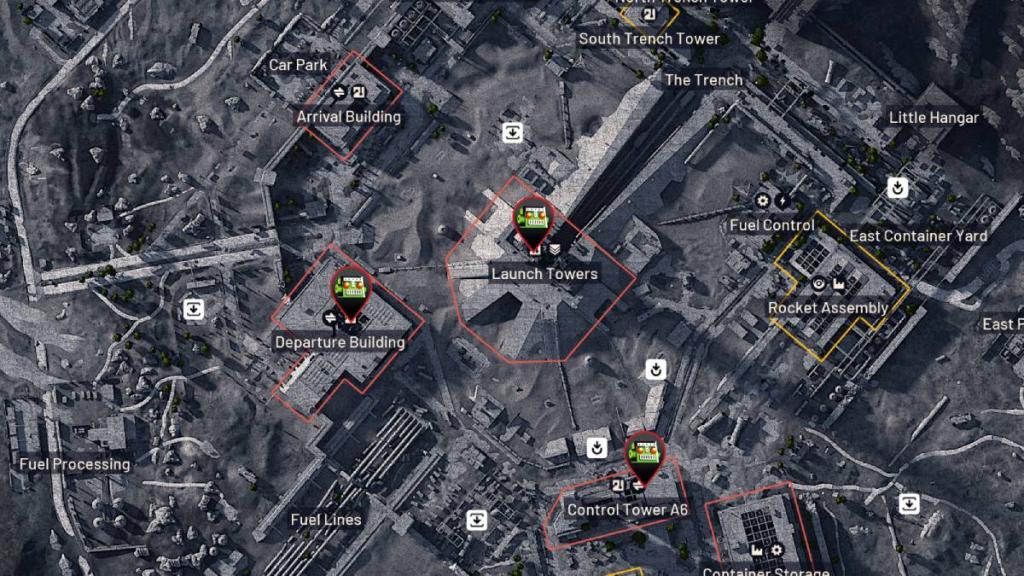
Spaceport is by far my favorite map in the game, and it has a wide array of good loot locations. One in particular can yield a ton of amazing items, some of which are super rare and necessary to upgrade various workstations.
- Launch Towers (top): The very top of the Launch Towers is packed to the brim with good loot. It has dozens of containers that can drop all sorts of different components, weapons, parts, you name it. Rushing to get to them first is almost always advisable, but that also makes this location very treacherous. Every player on the map is probably interested in doing the same, and that extra traffic tends to make looting the Launch Towers more difficult than your average zone. I recommend you go in well prepared and, perhaps, without too many valuables in case you do get downed.
- Control Tower A6: This building is very similar to the Space Travel building discussed in the Buried City section. It's diverse, contains loads of different items, and can be a source of weapons as much as components. If you cannot reach the Launch Towers in time, then this is the next best thing. Of course, the Departure Building and Arrival Building are good choices as well, so consider them secondary to the Launch Towers if they're simply out of reach.
The Blue Gate
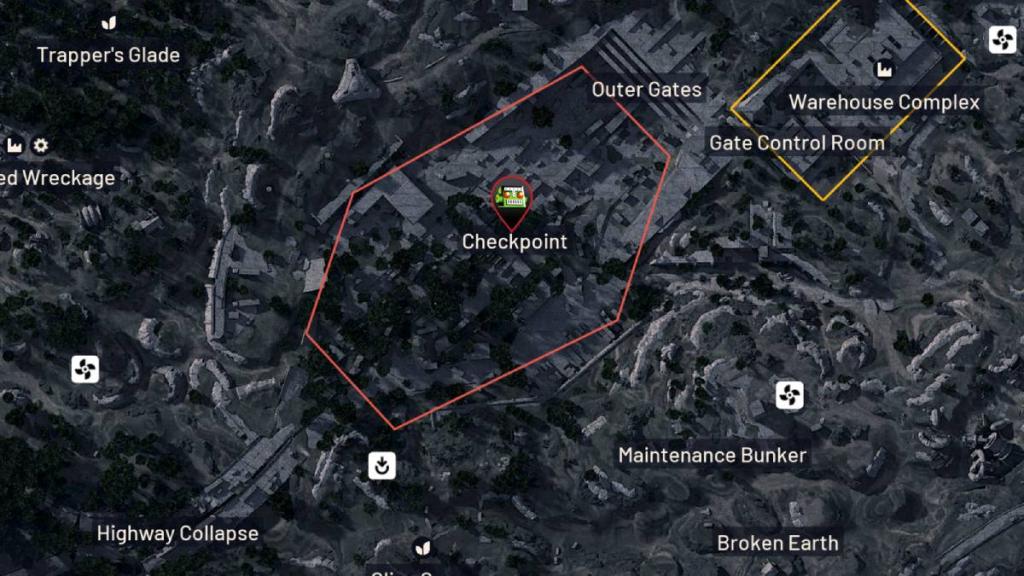
The Blue Gate is by far the most challenging and brutal map in the game. It has the strongest opponents, is riddled with ARCs, and is generally difficult to navigate. But precisely because of that, it's also a valuable source of tremendous loot, especially when it comes to one location.
- Gate Approach - Checkpoint: This location is as dangerous as they come, almost always spawning a difficult ARC like a Leaper or a Bastion to guard it. However, if you get past these troubles (and survive other players trying to do the same), you're in for a ride. Raiding this place almost guarantees fantastic loot, from weapons to components to blueprints to anything you can think of. Not a single visit to the Gate Approach will go unrewarded, so long as you can survive the onslaught. In fact, I think this is the sole place you should aim for on the map, as anything else is mediocre at best (except, maybe, the Warehouse Complex, but that's more specific for certain mechanical items).
Stella Montis

Stella Montis is the latest map in the game as of this article, and a dense one at that. It's trafficked by a great number of raiders at all times, and is overall a dangerous location. Even so, it's an amazing place for finding solid loot, and the following two places should be of particular interest to you:
- Medical Research: Much like some of the other locations we've discussed here, this one has it all, from medical items (hence the name) to just about everything else. It's filled with containers big and small and can be a steady go-to location and source of rare and valuable items. It's located on the far west side of the map, beneath the Assembly.
- Lobby: Though unassuming at first, the Lobby is actually quite interesting, and a super easy place to raid for good loot. So long as you get lucky, the good chunk of containers in this place can yield valuables, with, of course, a wide range of potential item types. Most people gun it for red loot zones as soon as they spawn, so the Lobby will oftentimes remain untouched, allowing you to make use of its calmer nature.
The post ARC Raiders loot guide – Best locations for top-tier items appeared first on Destructoid.