On Windows 11, File Explorer is the default file management tool, but its interface and features include options, buttons, and context menu items that many users never use. Some of these can clutter the experience or slow down navigation.
Although the system offers a set of customization options through the "Folder Options" page and Settings app, you can unlock more advanced changes by editing the Registry.
For example, you can remove unnecessary menu items from the context menu, hide pages you never use, bring back classic features, improve browsing speed, and customize the file manager to your liking.
In this how-to guide, I'll outline several Registry tweaks you can apply to File Explorer to customize it even further.
This is a friendly reminder that editing the Registry is risky and can cause irreversible damage to your installation if not done correctly. Before proceeding, it's recommended that you make a full backup of your PC. Also, these instructions are meant to configure a specific feature for a specific user account, not globally for all users.
Best Registry tweaks for File Explorer on Windows 11
The following Registry tweaks to apply in File Explorer are not listed in any particular order.
Although you can apply all of them, it's best to pick only the tweaks that fit your workflow.
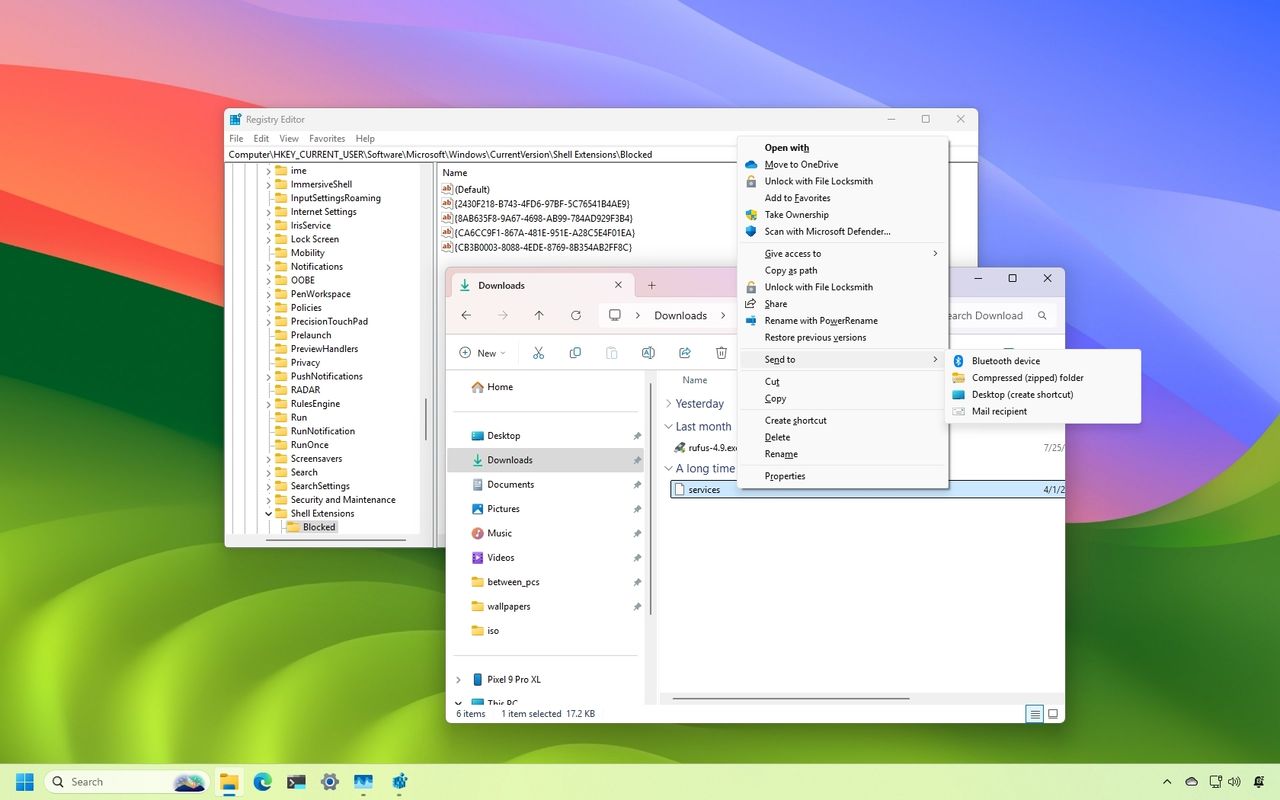
1. Remove Ask Copilot from context menu
If you have the Copilot app installed on your computer, you probably noticed the "Ask Copilot" option in the context menu for a file. If you want to keep the app but declutter the menu, you can hide the option in File Explorer.
To remove the Ask Copilot entry from the context menu, use these steps:
- Open Start.
- Search for regedit and click the top result to open the Registry Editor.
- Open the following path from the address bar: HKEY_CURRENT_USER\Software\Microsoft\Windows\CurrentVersion\Shell Extensions
- Right-click the Shell Extensions key, choose New, and select the Key option.
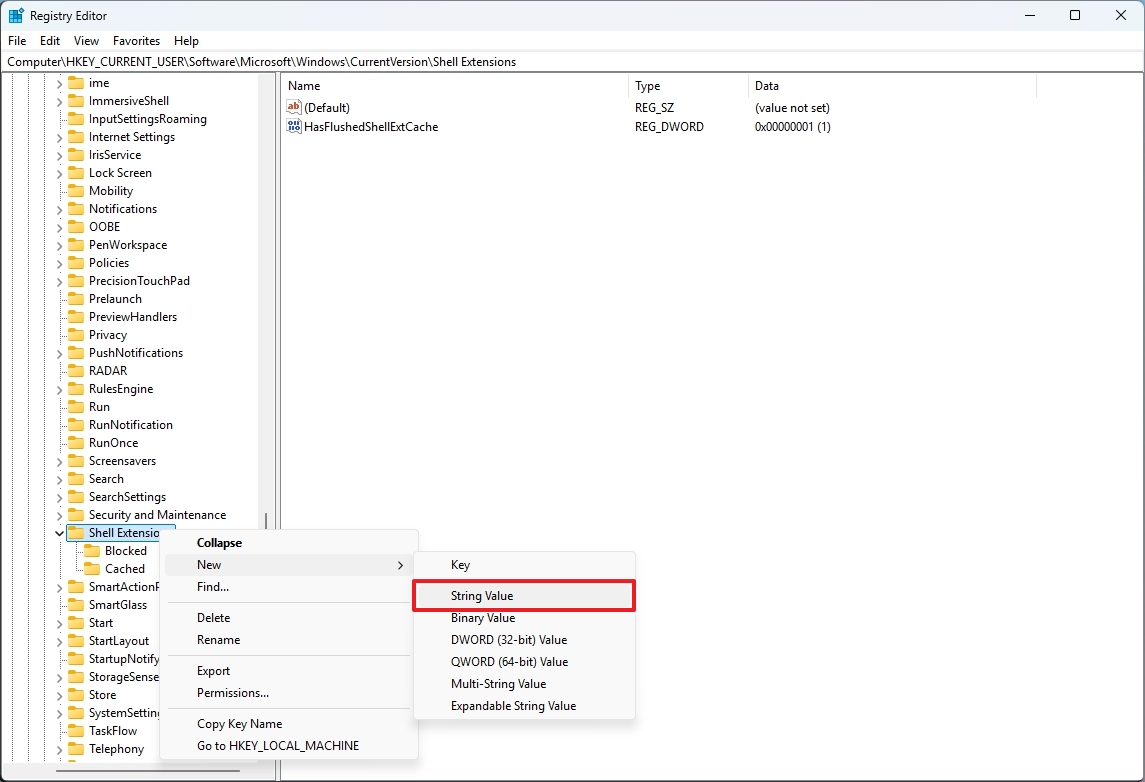
- Confirm the Blocked name for the key and press Enter.
- Right-click the newly created string, choose New, and select the "String Value" option.
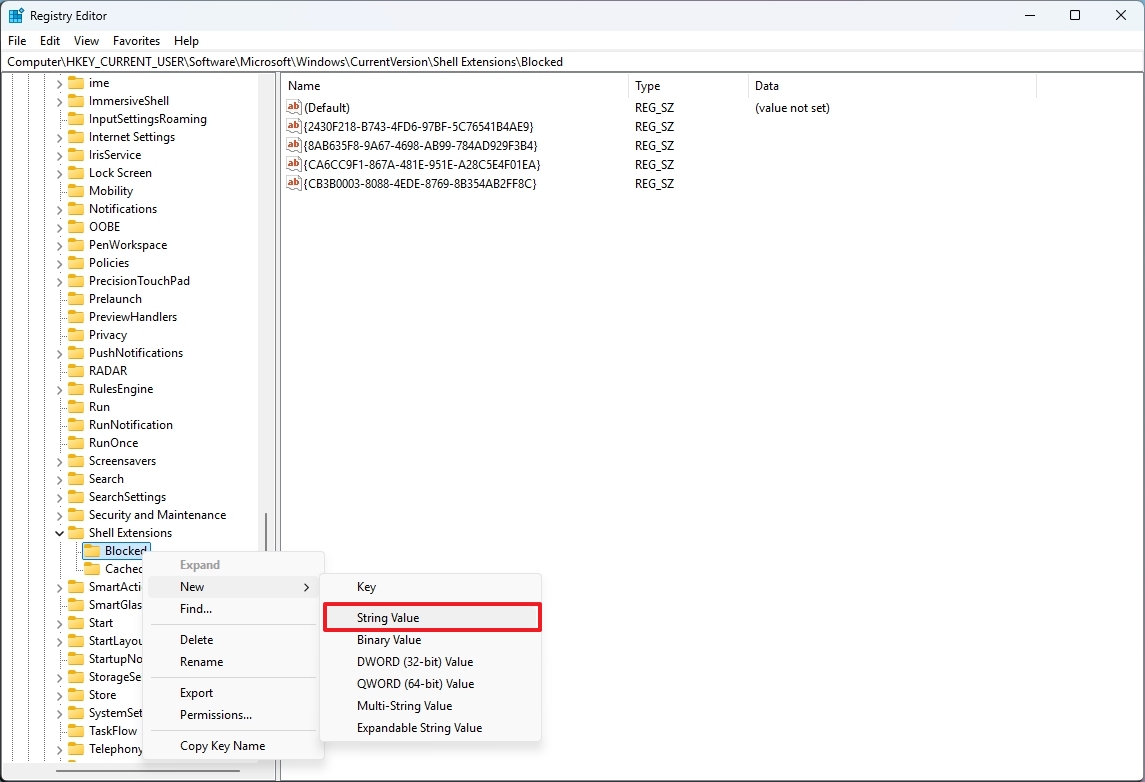
- Confirm the {CB3B0003-8088-4EDE-8769-8B354AB2FF8C} name for the key and press Enter.
- Restart the computer.
- Quick tip: You can also restart the File Explorer service from the Task Manager Processes tab without having to reboot the system.
Once you complete the steps, the next time you right-click a file, the "Ask Copilot" entry won't be an option in the context menu.
If you change your mind, you can revert changes by right-clicking and deleting the {CB3B0003-8088-4EDE-8769-8B354AB2FF8C} string from the "Blocked" key.
2. Remove Edit with Clipchamp from context menu
Similar to the Copilot app, if you have the Clipchamp app, the option will appear in the File Explorer context menu. If you want to keep the app but declutter the menu, you can suppress the option from its default location.
To remove the Clipchamp entry from the context menu, use these steps:
- Open Start.
- Search for regedit and click the top result to open the Registry Editor.
- Open the following path from the address bar: HKEY_CURRENT_USER\SOFTWARE\Microsoft\Windows\CurrentVersion\Shell Extensions
- Right-click the Shell Extensions key, choose New, and select the Key option.
- Quick note: Create the "Blocked" key only if it's missing from the list.
- Confirm the Blocked name for the key and press Enter.
- Right-click the newly created string, choose New, and select the "String Value" option.
- Confirm the {8BCF599D-B158-450F-B4C2-430932F2AF2F} name for the key and press Enter.
- Restart the computer (or the Windows Explorer service from Task Manager).
After you complete the steps, the next time you right-click a file, the "Edit with Clipchamp" entry won't be an option in the context menu.
If you want to revert the changes, right-click and delete the {8BCF599D-B158-450F-B4C2-430932F2AF2F} string from the "Blocked" key.
3. Remove Edit with Paint from context menu
If you want to keep the Paint app, but you're trying to declutter the modern context menu, it's possible to remove the "Edit with Paint" from the menu.
To hide the entry to edit an image with Paint, use these steps:
- Open Start.
- Search for regedit and click the top result to open the Registry Editor.
- Open the following path from the address bar: HKEY_CURRENT_USER\SOFTWARE\Microsoft\Windows\CurrentVersion\Shell Extensions
- Right-click the Shell Extensions key, choose New, and select the Key option.
- Confirm the Blocked name for the key and press Enter.
- Right-click the newly created string, choose New, and select the "String Value" option.
- Confirm the {2430F218-B743-4FD6-97BF-5C76541B4AE9} name for the key and press Enter.
- Restart the computer or the Windows Explorer service.
Once you complete the steps, the File Explorer context menu will no longer show the "Edit with Paint" entry.
If you want to revert the changes, right-click and delete the {2430F218-B743-4FD6-97BF-5C76541B4AE9} string from the "Blocked" key.
4. Remove Edit with Notepad from context menu
The modern context menu for File Explorer also includes an option to edit a text file with Notepad. If you prefer not to show the entry, you can hide it.
To remove the "Edit with Notepad" entry from the context menu, use these steps:
- Open Start.
- Search for regedit and click the top result to open the Registry Editor.
- Open the following path from the address bar: HKEY_CURRENT_USER\SOFTWARE\Microsoft\Windows\CurrentVersion\Shell Extensions
- Right-click the Shell Extensions key, choose New, and select the Key option.
- Confirm the Blocked name for the key and press Enter.
- Right-click the newly created string, choose New, and select the "String Value" option.
- Confirm the {CA6CC9F1-867A-481E-951E-A28C5E4F01EA} name for the key and press Enter.
- Restart the computer or the Windows Explorer service.
After you complete the steps, the context menu will no longer show the "Edit with Notepad" entry in File Explorer.
If you want to revert the changes, right-clicking and delete the {CA6CC9F1-867A-481E-951E-A28C5E4F01EA} string from the "Blocked" key.
If you want to remove these four options (Ask Copilot, Edit with Clipchamp, Edit with Paint, and Edit with Notepad) from the context menu, you can run this reg add from Command Prompt (admin):
- reg add "HKCU\Software\Microsoft\Windows\CurrentVersion\Shell Extensions\Blocked" /v "{CB3B0003-8088-4EDE-8769-8B354AB2FF8C}" /t REG_SZ /d "" /f & reg add "HKCU\Software\Microsoft\Windows\CurrentVersion\Shell Extensions\Blocked" /v "{8BCF599D-B158-450F-B4C2-430932F2AF2F}" /t REG_SZ /d "" /f & reg add "HKCU\Software\Microsoft\Windows\CurrentVersion\Shell Extensions\Blocked" /v "{2430F218-B743-4FD6-97BF-5C76541B4AE9}" /t REG_SZ /d "" /f & reg add "HKCU\Software\Microsoft\Windows\CurrentVersion\Shell Extensions\Blocked" /v "{CA6CC9F1-867A-481E-951E-A28C5E4F01EA}" /t REG_SZ /d "" /f
You can undo the changes using this command:
- reg delete "HKCU\Software\Microsoft\Windows\CurrentVersion\Shell Extensions\Blocked" /v "{CB3B0003-8088-4EDE-8769-8B354AB2FF8C}" /f & reg delete "HKCU\Software\Microsoft\Windows\CurrentVersion\Shell Extensions\Blocked" /v "{8BCF599D-B158-450F-B4C2-430932F2AF2F}" /f & reg delete "HKCU\Software\Microsoft\Windows\CurrentVersion\Shell Extensions\Blocked" /v "{2430F218-B743-4FD6-97BF-5C76541B4AE9}" /f & reg delete "HKCU\Software\Microsoft\Windows\CurrentVersion\Shell Extensions\Blocked" /v "{CA6CC9F1-867A-481E-951E-A28C5E4F01EA}" /f
An alternative way to remove the last four entries from the context menu is to uninstall those apps from your computer.
5. Remove Gallery page from the left pane
File Explorer includes the Gallery page that provides a quick and easy way to view and manage your photo collection. However, since this viewing experience is similar to the Photos app, the feature may be redundant for some people.
If this feature isn't for you, it's possible to hide the page from File Explorer, and here's how:
- Open Start.
- Search for regedit and click the top result to open the Registry Editor.
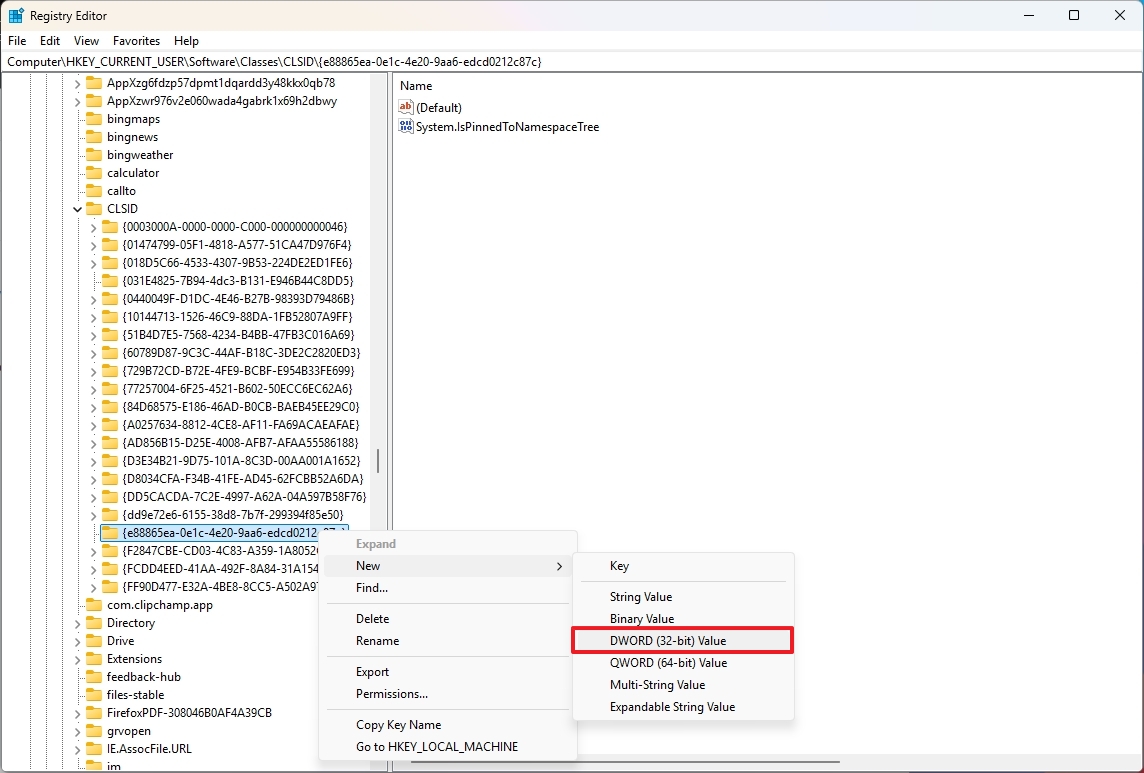
- Open the following path from the address bar: HKEY_CURRENT_USER\Software\Classes\CLSID
- Right-click the CLSID key, choose New, and select the Key option.
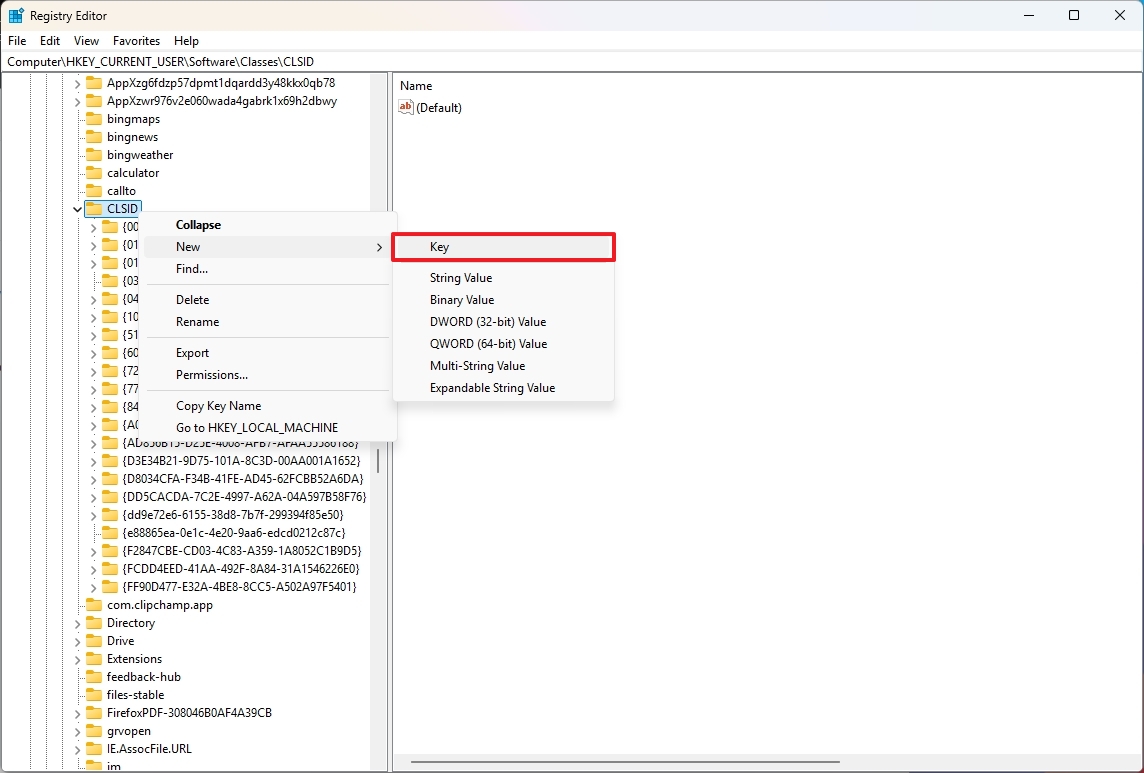
- Confirm the {e88865ea-0e1c-4e20-9aa6-edcd0212c87c} name for the key and press Enter.
- Right-click the newly created string, choose New, and select the "DWORD (32-bit)" option.
- Confirm the System.IsPinnedToNamespaceTree name for the key and press Enter.
- Double-click the newly created key and confirm the value is set to 0 (that's a zero).
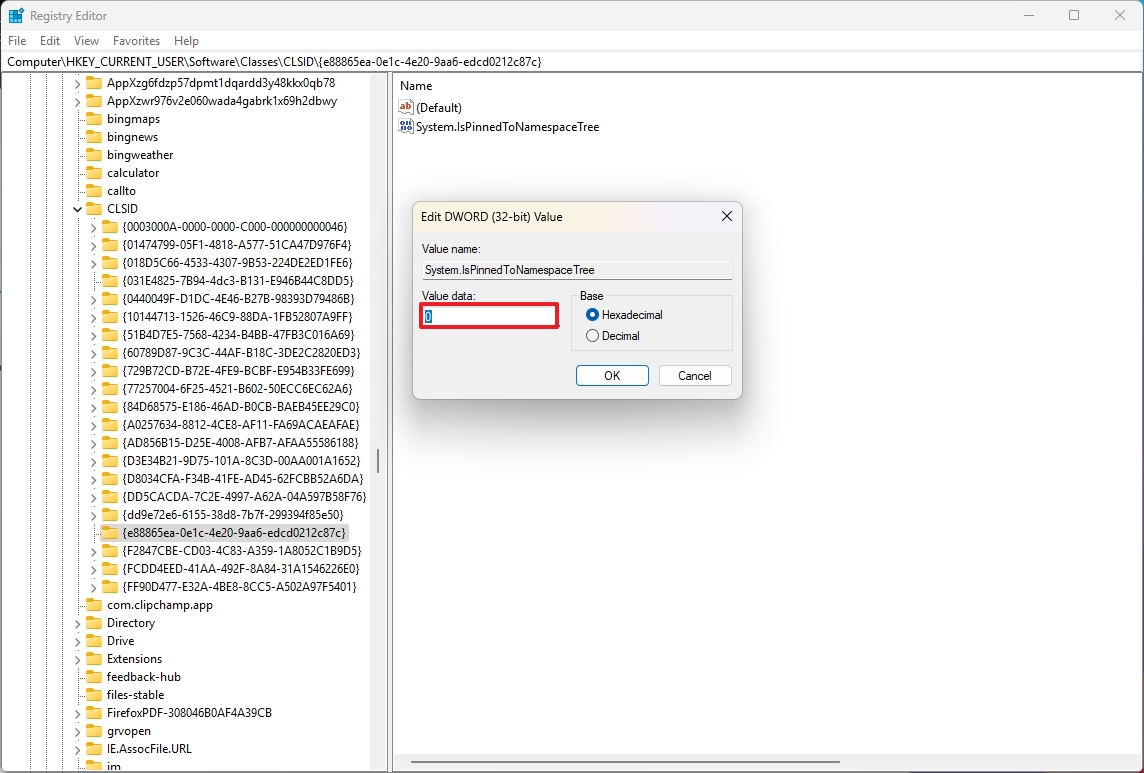
- Click the OK button.
- Restart the computer or the Windows Explorer service.
Once you complete the steps, the Gallery page will no longer be available in the file manager.
If you want to revert the changes, you will have to right-click and delete the {e88865ea-0e1c-4e20-9aa6-edcd0212c87c} key from the HKEY_CURRENT_USER\Software\Classes\CLSID path.
If you would rather use Command Prompt (admin) to modify the Registry, you can use this command to remove the Gallery page:
- reg add "HKCU\Software\Classes\CLSID\{e88865ea-0e1c-4e20-9aa6-edcd0212c87c}" /v System.IsPinnedToNamespaceTree /t REG_DWORD /d 0 /f
You can undo the changes by running the command:
- reg delete "HKCU\Software\Classes\CLSID\{e88865ea-0e1c-4e20-9aa6-edcd0212c87c}" /f
6. Remove OneDrive page from left pane
If you use OneDrive, but you'd rather not have the folder appear in the left pane of File Explorer, it's also possible to remove the entry using the Registry.
To remove the OneDrive page from File Explorer, use these steps:
- Open Start.
- Search for regedit and click the top result to open the Registry Editor.
- Open the following path from the address bar: HKEY_CLASSES_ROOT\CLSID
- Right-click the CLSID key, choose New, and select the Key option.
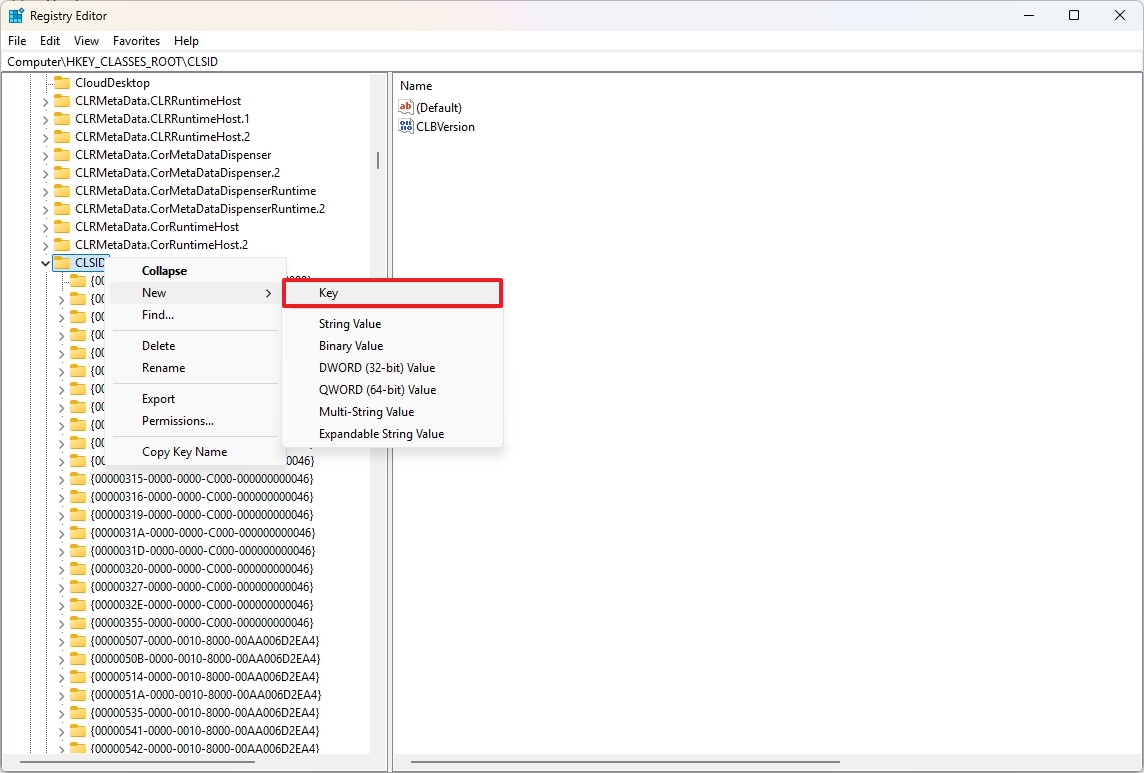
- Confirm the {018D5C66-4533-4307-9B53-224DE2ED1FE6} name for the key and press Enter.
- Right-click the newly created string, choose New, and select the "DWORD (32-bit)" option.
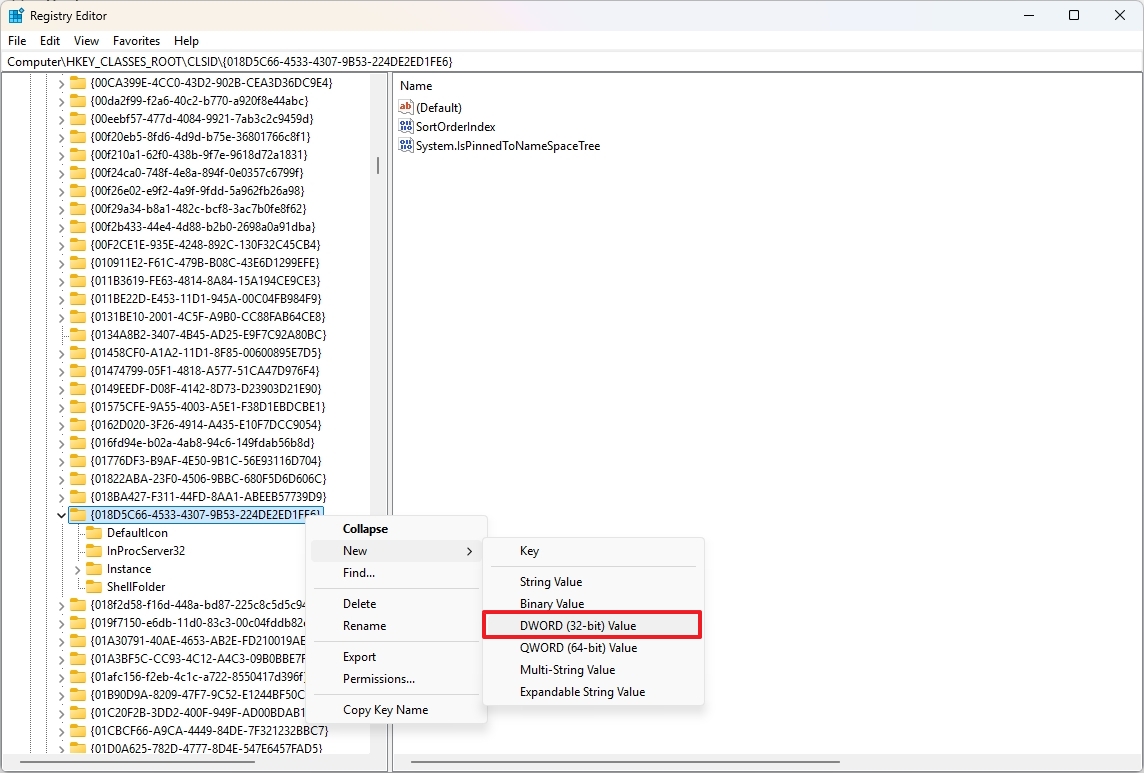
- Confirm the System.IsPinnedToNameSpaceTree name for the key and press Enter.
- Double-click the newly created key and confirm the value is set to 0 (that's a zero).
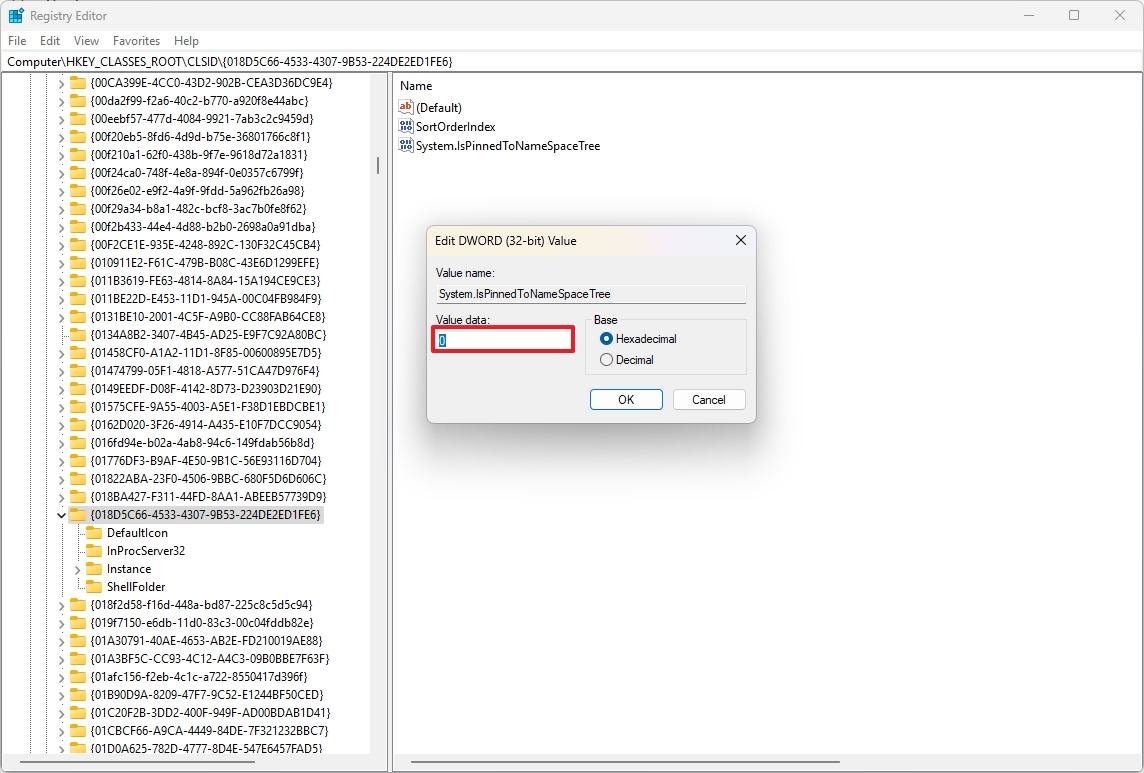
- Click the OK button.
- Restart the computer or the Windows Explorer service.
After you complete the steps, the OneDrive page will no longer be available in the file manager.
If you want to revert the changes, you will have to right-click and delete the {018D5C66-4533-4307-9B53-224DE2ED1FE6} key from the HKEY_CLASSES_ROOT\CLSID path.
If you would rather use Command Prompt (admin) to modify the Registry, you can use this command to remove the OneDrive page:
- reg add "HKCR\CLSID\{018D5C66-4533-4307-9B53-224DE2ED1FE6}" /v System.IsPinnedToNameSpaceTree /t REG_DWORD /d 0 /f
You can undo the changes by running the command:
- reg delete "HKCR\CLSID\{018D5C66-4533-4307-9B53-224DE2ED1FE6}" /f
7. Enable classic context menu in File Explorer
On Windows 11, the system introduces a modern version of the context menu, but the only problem is that it features a limited number of options. If you want to access all the available options, you have to go through the extra step to open the classic menu.
If you would rather revert to the old design, it's something you can do, but you will have to use the Registry.
To enable the classic context menu in File Explorer, use these steps:
- Open Start.
- Search for regedit and click the top result to open the Registry Editor.
- Open the following path from the address bar: HKEY_CURRENT_USER\SOFTWARE\CLASSES\CLSID
- Right-click the CLSID key, choose New, and select the Key option.
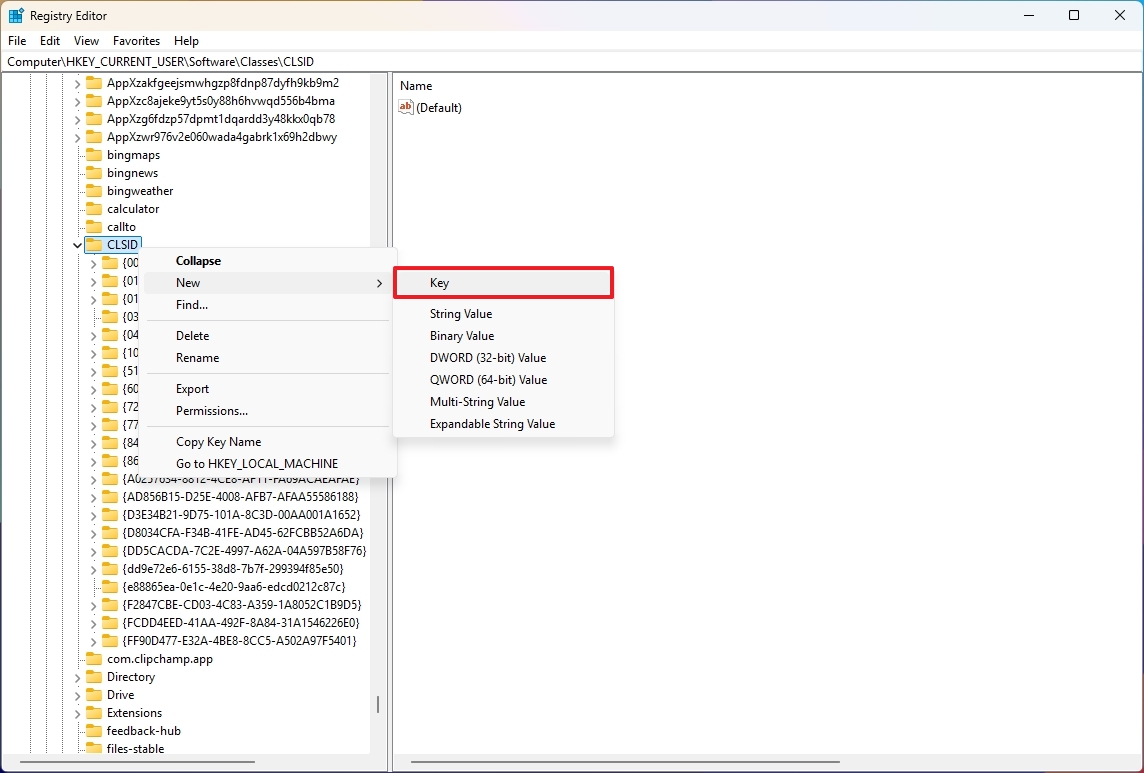
- Confirm the {86ca1aa0-34aa-4e8b-a509-50c905bae2a2} name for the key and press Enter.
- Right-click the newly created string, choose New, and select the "Key" option.
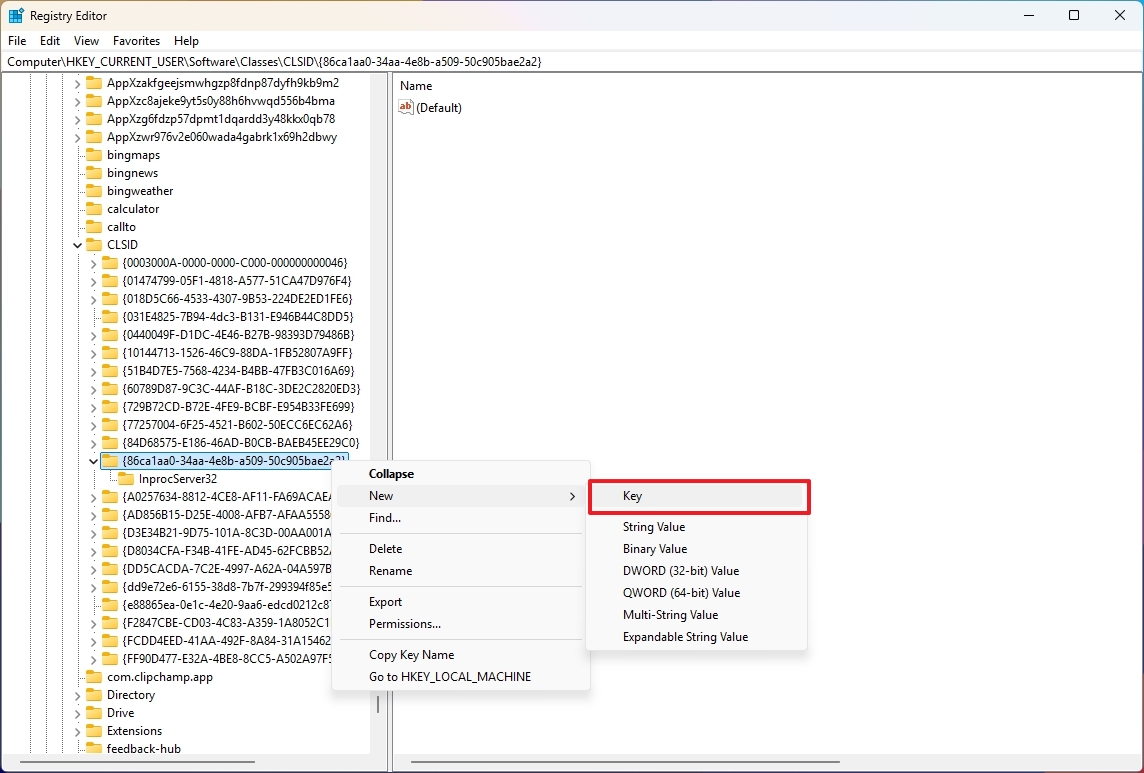
- Confirm the InprocServer32 name for the key and press Enter.
- Double-click the (Default) key and confirm the value is set to blank.
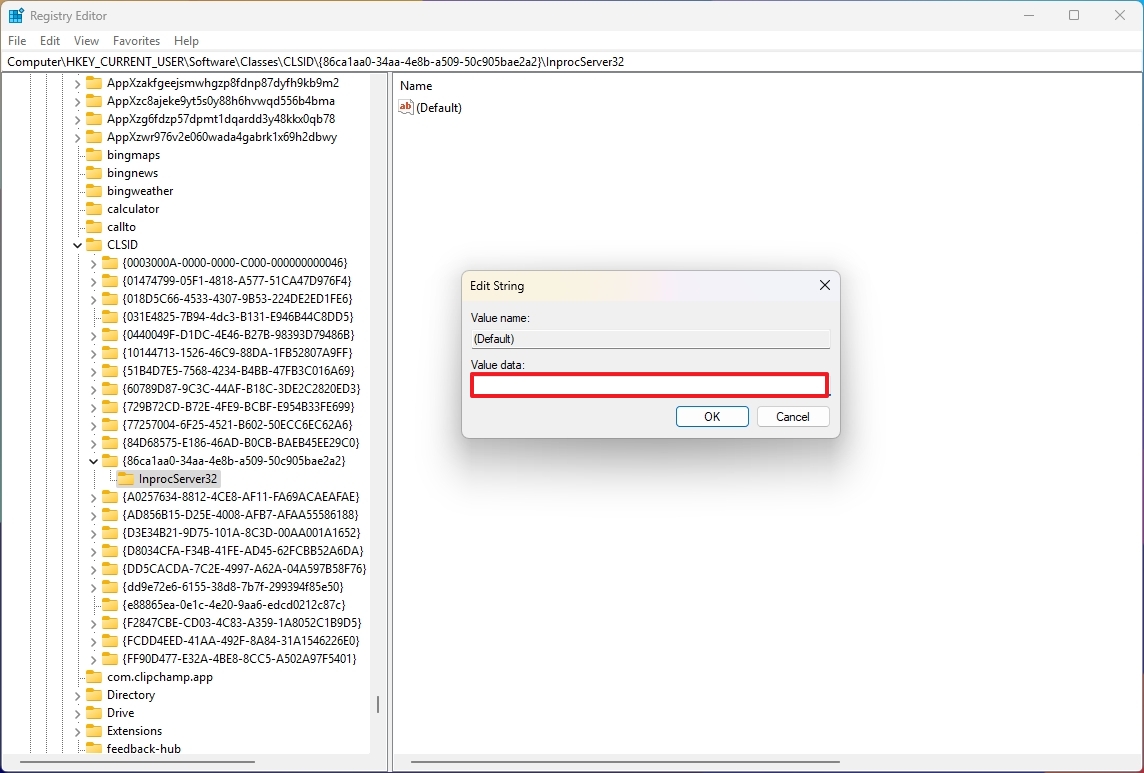
- Click the OK button.
Once you complete the steps, the next time you right-click a file or folder, the legacy menu will open.
If you want to revert the changes, you will have to right-click and delete the {86ca1aa0-34aa-4e8b-a509-50c905bae2a2} key from the HKEY_CURRENT_USER\SOFTWARE\CLASSES\CLSID path.
If you would rather use Command Prompt (admin) to modify the Registry, you can use this command to enable the legacy context menu:
- reg add "HKCU\Software\Classes\CLSID\{86ca1aa0-34aa-4e8b-a509-50c905bae2a2}\InprocServer32" /ve /t REG_SZ /d "" /f
You can undo the changes by running the command:
- reg delete "HKCU\Software\Classes\CLSID\{86ca1aa0-34aa-4e8b-a509-50c905bae2a2}" /f
8. Speed up folder browsing in File Explorer
On Windows 11, if you have folders with a large number of files, File Explorer can take a long time to load the folder because the file manager always tries to figure out the type of content available in the folder, which can slow down the browsing experience. However, you can always tweak the Registry to stop File Explorer from checking the contents and displaying everything as general items to speed up the loading process.
To speed up folder browsing in File Explorer, use these steps:
- Open Start.
- Search for regedit and click the top result to open the Registry Editor.
- Open the following path from the address bar: HKEY_CURRENT_USER\Software\Classes\Local Settings\Software\Microsoft\Windows\Shell\Bags\AllFolders\Shell
- Right-click the Shell key, choose New, and select the String Value option.

- Confirm the FolderType name for the key and press Enter.
- Double-click the newly created key and confirm the value is set to NotSpecified.
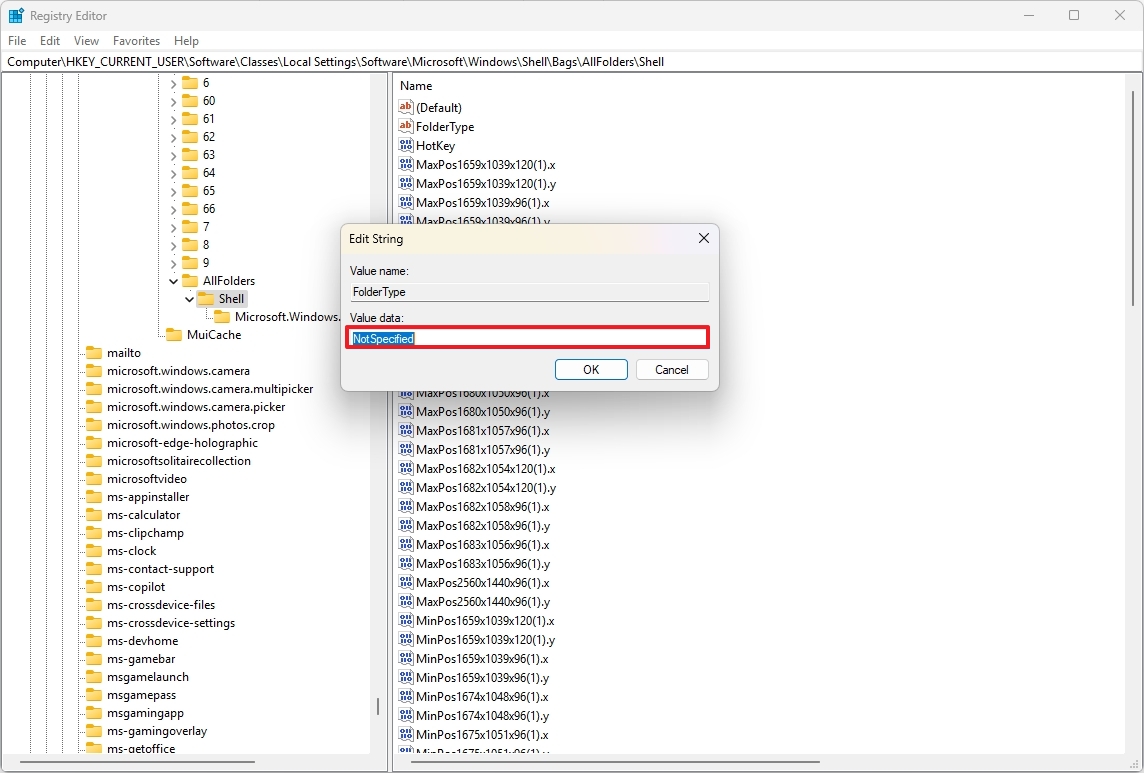
- Click the OK button.
- Restart the computer or the Windows Explorer service.
After you complete the steps, when browsing folders with a lot of files and folders, File Explorer should load these locations noticeably faster.
If you would rather use Command Prompt (admin) to modify the Registry, you can use this command to speed up folder browsing in File Explorer:
- reg add "HKCU\Software\Classes\Local Settings\Software\Microsoft\Windows\Shell\Bags\AllFolders\Shell" /v FolderType /t REG_SZ /d NotSpecified /f
You can undo the changes by running this command:
- reg delete "HKCU\Software\Classes\Local Settings\Software\Microsoft\Windows\Shell\Bags\AllFolders\Shell" /v FolderType /f
Are you using File Explorer with one or more Registry tweaks? Let me know in the comments.
More resources
Explore more in-depth how-to guides, troubleshooting advice, and essential tips to get the most out of Windows 11 and 10. Start browsing here: